If you work with the .NET platform or are new to this area, you need to know about Web APIs—robust and secure applications that use the HTTP protocol to communicate between servers and clients and are in high demand in the market.
What Is a Web API?
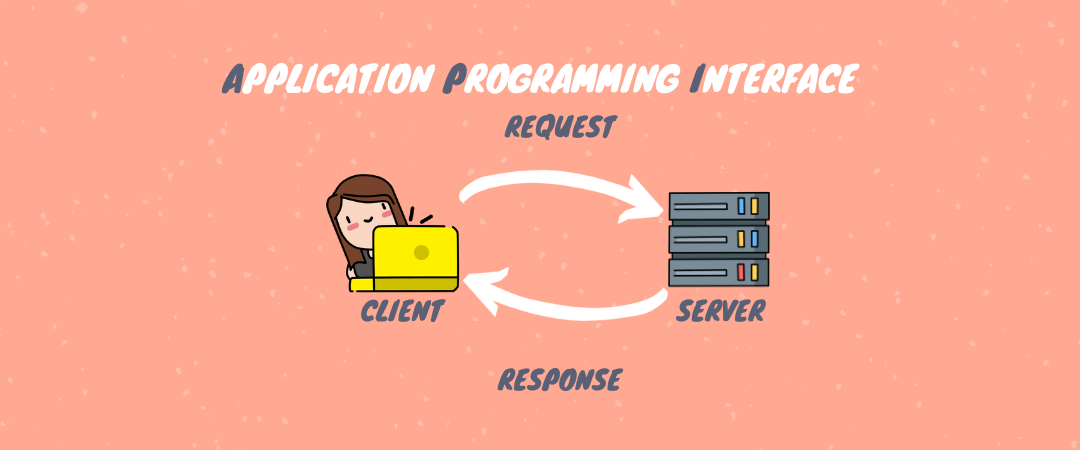
Application Programming Interfaces (APIs) are basically HTTP services that are used to communicate between applications in a simple and centralized way.
Microsoft through the ASP.NET framework provides ways to build Web APIs that can be accessed from any client, such as browsers, desktop applications and mobile devices.
ASP.NET Web API can be used to build REST and SOAP services.
Following are some benefits of working with an ASP.NET Web API:
- It works the way HTTP works, using standard HTTP verbs like GET, POST, PUT, DELETE for all CRUD operations.
- Full support for routing.
- Response is generated in JSON and XML format using MediaTypeFormatter.
- It can be hosted on IIS as well as auto-hosted outside of IIS.
- Supports template binding and validation.
- Supports URL patterns and HTTP methods.
- It has a simple form of dependency injection.
- Can be versioned.
How Do ASP.NET Web APIs Work?
An ASP.NET Core Web API basically consists of one or more controller class that derives from ControllerBase. The ControllerBase class provides many methods and properties that are useful for working with HTTP requests.
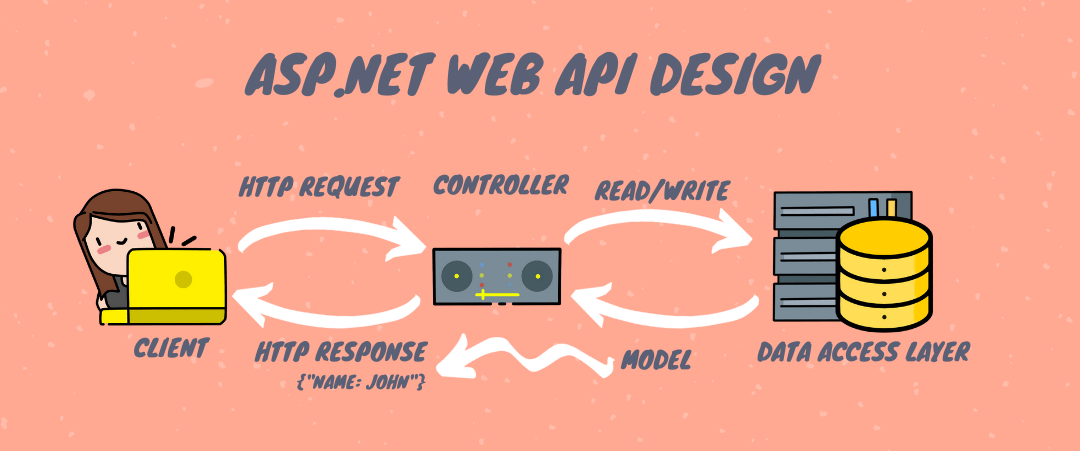
As you can see in the image above, a “client” makes an “HTTP request” to the API, which—through the “controller”—identifies the call and makes the Read or Write in the “data access layer.” The “Model” is returned, in this case, a JSON object “Contact: Name” in the “HTTP response.” In simple terms, the API is bridging the “client” and the “data” in a simple and safe way.
Example console API response
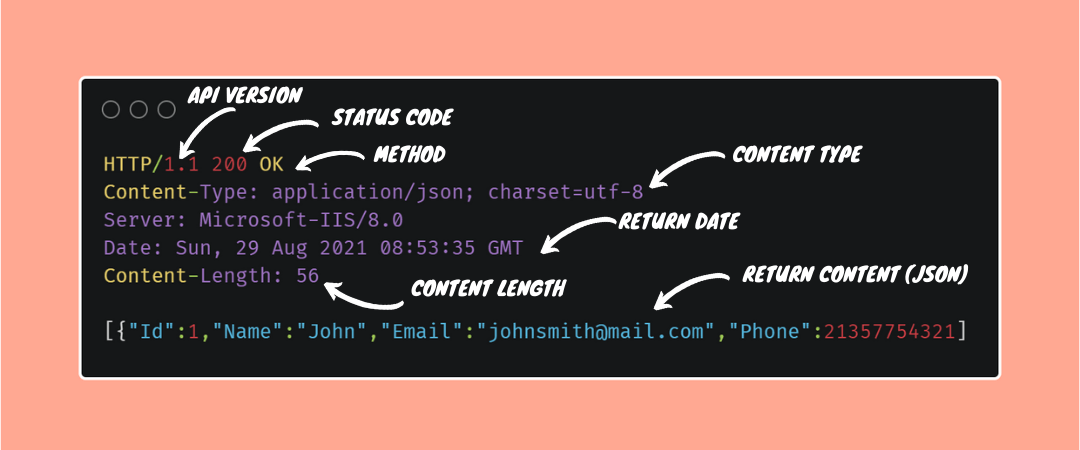
Now that we’ve seen the basics of Web APIs, let’s create an API and see in practice how it works.
Creating an ASP.NET Core 5 Web API
To create an ASP.NET Core 5 Web API application, we will use:
-
.NET SDK: The .NET SDK is a toolkit for developers that you’ll need to start developing in the .NET platform. You can download the version here (the .NET 5.0 is recommended because it already contains the anterior versions).
-
Visual Studio 2019: You can download the Community Version here—it’s free and contains all of the features you need to create, test and deploy a Web API application.
You can download the project’s source code here.
Below we will have some steps to build our application:
-
Open the Visual Studio 2019 → Click on “Create a new project.”
-
Choose option “ASP.NET Core Web API.” Click “Next.”
-
Write the project name (my suggestion is “MyReadingList.WebAPI”) and the solution name folder (my suggestion is “MyReadingList”), then Click “Next.”
-
In the “Target Framework” choose “.NET 5.0”, and Click “Create.”
By default, our newly created API comes with the basics to run it, with an example controller. If you click on “IIS Express” or press the “F5” key on your keyboard, the application will start and can be accessed through the URL:
https://localhost:44345/swagger/index.html
The GIF below shows the execution of the procedure.
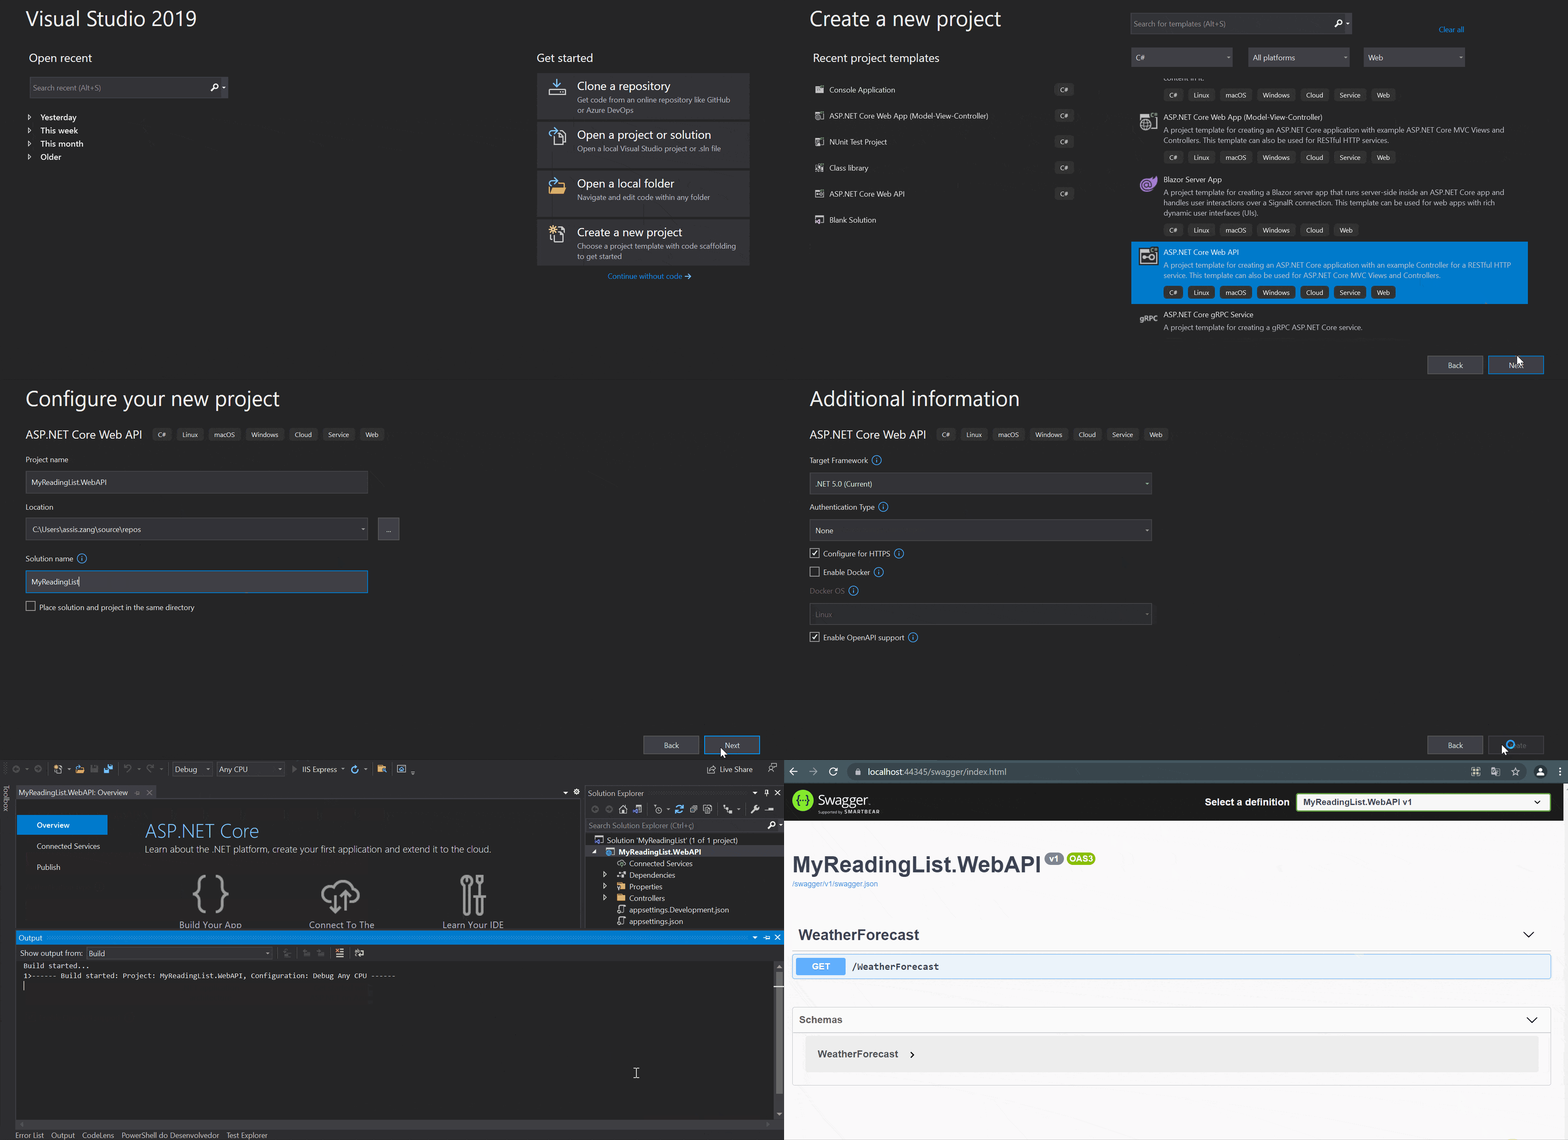
When we created our API, it already had an example called “WeatherForecast” that you just ran, but let’s not waste time with that—we’ll make our own example API: a reading list and then we’ll add our favorite books.
First, let’s create our “Book” Model class, which is a class that represents a “Book” entity. To do this, right-click on the project and add a folder called “Models” and then within Models create a class called “Book”.
public class Book
{
  public Guid Id { get; set; }
  public string Name { get; set; }
  public string Author { get; set; }
  public string Genre { get; set; }
  public bool Read { get; set; }
}
Creating Database Context
The context class is responsible for interacting with data objects. It manages the entity objects during runtime, which includes filling object values with data coming from a database, tracking changes made and persisting the data to our database.
One way to work with the “context” paradigm is to define a class that derives from DbContext and exposes the model class as a property of DbSet.
The Entity Framework allows us to query, insert, update and delete data using objects known as entities. It maps the entities and relationships that are defined in your entity model and provides functions to perform the following tasks:
- Materialize data returned from the database as objects
- Control the changes made to objects
- Make changes to the database
- Work with the competition
- Link objects to controls
In this project, we will use a database called SQLite, which is a C-language library that implements a small, fast, self-contained, highly reliable and full-featured SQL database engine.
We need to install the following packages in the project:
- “Microsoft.EntityFrameworkCore” Version=“5.0.9”
- “Microsoft.EntityFrameworkCore.Design” Version=“5.0.9”
- “Microsoft.EntityFrameworkCore.Sqlite” Version=“5.0.9”
- “Microsoft.EntityFrameworkCore.Sqlite.Design” Version=“1.1.6”
- “Microsoft.EntityFrameworkCore.Tools” Version=“5.0.9”
You can do this through the NuGet package manager.
Then still inside the Models folder, create a class called “BookContext” and put the following code in it:
public class BookContext : DbContext
{
  public BookContext(DbContextOptions<BookContext> options) : base(options) { }
  public DbSet<Book> Books { get; set; }
  protected override void OnModelCreating(ModelBuilder builder)
  {
    builder.Entity<Book>().HasKey(b => b.Id);
    base.OnModelCreating(builder);
  }
}
With this code, we define that “Book” is our context class, which will receive in the database an entity of the same name and will have its properties (name, author, etc.) as columns in the book table.
We also defined that the Id will be the primary key of the table through the OnModelCreating method.
Creating SQLite Connection String
Let’s create our connection string, which will open a connection to the database we’ll call “ReadingList.db”.
Open the archive “appsettings.json” and put this code before “Logging”:
"ConnectionSqlite": { "SqliteConnectionString": "Data Source=ReadingList.db" },
Registering Context With Dependency Injection
ASP.NET Core implements dependency injection by default. Now that we have created our Context class, we need to do the dependency injection of this class. ASP.NET Core allows us to do the injection when our application is started.
To do this, open the Startup.cs file and replace the ConfigureServices method with this:
public void ConfigureServices(IServiceCollection services)
{
  services.AddControllers();
  services.AddSwaggerGen(c =>
  {
    c.SwaggerDoc("v1", new OpenApiInfo { Title = "MyReadingList.WebAPI", Version = "v1" });
  });

  var connection = Configuration["ConnectionSqlite:SqliteConnectionString"];
  services.AddDbContext<BookContext>(options => options.UseSqlite(connection));
}
Creating the Database
Now that we have everything set up, we can create the database from the model using “Migrations.”
The migrations feature enables you to make changes to your model and then propagate those changes to your database schema. Migrations are enabled by default in EF Core.
The process is very simple. Go to the folder where the project was created, open a console and enter the commands below.
dotnet ef migrations add InitialModel
And then:
dotnet ef database update
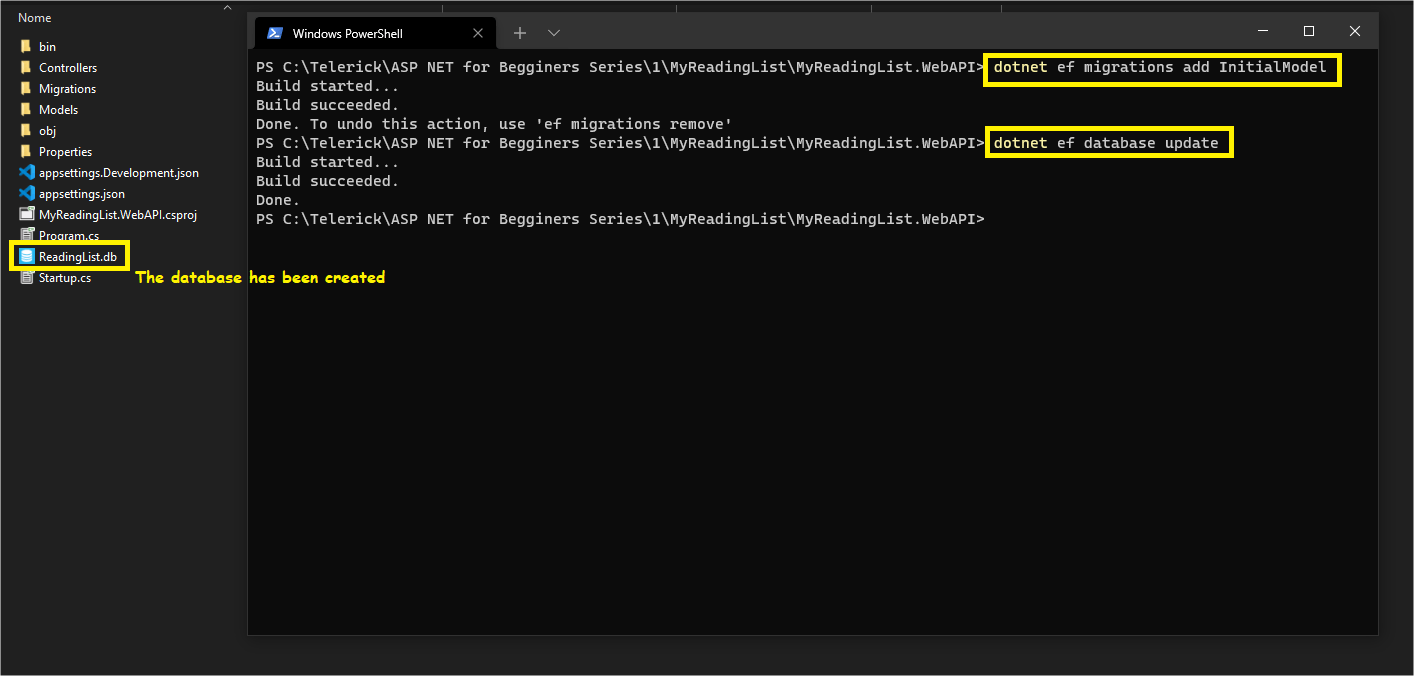
The first command is to support migration and create the initial set of tables for the model. The second is to apply the migration to the database.
Important! If while running the commands you get any errors related to the version of EntityFramework, run this command in the console:
dotnet tool update --global dotnet-ef --version 5.0.9
If everything worked out, you will see the database created at the root of the project—where you opened the console, in the file “ReadingList.db”, that’s where our database is. To open this file and see the tables created as in our model, you will need to download an SQLite-compatible app. If you use Windows, I recommend the “SQLite Viewer Editor”—it is free and can be downloaded directly from the Microsoft Store.
The database in "SQLite Viewer Editor"
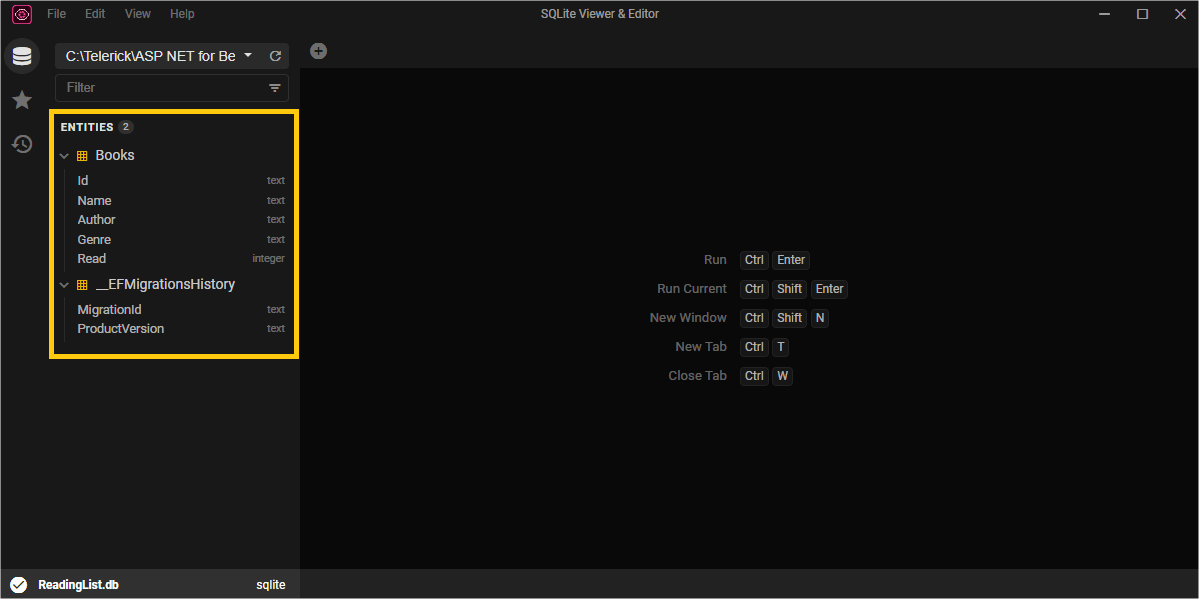
In addition to the “Books” table, we also have the “__EFMigrationsHistory” which is automatically created when we apply Migrations and is used to track change versions, like a history.
Creating the Controller
Now we are going to create a controller to be able to do CRUD operations in our database. To do this, perform the following steps:
- Right-click on the “Controllers” folder → Add → Controller → Select “MVC Controller - Empty” → Add
- Name it “BooksController”
- Open the generated file and replace your code with this:
using Microsoft.AspNetCore.Mvc;
using MyReadingList.WebAPI.Models;

namespace MyReadingList.WebAPI.Controllers
{
  [Route("api/[controller]")]
  [ApiController]
  public class BooksController : Controller
  {
    private readonly BookContext _context;
    public BooksController(BookContext context)
    {
      _context = context;
    }
  }
}
With this code we made the context dependency injection in the controller. Next we will implement the methods responsible for performing the operations (CRUD):
| HTTP Method | Route | Description | Request body | Response body |
|---|---|---|---|---|
| GET | /api/books | Get all books | None | Array of books |
| GET | /api/books/read=true | Get all books read | None | Array of books |
| GET | /api/books/{id} | Get a book by Id | None | Book |
| POST | /api/books | Add a new book | Book | Book |
| PUT | /api/books/{id} | Update an existing book | Book | None |
| DELETE | /api/books/{id} | Delete a book | None | None |
Implementing API Methods
Following the order in the table above, we will implement the API methods responsible for doing CRUD operations in the database. Still in “BooksController,” you can put this code right below the dependency injection:
//Get all books
[HttpGet]
public async Task<ActionResult<IEnumerable<Book>>> GetBooks()
{
  return await _context.Books.ToListAsync();
}

//Get all books read
[HttpGet("read")]
public async Task<ActionResult<IEnumerable<Book>>> GetBooksRead()
{
  bool read = true;
  var books = await _context.Books.ToListAsync();

  var booksRead = (from book in books where book.Read == read select book).ToList();

  return booksRead;
}

//Get a Book by id
[HttpGet("{id}")]
public async Task<ActionResult<Book>> GetBook(string id)
{
  Guid guidId = Guid.Parse(id);

  var book = await _context.Books.FindAsync(guidId);

  if (book == null)
    return NotFound();

  return book;
}

//Add a new book
[HttpPost]
[Route("create")]
public async Task<ActionResult<Book>> Create(Book book)
{
  _context.Books.Add(book);
  await _context.SaveChangesAsync();
  return CreatedAtAction("GetBook", new { id = book.Id }, book);
}

//Update an existing book
[HttpPut("{id}")]
public async Task<IActionResult> Update(string id, Book book)
{
  if (id != Convert.ToString(book.Id).ToUpper())
    return BadRequest();

  _context.Entry(book).State = EntityState.Modified;

  try
  {
    await _context.SaveChangesAsync();
  }
  catch (DbUpdateConcurrencyException)
  {
    if (!BookExists(id))
      return NotFound();
    }

  return NoContent();
}

//Delete an existing book
[HttpDelete("{id}")]
public async Task<IActionResult> Delete(string id)
{
  Guid guidId = Guid.Parse(id);

  var book = await _context.Books.FindAsync(guidId);

  if (book == null)
    return NotFound();

  _context.Books.Remove(book);

  await _context.SaveChangesAsync();

  return NoContent();
}

//Check if the book exists in the database
private bool BookExists(string id)
{
  return _context.Books.Any(e => Convert.ToString(e.Id) == id);
}
Performing Operations (CRUD) With Fiddler Everywhere
Now we have the basics we need to create, update, delete and fetch books from the database. To do this, first, run the project by clicking on the run icon in Visual Studio or pressing the “F5” key.
Create
To do the operations we will use Fiddler Everywhere, which can be used to make HTTP requests to Web APIs simply and quickly, and has many other features.
Follow the steps in the image below to add a book to the database via the Create method of the API. Afterward, you can open the ReadingList.db file with SQLite Viewer Editor and see the record in the table.
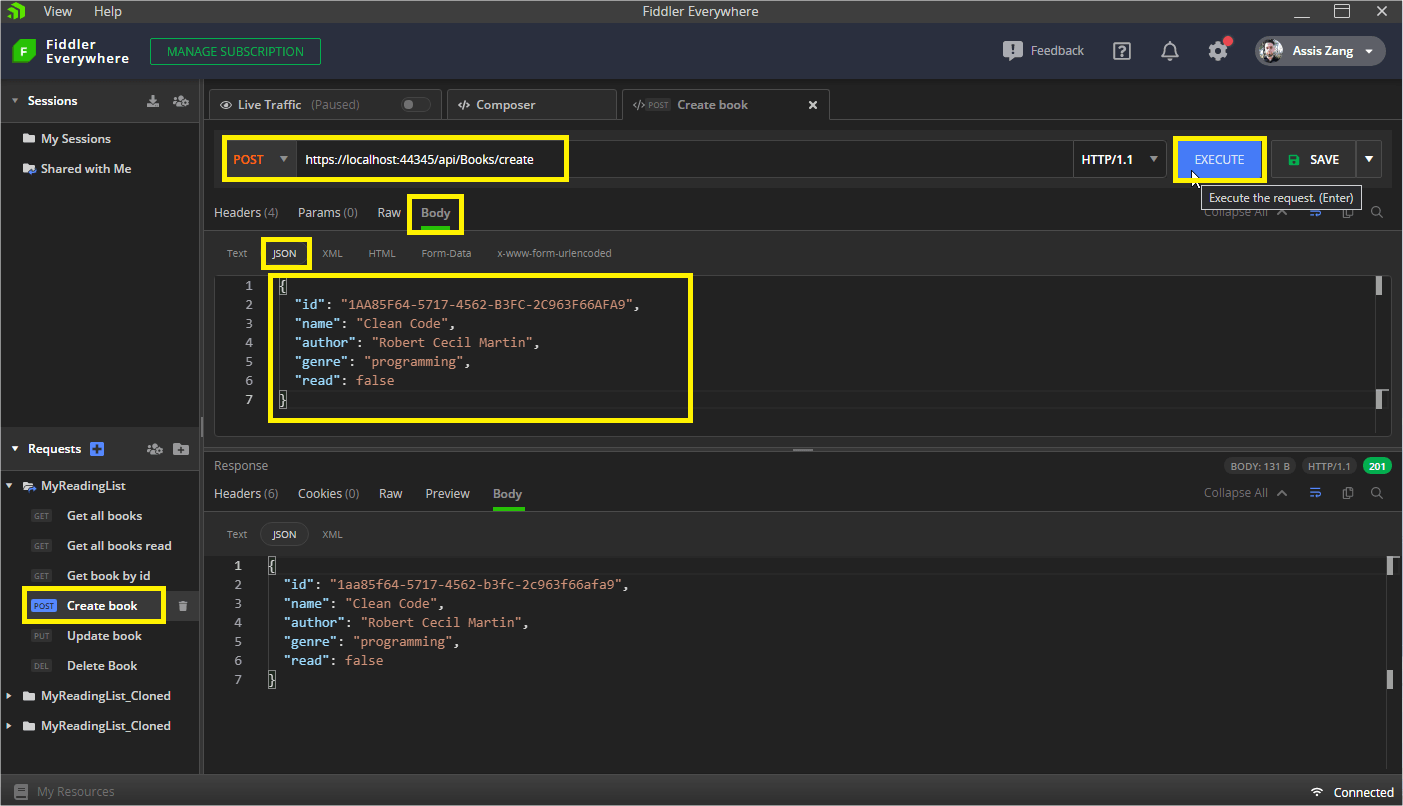
Important! The example images will have the localhost port set to 44345, but you must change it based on the port your application runs on.
Get All Books
Now that we have inserted our book (you can insert as many as you like, just edit the data sent in the “body”), we can search them through the “GET” route.
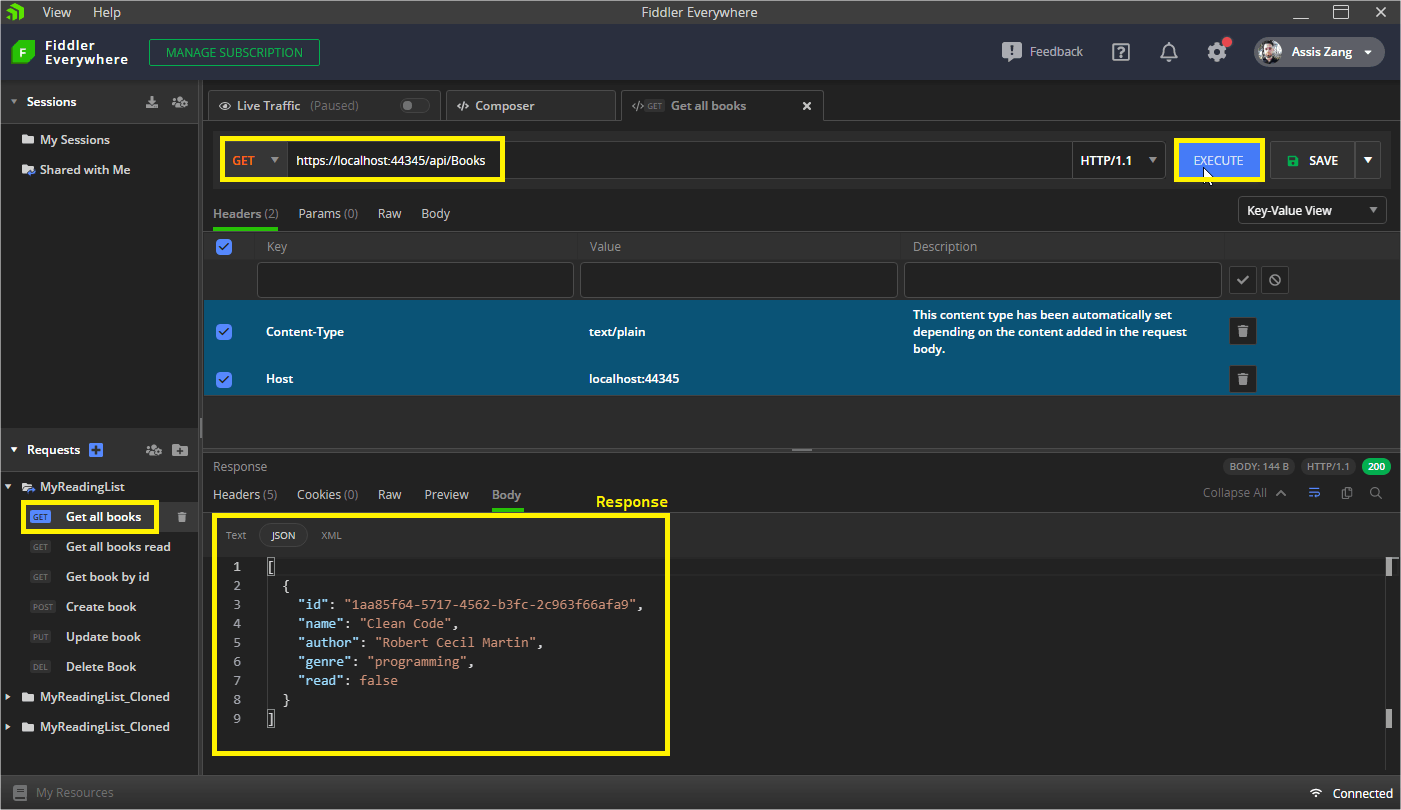
Update
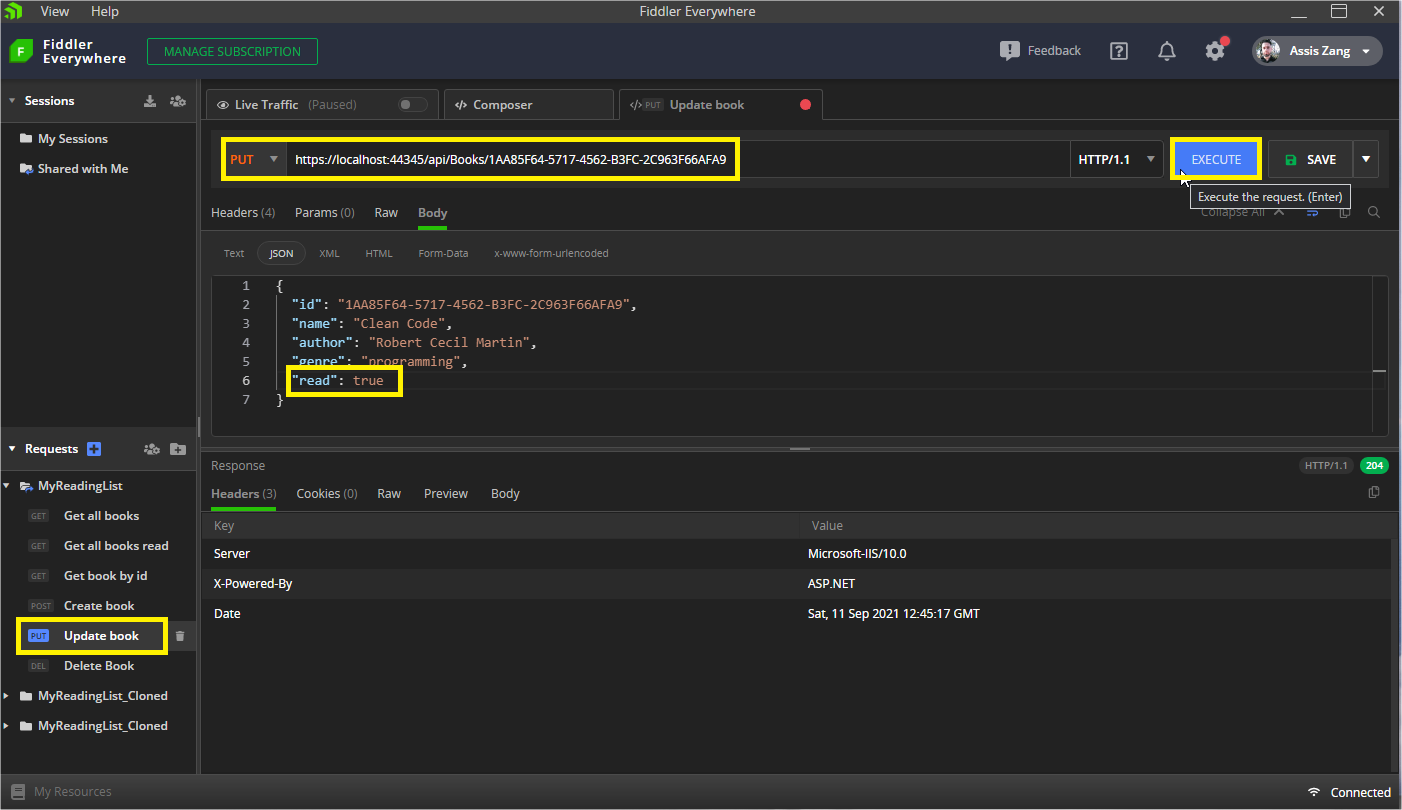
For Update, in Fiddler Everywhere create the method “Update book,” in the contents of the “Body” change the data from “read” to “true” and click on “Send.”
The record has now been changed to “read” and can be fetched on the next route.
Get All Books (Read)
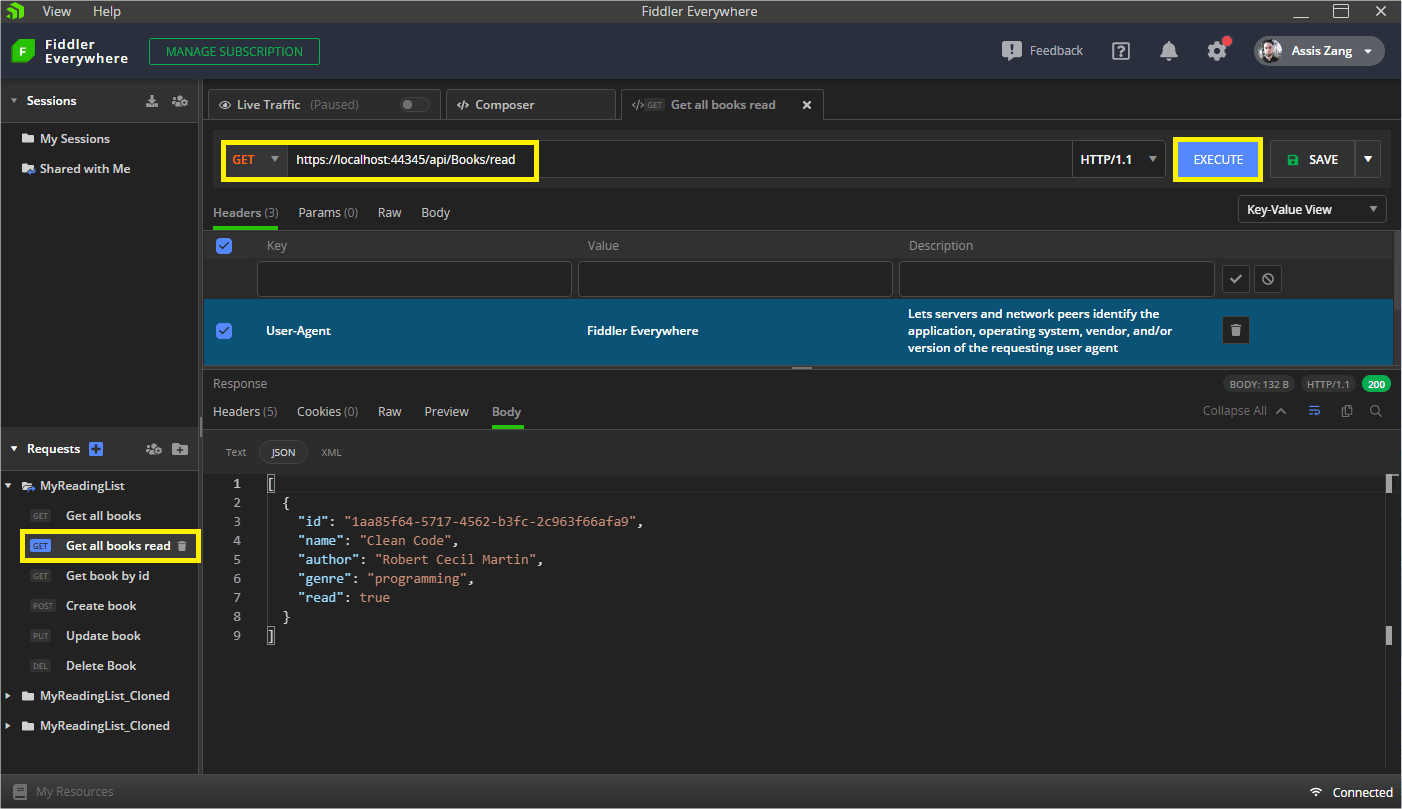
We will only look for books that have already been read. For that we will use another route, and this route will only return records that have the property “read”=“true”, as you can see in the image below:
Get a Book by Id
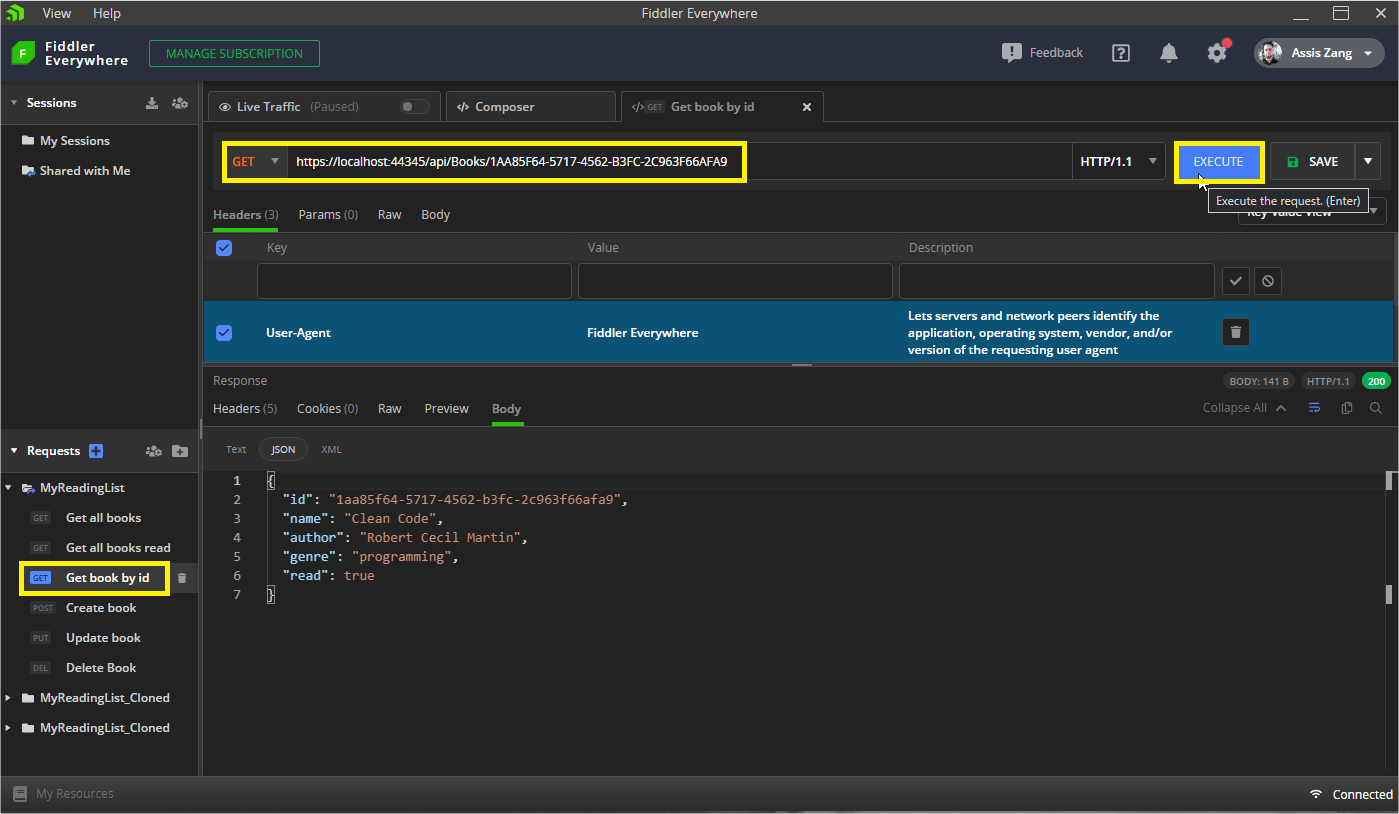
To search for a single specific book, we will use the same “GET” route, but passing in the route the Id of the book we want to see details.
Delete
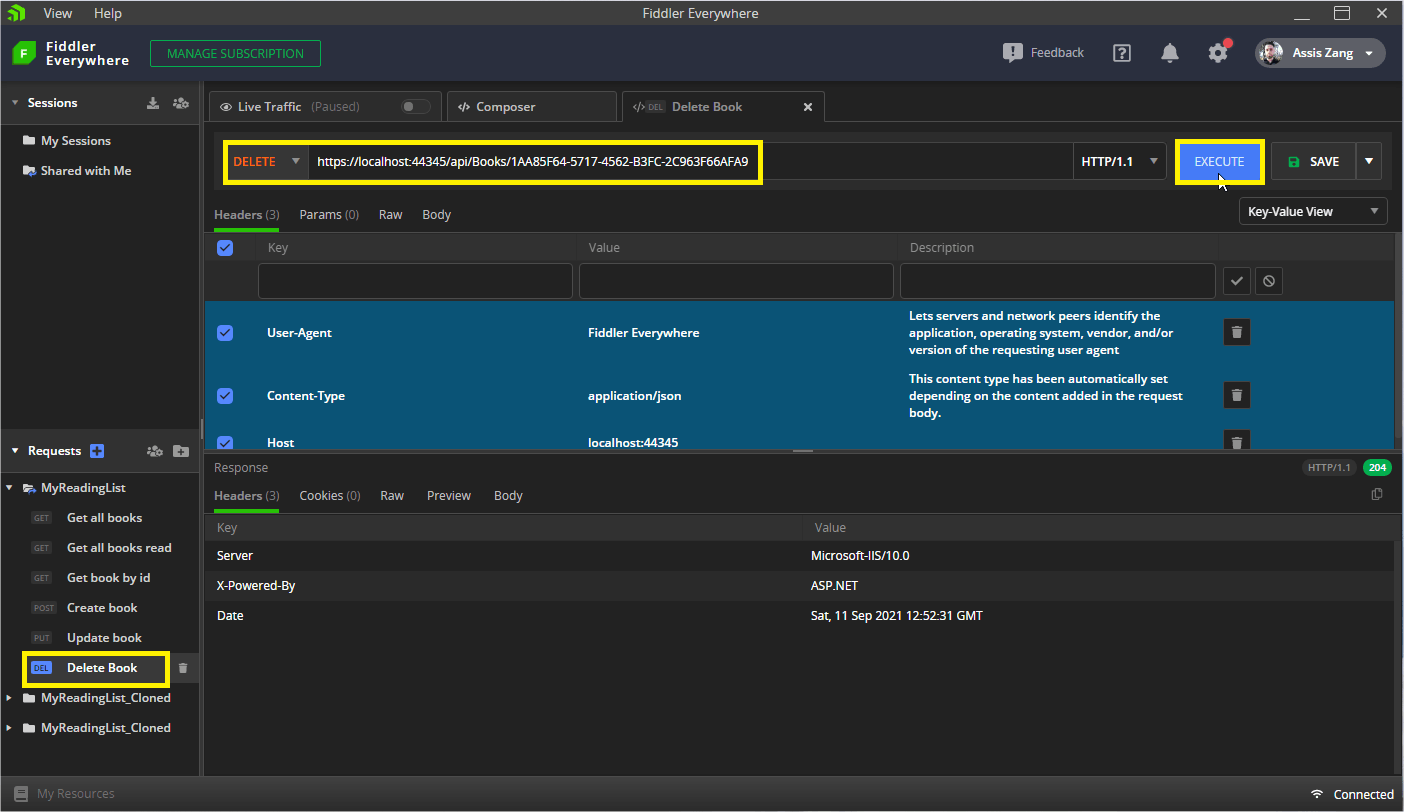
To delete a record is very simple—just pass the id of the record you want to delete in the route, as in the example below:
Conclusion
Finally! Our API is 100 percent functional! ✨
In this article, we looked at the basics of ASP.NET Core Web APIs, created a project using Visual Studio, added a database, and performed the four basic operations (CRUD) with Fiddler Everywhere.
Now you can fill your list with your favorite books. Feel free to add new fields and features.
In the next post on APIs we will develop a frontend application and integrate it with our API to display the records. See you soon! ♂️