In this article, we’ll look at how we can create a simple Visual Studio Code extension that translates a piece of text to any language with the help of the Google Translate API. The extension will come in handy when writing or reading through markdown files.
Visual Studio Code is an open-source editor created by Microsoft. It is a lightweight editor that is highly extensible and features a whole host of extensions to make it robust and to ease development. You can download the latest release of the editor here if you haven’t already.
We’ll be making use of it throughout this article. If you’re the curious type, you can check out the insiders build to get the latest features before it goes public.
In this article, we’ll look at how we can create a simple VS Code extension that translates a piece of text to any language with the help of the Google Translate API. The extension will come in handy when writing or reading through markdown files.
Getting Started
Creating VS Code extensions has been made easier by the VS Code team. They have a generator that scaffolds projects that are ready for development. To make use of the generator, install Yeoman and the VS Code Extension Generator by running the following command:
npminstall -g yeoman generator-code
After the command has been run successfully, run the command below to scaffold a new project:
    yo code

    # ? What type of extension do you want to create? New Extension (TypeScript)# ? What's the name of your extension? code-translate### Press <Enter> to choose default for all options below #### ? What's the identifier of your extension? code-translate# ? What's the description of your extension? LEAVE BLANK# ? Initialize a git repository? Yes# ? Which package manager to use? npm
Fill the prompts using the comments as a guide. When asked for the extension name, enter code-translate; provide the same response when asked for an identifier for the extension. Initialize a git repository and choose between Yarn and npm as your package manager of choice for installing project dependencies.
Next, open the project folder generated using your VS Code editor. We’ll come back to the code later. Next let’s see how we can get started using the Google Translate API.
Using the Translate API
To get started using the Google Translate API, follow the steps below to create a GCP console project, obtain your projectId and download your credentials:
- Set up a console project. Visit your Google Cloud Platform dashboard to set up a new project if you don’t have one already.
- After setting up the project, visit the APIs page to enable the Cloud Translation API on the project.
- Create a Service Account Key in the Credentials page. You’ll get a prompt to save the file containing the key after creation. Be sure to keep this key safe and secure.
- You can view and manage these resources at any time in the GCP Console.
- Set the environment variable GOOGLE_APPLICATION_CREDENTIALS to the file path of the JSON file that contains your service account key. This variable only applies to your current shell session, so if you open a new session, set the variable again.
Example: Linux or macOS
Replace [PATH] with the file path of the downloaded JSON file that contains your service account key.
export GOOGLE_APPLICATION_CREDENTIALS="[PATH]"For example:
export GOOGLE_APPLICATION_CREDENTIALS="/home/user/Downloads/service-account-file.json"Example: Windows
Replace [PATH] with the file path of the JSON file that contains your service account key, and [FILE_NAME] with the filename.
With PowerShell:
$env:GOOGLE_APPLICATION_CREDENTIALS="[PATH]"For example:
$env:GOOGLE_APPLICATION_CREDENTIALS="C:\Users\username\Downloads\[FILE_NAME].json"With command prompt:
set GOOGLE_APPLICATION_CREDENTIALS=[PATH]The projectId is important and we will make use of it to initialize the Node Translate client library. When you’re done creating a console project and obtaining a projectId, run the following command to install the client library.
npminstall @google-cloud/translate
After running this command and installing the library, make sure you have configured your terminal environment to point to your downloaded credentials as shown in Step 5 of the guide. Once this is done, we can head back to creating the extension.
Registering Commands
Commands act as action triggers within the code editor. Also, commands are used by extensions to expose functionality to users, bind to actions in VS Code’s UI, and implement internal logic.
Our extension will make use of commands, we’ll listen for commands and act on them. In the src/extension.ts file, you’ll see that there is one registered command pushed to the extension context. We have to update the registered command: change the registered command from extension.helloWord to extension.translateFrench. Replace the content within the activate function to look like the snippet below:
// src/extension.ts// The module 'vscode' contains the VS Code extensibility API// Import the module and reference it with the alias vscode in your code belowimport*as vscode from'vscode';// this method is called when your extension is activated// your extension is activated the very first time the command is executedexportfunctionactivate(context: vscode.ExtensionContext){
      context.subscriptions.push(
        vscode.commands.registerCommand('extension.translateFrench',()=>{
          vscode.window.showInformationMessage('Translate to French');}));}// this method is called when your extension is deactivatedexportfunctiondeactivate(){}
The snippet above registers a command extension.translateFrench; within the command handler function, we display a simple information message when the command is triggered. Registering a new command isn’t as simple as updating the string in the extension.ts file. We also have to add a new command to the commands array in the package.json file.
Open the package.json file and look for the commands array. Within this array, we’ll add the new command used in the snippet above. Replace the default extension.helloWorld command and title with the snippet below:
{"command":"extension.translateFrench","title":"Translate: French"}The title field is the display name that will be visible to users while the command field is the part that the editor will subscribe to and listen out for triggers.
Also, update the activationEvents array. Replace the current value with the one shown below:
"activationEvents":["*"],Since we’ll be making use of multiple commands in this extension, it doesn’t make sense to still use a single activation event.
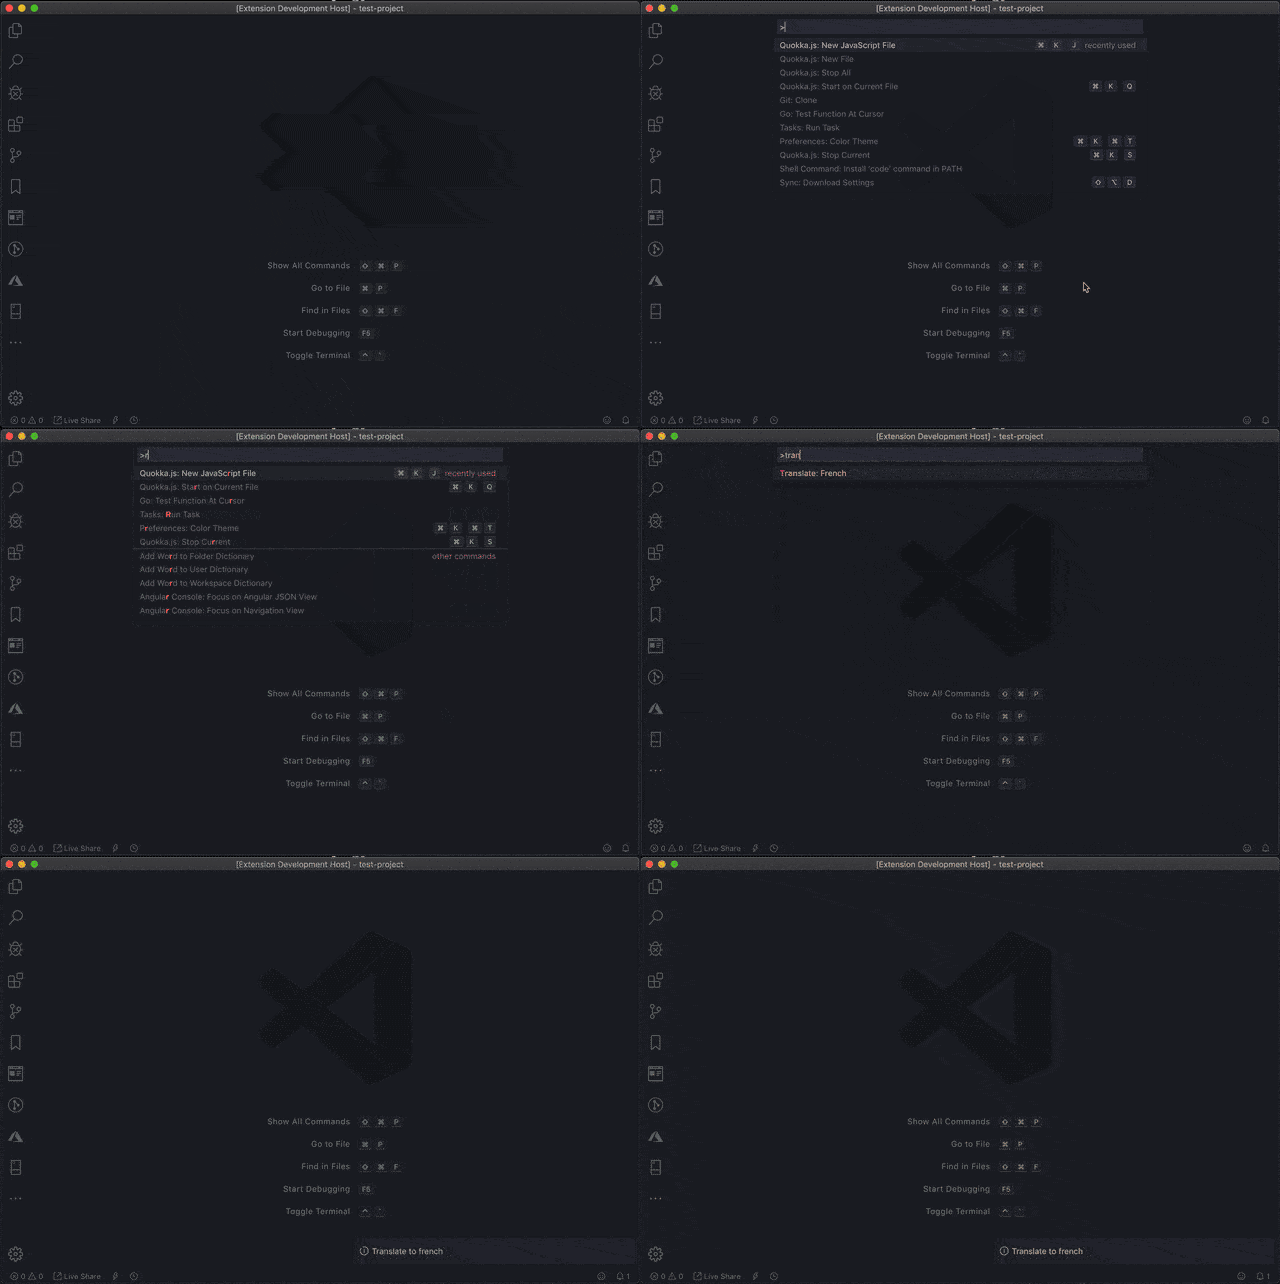
Before we make further changes, let’s test that we have a proper base setup. Go to the editor that has the project open and press F5 on your keyboard. Go to the Debug tab and click on the Start debugging icon.
A new editor window will be launched in debug mode with your extension installed. To test the registered command, use the following key combination to open the command dialog.
#Windows
    ctrl + shift + p

    #Mac
    cmd + shift + p
After launching the command dialog, type out the command title Translate: French and click on it to run the command. If you see the information message after clicking the command, then you’re on track.

Running Translations and Displaying Translated Text
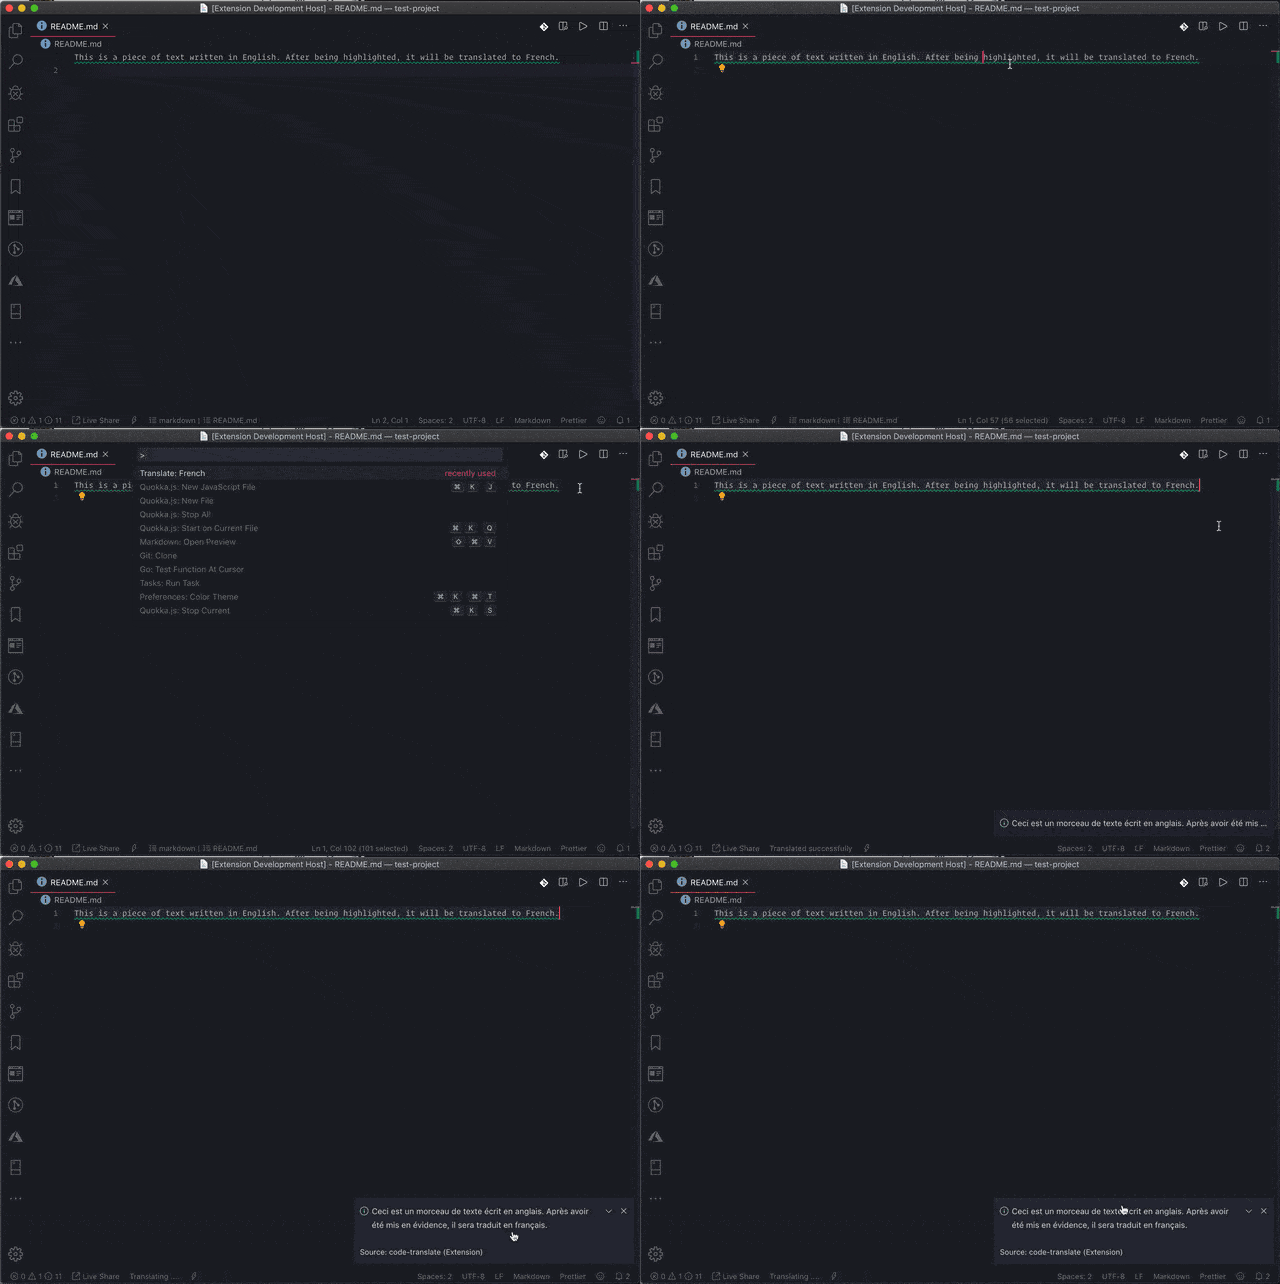
What we aim to achieve with this extension is to give users the ability to translate a piece of text that has been highlighted. After running the translations under the hood, we will then display the translated text as an information message.
Let’s do this in a separate file. Create a file called translate.ts within the src directory. In this file, we will initialize the Google translate library using the projectId we got after setting up the GCP project, then we’ll find get the highlighted text, translate it and display it in an information message.
Open the src/translate.ts file and copy the following snippet into the file:
// src/translate.tsimport*as vscode from'vscode';import{ Translate as GTranslate }from'@google-cloud/translate';const translator =newGTranslate({ projectId:'YOUR_PROJECT_ID'});exportasyncfunctiondoTranslate(language:'en'|'fr'|'es'|'de'|'pt'){// Get the active editorconst editor = vscode.window.activeTextEditor;if(editor){const document = editor.document;const selection = editor.selection;// Get the word within the selectionconst textSelection = document.getText(selection);// Display a status bar message to show progress
        vscode.window.setStatusBarMessage('Translating ....');const[translation]=await translator.translate(textSelection, language);
        console.log(translation);
        vscode.window.showInformationMessage(translation);
        vscode.window.setStatusBarMessage('Translated successfully',2000);}}
The doTranslate function takes a single argument language, this represents the ISO 639-1 language code for the specific language. Within the function, we get the activeTextEditor from the window object. The document and selection values are gotten from the active editor. To get the selected text, we call the getText method on the document object.
After getting the selected text, we pass that alongside the language code to the translate method. Calling the translate method returns an array of values, the translated text as the first value in the array and the API response as the second value.
When we get the translated text, we display it using the window’s showInformationMessage method.
The function is ready, so let’s use it as the handler for the extension.translateFrench command. Open the src/extension.ts file and update the code replacing the command handler to look like the snippet below:
// src/extension.tsimport*as vscode from'vscode';import{ doTranslate }from'./translate';exportfunctionactivate(context: vscode.ExtensionContext){
      context.subscriptions.push(
        vscode.commands.registerCommand('extension.translateFrench',()=>{doTranslate('fr');}));}
After making this change, reload the debugger to pick the changes and try running the command after highlighting a piece of text in a file. You should see an information message containing the text in French.

In the next section, we’ll see how we can register more commands to support translating to other languages.
Translating to More Languages
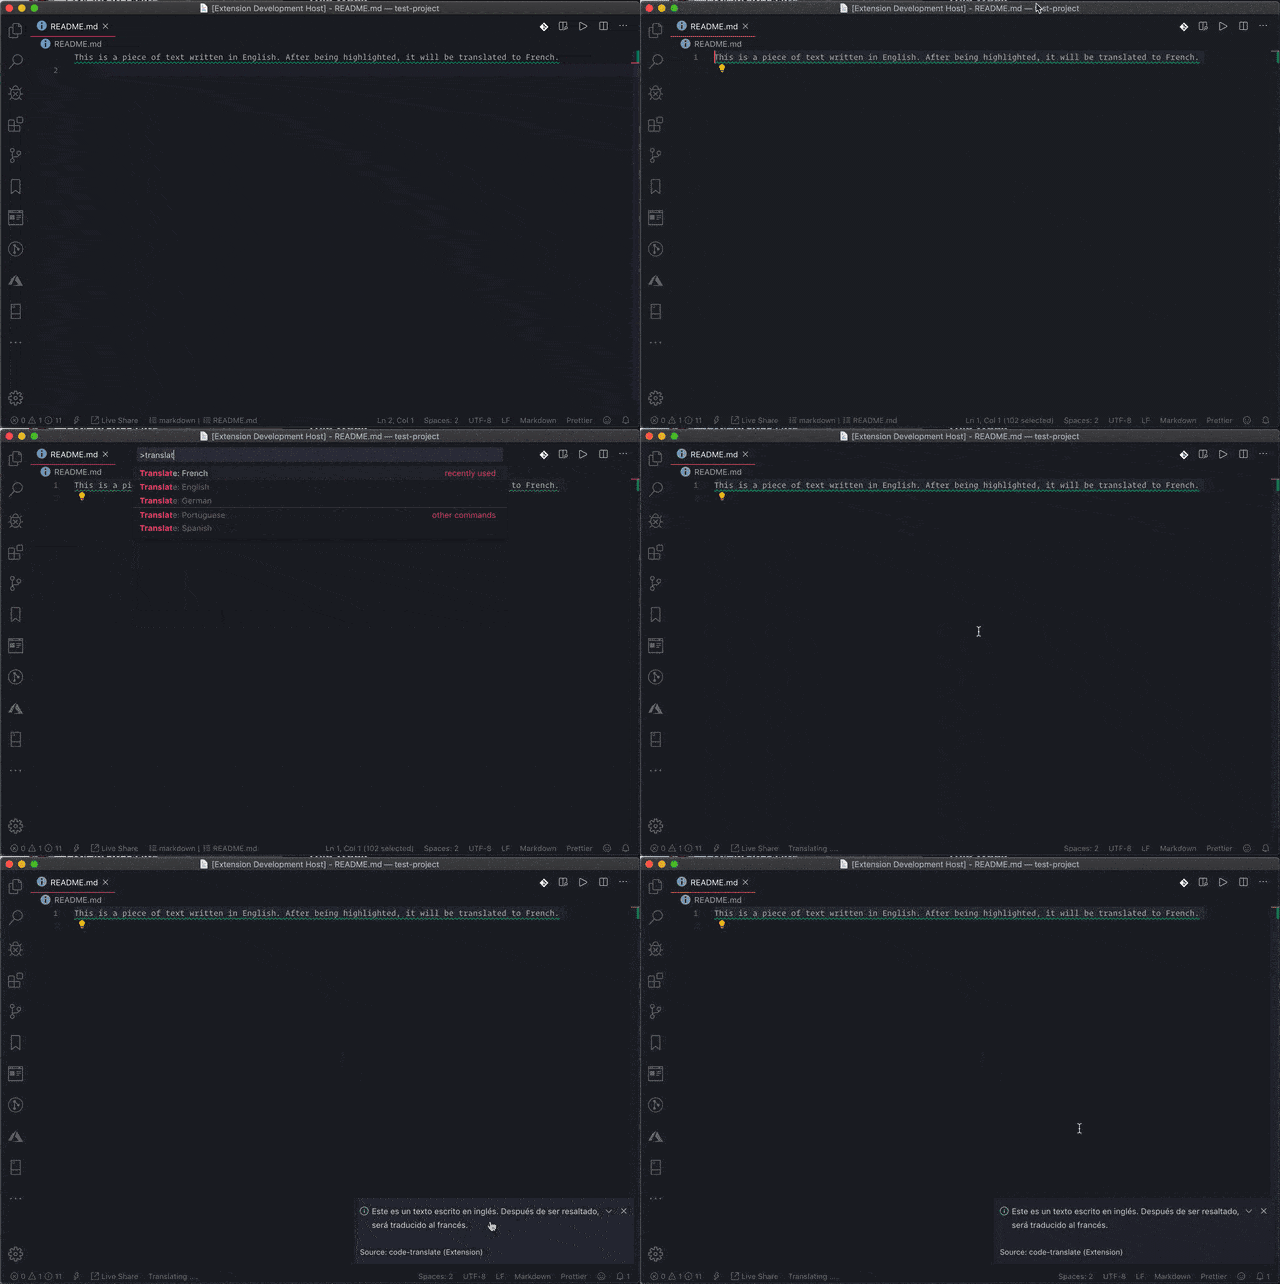
To support translating to more languages, we have to register a couple more commands. Let’s add four more commands to support translating to German, English, Portuguese and Spanish. The doTranslate function only needs a valid language code to function, so all we need to do is register a command and call the doTranslate function with the valid language code within the handler function.
Open the extension.ts file and register some new commands. Update the content of the file to look similar to the snippet below:
// src/extension.tsimport*as vscode from'vscode';import{ doTranslate }from'./translate';exportfunctionactivate(context: vscode.ExtensionContext){
      context.subscriptions.push(
        vscode.commands.registerCommand('extension.translateFrench',()=>{doTranslate('fr');}));
      context.subscriptions.push(
        vscode.commands.registerCommand('extension.translateEnglish',()=>{doTranslate('en');}));
      context.subscriptions.push(
        vscode.commands.registerCommand('extension.translateSpanish',()=>{doTranslate('es');}));
      context.subscriptions.push(
        vscode.commands.registerCommand('extension.translateGerman',()=>{doTranslate('de');}));
      context.subscriptions.push(
        vscode.commands.registerCommand('extension.translatePortuguese',()=>{doTranslate('pt');}));}exportfunctiondeactivate(){}
We know what’s next after registering new commands — we have to add the new commands to the package.json file along with the readable titles. Open the package.json file and replace the contents with the following code snippet:
{"name":"code-translate","displayName":"code-translate","description":"An extension for translating pieces of text in your editor","version":"0.0.1","engines":{"vscode":"^1.39.0"},"categories":["Other"],"activationEvents":["*"],"main":"./out/extension.js","contributes":{"commands":[{"command":"extension.translateEnglish","title":"Translate: English"},{"command":"extension.translateFrench","title":"Translate: French"},{"command":"extension.translateGerman","title":"Translate: German"},{"command":"extension.translateSpanish","title":"Translate: Spanish"},{"command":"extension.translatePortuguese","title":"Translate: Portuguese"}]},"scripts":{...},"devDependencies":{...},"dependencies":{...}}We added the registered commands in the commands array. Now we can find these commands available when we go looking. Reload the debugger to test out the new translation commands.

![]() Conclusion
Conclusion
VS Code is a great editor for development and it offers an easy-to-use extensions API. Going through their documentation, I realized how I could take even more control of my editor using extensions. You can go through the quick start guide in the official documentation. You can take it upon yourself to extend this demo even further by supporting more languages without as much duplication. The code for this demo is available here on GitHub.
 Conclusion