This post shows how to use the context argument that every resolver function receives, implement GraphQL mutation, and work with Prisma as your data access layer.
GraphQL, described as a data query and manipulation language for APIs, and a runtime for fulfilling queries with existing data, allows varying clients to use your API and query for just the data they need. It helps solve issues that some REST services have – such as over-fetching and under-fetching, which is a performance issue.
In my previous post, I wrote about the GraphQL type system, query language, schema and resolver. I showed you how to build a GraphQL server using graphql-yoga and tested the API with some queries from the GraphQL playground. In this post, I'll introduce you to GraphQL mutation. We will also move off the in-memory store we used in the previous post and use a database to access and store our data.
Adding a Database
If you did not follow along from previous post, you can download the source code on GitHub. The completed code for the previous post is contained in the src-part-1 folder. If you want to follow along with the coding, rename that folder to src and follow the coding instruction from here on.
Before we move to creating GraphQL mutations, I want us to use a database for the existing queries we have in our GraphQL system. We will be using Prisma as a data access layer over MySQL database. For this example we will use Prisma demo server running on Prisma cloud service.
Let's go ahead and define a database schema. Add a new file, src/prisma/datamodel.prisma with the following content:
type Book {
  id: ID! @id
  title: String!
  pages: Int
  chapters: Int
  authors: [Author!]!
}

type Author {
  id: ID! @id
  name: String! @unique
  books: [Book!]!
}
The above schema represents our data model. Each type will be mapped to a database table. Having ! with a type will make that column in the database non-nullable. We also annotated some fields with the @ and be are used in the schema language or query language. The @unique directive will mark that column with a unique constraint in the database. This will also allow us to find authors by their names as you'll see later.
Next, we add a new file src/prisma/prisma.yml which will contain configuration options for Prisma:
# the HTTP endpoint for the demo server on Prisma Cloud
endpoint: ""

# points to the file that contains your datamodel
datamodel: datamodel.prisma

# specifies language & location for the generated Prisma client
generate:
- generator: javascript-client
output: ./client
This will be used by the Prisma CLI to configure and update the Prisma server in the cloud, and generate a client API based on the data model. The endpoint option will contain the URL to the Prisma Cloud server. The datamodel option specifies a path to the data model, the generate option specifies we're using the JavaScript client generator and it should output the client files to the /client folder.
Prisma CLI can generate the client using other generators. There are generators for TypeScript and Go currently. We're working with JavaScript so I've opted to use the javascript-client generator. To learn more about the structure of this configuration file, feel free to check the documentation.
We need the Prisma CLI to deploy our Prisma server and for generating the Prisma client. We'll install the CLI globally using npm:
npm install -g prismaAt the time of this writing, I'm running version 1.34.0 of the CLI. With that installed, we now need to deploy our data model. Follow the instructions below to set up the database on Prisma cloud.
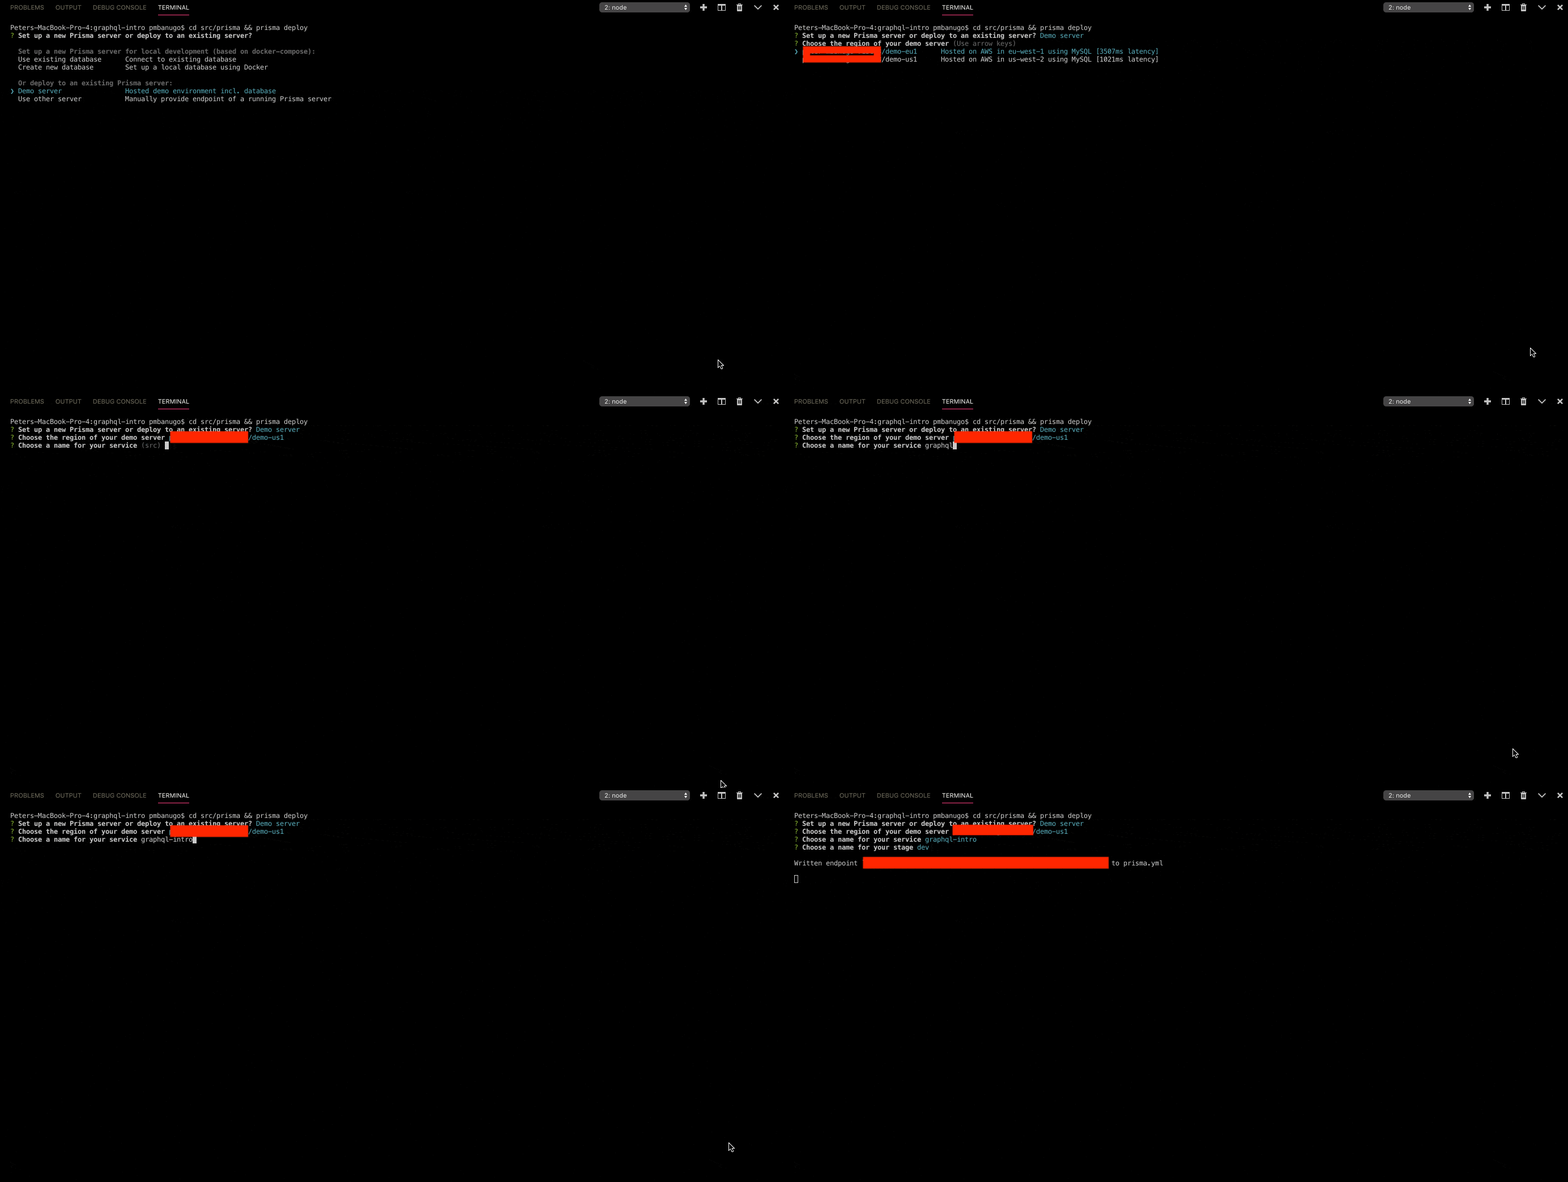
- Run
cd src/prisma && prisma deployin the command line. - You'll get prompted to choose how you want to set up the Prisma server. Select
Demo Serverto continue. - The CLI might want to authenticate your request by opening a browser window for you to log in to or sign up for Prisma. Once you've logged in, close the window and go back to the command prompt.
- The next prompt requires you to choose a region for the demo server to be hosted on Prisma Cloud. Pick any of your choice and press Enter to continue.
- Now you get asked to choose a name for the service. Enter
graphql-intro(or any name of your choosing) and continue. - The next prompt asks for a name to give the current stage of our workflow. Accept the default by pressing Enter to continue.
The CLI takes that information and the information in prisma.yml to set up the demo server. Once it's done, it updates the file with the endpoint to the Prisma server. It'll also print in the console information regarding how the database was set up.

With the server set up, the next step is to generate the Prisma client for our data model. The Prisma client is autogenerated based on your data model and gives you API to communicate with the Prisma service. Run the following command to generate our Prisma client.
prisma generateThis command generates the client API to access the demo server we created from earlier. It should dump a couple of files in src/prisma/client. The next step for us is to connect our GraphQL server to the database server using the Prisma client and get data from there.
Open src/index.js and import the Prisma instance exported from the generated client, and then delete the books variable.
const { GraphQLServer } = require('graphql-yoga');
const { prisma } = require('./prisma/client')

// ... the rest of the code remains untouched
We also need a dependency which is needed to run the Prisma client. Open the command line and run the command npm install prisma-client-lib to install this package.
Using Prisma Client in Resolvers
Now that we have a Prisma client generated, we'll need to use that in our resolvers. We'll pass down the Prisma instance using the context argument that every resolver function gets. We talked briefly about this argument in the last post, and now you'll get to use it. I mentioned that the context argument is useful for holding contextual information and you can read or write data to it. To work with the Prisma client, we'll write the Prisma instance from the generated client to the context object when the GraphQL client has been initialized.
In src/index.js, on line 32, update the initialization of the GraphQLServer as follows:
const server = new GraphQLServer({
  typeDefs,
  resolvers,
  context: { prisma }
});
We will also update the resolvers to use Prisma for resolving queries. Update the Query property in the resolvers variable as follows:
const resolvers = {
  Query: {
    books: (root, args, context, info) => context.prisma.books(),
    book: (root, args, context, info) => context.prisma.book({ id: args.id })
  },
  // ...
}
In those resolvers, we're calling a function on the Prisma client instance attached to the context. The function prisma.books() gives us all books in the database, while prisma.book({ id: args.id}) gets us a book based on the passed in id.
Adding Mutation Operations
So far we're able to fetch data from the GraphQL API, but we need a way to update data on the server. GraphQL mutation is a type of operation that allows clients to modify data on the server. It is through this operation type that we're able to add, remove, and update records on the server. To read data we use GraphQL query operation type, which you learned from the previous post, and we touched on it in the previous section.
We will add new a new feature to our GraphQL API so that we can add books and authors. We will start by updating the GraphQL schema. Update the typeDefs variable in index.js as follows:
const typeDefs = `
  type Book {
    id: ID!
    title: String!
    pages: Int
    chapters: Int
    authors: [Author!]!
  }

  type Author {
    id: ID!
    name: String!
    books: [Book!]!
  }

  type Query {
    books: [Book!]
    book(id: ID!): Book
    authors: [Author!]
  }

  type Mutation {
    book(title: String!, authors: [String!]!, pages: Int, chapters: Int): Book!
  }
`;
We have updated our GraphQL schema to add new types, Author and Mutation. We added a new field authors which is a list of Author to the Book type, and a new field authors: [Author!] to the root query type. I also changed fields named id to use the ID type. This is because we're using that type in our data model and the database will generate global unique identifier for those fields, which won't match the Int type we've been using so far. The root Mutation type defines our mutation operation and we have only one field in it called book, which takes in parameters needed to create a book.
The next step in our process of adding mutation to the API is to implement resolvers for the new fields and types we added. With index.js still open, go to line 30 where the resolvers variable is defined and add a new field Mutation to the object as follows:
const resolvers = {
  Mutation: {
    book: async (root, args, context, info) => {
      let authorsToCreate = [];
      let authorsToConnect = [];
      for (const authorName of args.authors) {
        const author = await context.prisma.author({ name: authorName });
        if (author) authorsToConnect.push(author);
          else authorsToCreate.push({ name: authorName });
        }
        return context.prisma.createBook({
          title: args.title,
          pages: args.pages,
          chapters: args.chapters,
          authors: {
            create: authorsToCreate,
            connect: authorsToConnect
          }
      });
    }
  },
  Query: {
    // ...
  },
  Book: {
    // ...
  }
};
Just like every other resolver function, the resolver for books in the root mutation type takes in four arguments and we get the data that needs to be created from the args parameter, and the Prisma instance from the context parameter. This resolver is implemented such that it will create the book record in the database, create the author if it does not exist, and then link the two records based on the data relationship defined in our data model. All this will be done as one transaction in the database. We used what Prisma refers to as nested object writes to modify multiple database records across relations in a single transaction.
While we have the resolver for the root mutation type, we still need to add resolvers for the new Author type and the new fields added to Query and Book type. Update the Book and Query resolvers as follows:
const resolvers = {
  Mutation: {
    // ...
  },
  Query: {
    books: (root, args, context, info) => context.prisma.books(),
    book: (root, args, context, info) => context.prisma.book({ id: args.id }),
    authors: (root, args, context, info) => context.prisma.authors()
  },
  Book: {
    authors: (parent, args, context) => context.prisma.book({ id: parent.id }).authors()
  },
  Author: {
    books: (parent, args, context) => context.prisma.author({ id: parent.id }).books()
  }
};
The authors field resolver of the root query operation is as simple as calling prisma.authors() to get all the authors in the database. You should notice the resolvers for the fields with scalar types in Book and Author was omitted. This is because the GraphQL server can infer how to resolve those fields by matching the result to a property of the same name from the parent parameter. The other relation fields we have cannot be resolved in the same way, so we needed to provide an implementation. We call in to Prisma to get this data as you've seen.
After all these edits, your index.js should be the same as the one below:
const { GraphQLServer } = require('graphql-yoga');
const { prisma } = require('./prisma/client');

const typeDefs = `
  type Book {
    id: ID!
    title: String!
    pages: Int
    chapters: Int
    authors: [Author!]!
  }

  type Author {
    id: ID!
    name: String!
    books: [Book!]!
  }

  type Query {
    books: [Book!]
    book(id: ID!): Book
    authors: [Author!]
  }

  type Mutation {
    book(title: String!, authors: [String!]!, pages: Int, chapters: Int): Book!
  }
`;

const resolvers = {
  Mutation: {
    book: async (root, args, context, info) => {
      let authorsToCreate = [];
      let authorsToConnect = [];

      for (const authorName of args.authors) {
        const author = await context.prisma.author({ name: authorName });
        if (author) authorsToConnect.push(author);
        else authorsToCreate.push({ name: authorName });
      }

      return context.prisma.createBook({
        title: args.title,
        pages: args.pages,
        chapters: args.chapters,
        authors: {
          create: authorsToCreate,
          connect: authorsToConnect
        }
      });
    }
  },
  Query: {
    books: (root, args, context, info) => context.prisma.books(),
    book: (root, args, context, info) => context.prisma.book({ id: args.id }),
    authors: (root, args, context, info) => context.prisma.authors()
  },
  Book: {
    authors: (parent, args, context) => context.prisma.book({ id: parent.id }).authors()
  },
  Author: {
    books: (parent, args, context) =>
    context.prisma.author({ id: parent.id }).books()
  }
};

const server = new GraphQLServer({
  typeDefs,
  resolvers,
  context: { prisma }
});

server.start(() => console.log(`Server is running on http://localhost:4000`));
Testing the GraphQL API
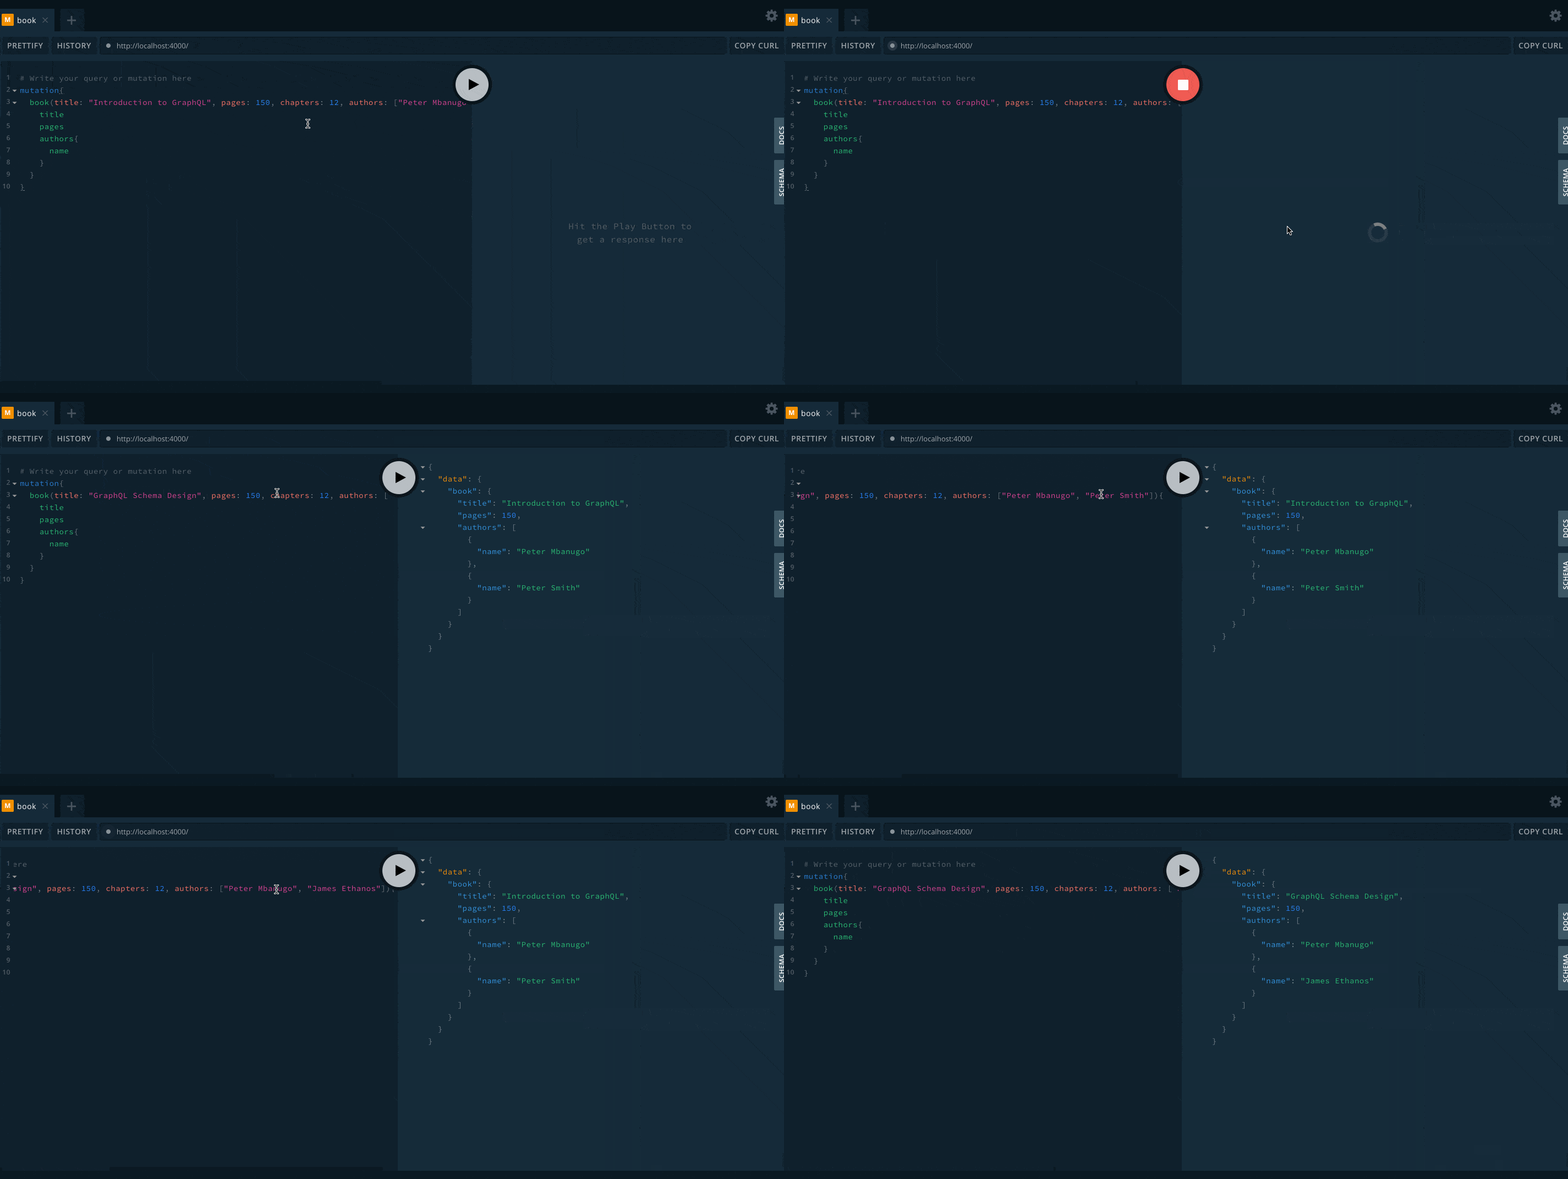
So far, we have updated our schema and added resolvers to call in to the database server to get data. We have now come to the point where we need to test our API and see if it works as expected. Open the command line and run node src/index.js to start the server. Then open localhost:4000 in your browser. This should bring up the GraphQL Playground. Copy and run the query below to add a book:
mutation {
  book(title: "Introduction to GraphQL", pages: 150, chapters: 12, authors: ["Peter Mbanugo", "Peter Smith"]) {
    title
    pages
    authors {
      name
    }
  }
}
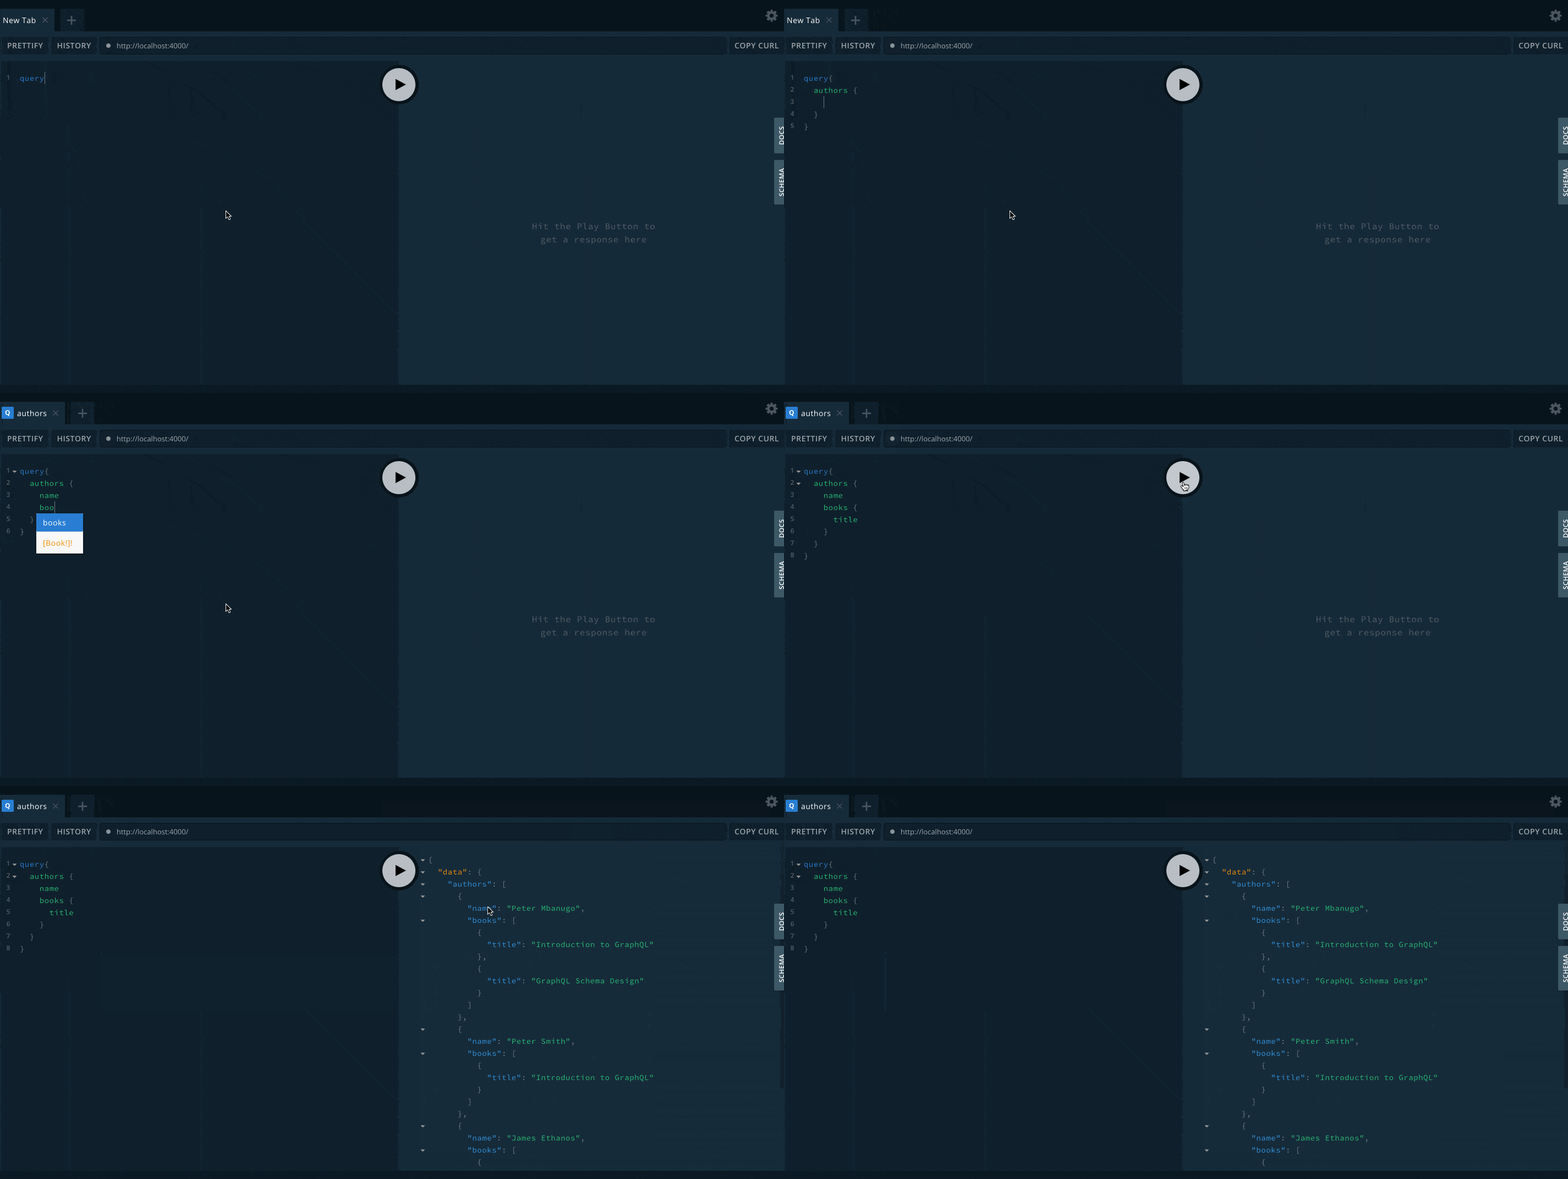
Now that the book is created, we can query and see how for the authors in the application:
query {
  authors {
    name
    books {
      title
    }
  }
}
That's a Wrap!
I introduced you to GraphQL mutation, one of the three root operation types in GraphQL. We updated our schema with new functionalities, which included mutation to add books to the application and using Prisma as our database access layer. I showed you how to work with a data model using the same schema definition language from GraphQL, working with the CLI and generating a Prisma client, and how to read and write data using the Prisma client. Since our data is stored on Prisma cloud, you can access your services and database online at app.prisma.io.
You added new functionalities to our application in this post. This should leave you with the skills to build a GraphQL API to perform CRUD operations. This should let you brag with your friends that you're now a GraphQL developer. To prove that to you, I want you to add a new set of functionalities to your API as follows:
- Add a query to find authors by their name.
- Allow books to have publishers. This will have you add a new type to the schema. You should be able to independently add publishers and query for all the books belonging to a publisher.
While this skill makes you a proud GraphQL developer, I'm not stopping here. I want to supercharge your skills to make you more professional. In the next post, I'm going to teach you about authentication in a GraphQL server and GraphQL subscription. So stay tuned and keep the coding spirit! ❤️
You can find the completed code for this post on GitHub. Download the source code and go to src-part-2 folder.