Learn how the Telerik RichTextEditor for .NET MAUI component enables users to create rich textual content through a WYSIWYG. It comes with various editing capabilities, and with the help of the built-in Toolbar you can provide users an easy and quick way to edit their HTML content.
Displaying and editing rich text are often needed for end-user applications. No matter whether we are targeting Windows, macOS, iOS or Android, or whether we need just to send an email and format its content or to focus on editing and viewing documents, Telerik RichTextEditor is here to do the job. Available with R2 2023 (version 5.2.0) of Progress Telerik UI for .NET MAUI, this What-You-See-Is-What-You-Get (WYSIWYG) interface component comes with:
- Visualized HTML content—paragraphs, formatted text, images, tables, ordered and unordered lists, and more
- Text formatting such as bold, italic, underline and
strikethrough - Font manipulations such as size, family, text color and text background color
- Bulleted and numbered lists
- Text selection
- Hyperlink creation and management
- Subscript and superscript formatting
- Indentation and content alignment
- Undo/Redo editing actions
- Various HTML source options
- Commands support
- Ability to insert and edit images—operations like resize, cut, copy, paste, remove
- Built-in Toolbar
- Flexible Styling API
Adding Telerik RichTextEditor to .NET MAUI Application
As with any of the other UI components from Telerik UI for .NET MAUI suite, adding Telerik RichTextEditor is simple and can be done in three steps:
- Download and Install Telerik UI for .NET MAUI.
- Call the
UseTelerik()method inside the Maui Program.cs file of your .NET MAUI project. This is needed for all Telerik UI for .NET MAUI components asUseTelerik()registers all built-in or additionally created handlers to the Telerik components. - Define Telerik RichTextEditor in XAML or C#.
XAML
<Grid>
  <telerik:RadRichTextEditor  x:Name="richTextEditor"  AutomationId="richTextEditor"/>
</Grid>

xmlns:telerik="http://schemas.telerik.com/2022/xaml/maui"
C#
RadRichTextEditor richTextEditor = new RadRichTextEditor();
Load Rich Text to Telerik RichTextEditor
Telerik RichTextBox displays HTML content by offering a Rich API to retrieve the html from string or document. After that, all you should need to do is to set the Source property.
Directly setting the Source to a string:
this.richTextEditor.Source = "<b>Hello World!</b>";
Using RichTextSource.FromString method to extract the HTML from a string:
var htmlSource =  @"<h4>One of the Most Beautiful Islands on Earth - Tenerife</h4>
  <p><strong>Tenerife</strong> is the largest and most populated island of the eight <a href='https://en.wikipedia.org/wiki/Canary_Islands' target='_blank'>Canary Islands</a>.</p>
  <p style='color:#808080'>It is also the most populated island of <strong>Spain</strong>, with a land area of <i>2,034.38 square kilometers</i> and <i>904,713</i> inhabitants, 43% of the total population of the <strong>Canary Islands</strong>.</p>";
this.richTextEditor.Source  =  RichTextSource.FromString(htmlSource);
Using RichTextSource.FromStream method to read a stream (a very useful option when we need to load a document):
Func<CancellationToken,  Task<Stream>> streamFunc = ct =>  Task.Run(()  =>
{
  Assembly assembly =  typeof(GetHtml).Assembly;
  string fileName = assembly.GetManifestResourceNames().FirstOrDefault(n => n.Contains(" PickYourHoliday.html"));
  Stream stream = assembly.GetManifestResourceStream(fileName);
  return stream;
});

this.richTextEditor.Source  =  RichTextSource.FromStream(streamFunc);
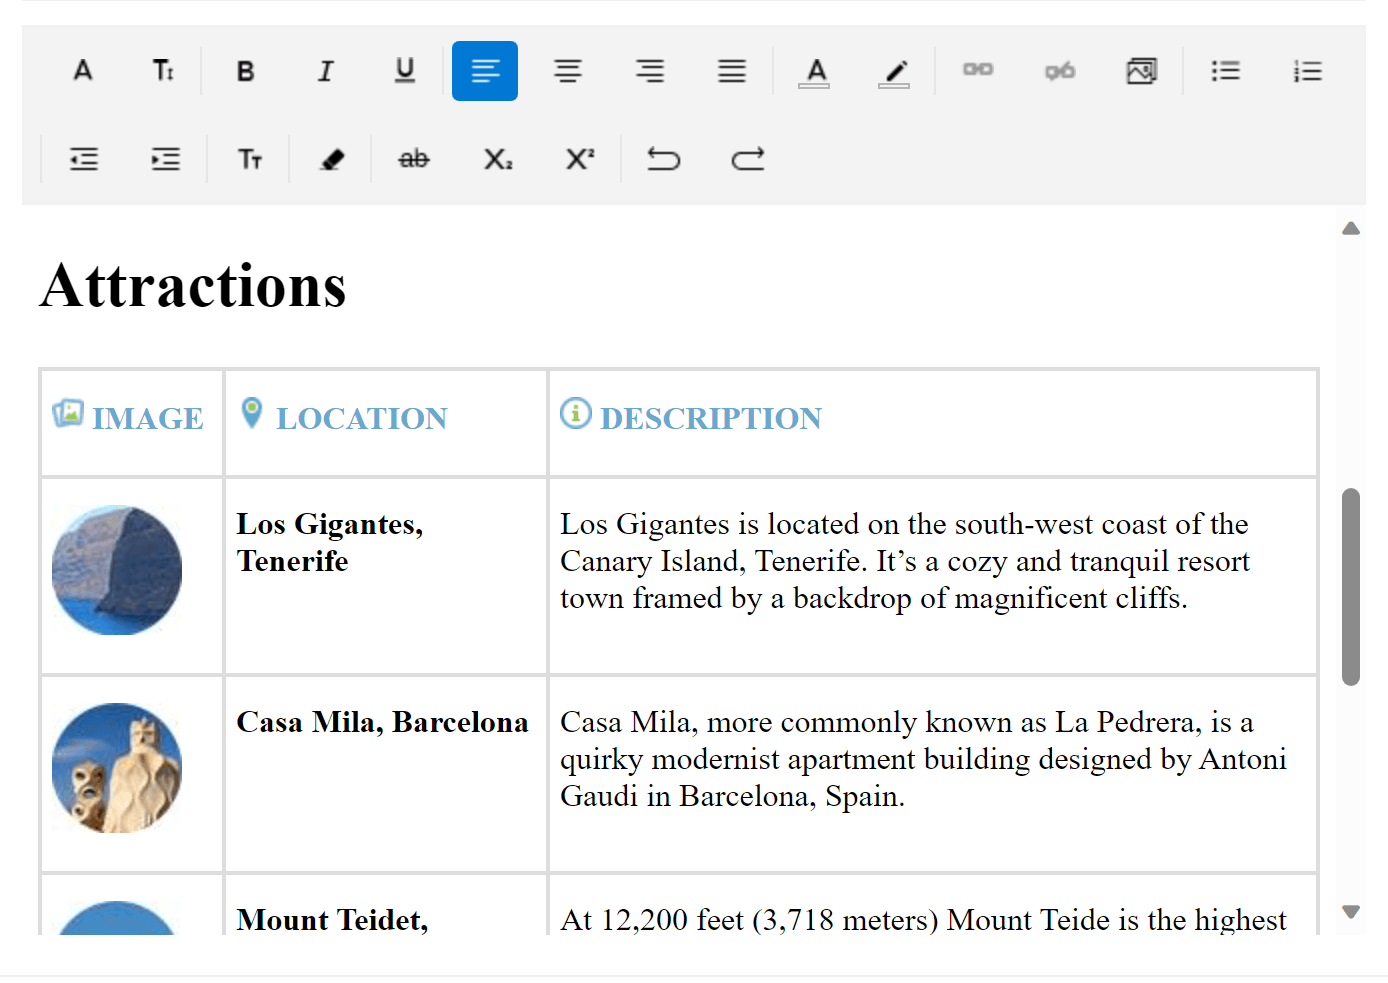
For the purpose of this post, I used the third approach and loaded a document containing images, links, tables and a lot of other complex HTML features as shown below:
Editing Rich Text with Telerik RichTextEditor
We already loaded our full rich document, but what do we do in an editor if we don’t want to edit, right?
Telerik Editor offers rich functionality to do that, and all of that is exposed to user commands that we can bind to different UI depending on the needs of our application.
A table with all commands is below:
| Commands | Description |
UndoCommand | Gets a command to undo the last changes in the editor. |
RedoCommand | Gets a command to redo the last changes in the editor. |
ToggleBoldCommand | Gets a command to toggle the bold text in the editor. |
ToggleItalicCommand | Gets a command to toggle the italic text in the editor. |
ToggleUnderlineCommand | Gets a command to toggle the underline text in the editor. |
ToggleStrikethroughCommand | Gets a command to toggle the strikethrough text in the editor. |
ToggleSubscriptCommand | Gets a command to toggle the subscript text in the editor. |
ToggleSuperscriptCommand | Gets a command to toggle the superscript text in the editor. |
ToggleBulletingCommand | Gets a command to toggle the bullets paragraph in the editor. |
ToggleNumberingCommand | Gets a command to toggle the numbered paragraph in the editor. |
ClearFormattingCommand | Gets a command to clear the formatting of the text in the editor. |
AlignLeftCommand | Gets a command to apply left text alignment in the editor. |
AlignRightCommand | Gets a command to apply right text alignment in the editor. |
AlignCenterCommand | Gets a command to apply center text alignment in the editor. |
AlignJustifyCommand | Gets a command to apply justified text alignment in the editor. |
IndentCommand | Gets a command to indent the text in the editor. |
OutdentCommand | Gets a command to outdent the text in the editor. |
ApplyHyperlinkCommand | Gets a command to apply a hyperlink in the editor. |
RemoveHyperlinkCommand | Gets a command to remove a hyperlink in the editor. |
OpenHyperlinkCommand | Gets a command to open a hyperlink in the editor. |
InsertImageCommand | Gets a command to insert an image in the editor. The command takes a single paramerer of type Telerik.Maui.Controls.RichTextEditor.RichTextImage. |
RemoveImageCommand | Gets a command to remove an image in the editor. |
SelectAllCommand | Gets a command to select all HTML in the editor. |
However, one of the most common scenarios is to edit the doc using the toolbar of the component—so this functionality comes built in.
The first time you visualize Telerik Editor, it appears with a toolbar containing buttons with all of the commands above.
Configure the Toolbar
Hide the Toolbar
By default, the Toolbar appears ready to be used with an adaptive look and feel. Still if you want to hide it or customize it, the first step is to set the AutoGenerateItems property to False.
Add the Toolbar
Once the default toolbar is hidden, it is time to create a new one. The important part here is that you need to create an instance of RadRichTextEditorToolbar component outside the Telerik Editor but use the toolbar’s RichTextEditor property to associate with the Editor component.
<telerik:RadRichTextEditorToolbar  RichTextEditor="{x:Reference richTextEditor}" >
  ...
</telerik: RadRichTextEditorToolbar  >

<telerik:RadRichTextEditor  x:Name="richTextEditor"  />
Add Toolbar Items
Then you can define which features to display. There are two ways to do that. You can use regular RadToolBarItems or use the predefined RichTextEditor toolbar items, which have assigned functionality. The code below illustrates the pre-built Editor toolbar items:
<telerik:RadRichTextEditorToolbar x:Name="richTextToolbar"
    Grid.Row="{OnIdiom Desktop=0, Phone=1}"
    ZIndex="10"
    RichTextEditor="{x:Reference richTextEditor}"
    AutoGenerateItems="False">
<telerik:RichTextEditorFontFamilyToolbarItem/>
<telerik:RichTextEditorFontSizeToolbarItem/>
<telerik:SeparatorToolbarItem/>
<telerik:RichTextEditorBoldToolbarItem/>
<telerik:RichTextEditorItalicToolbarItem/>
<telerik:RichTextEditorUnderlineToolbarItem/>
<telerik:SeparatorToolbarItem/>
<telerik:RichTextEditorAlignLeftToolbarItem/>
<telerik:RichTextEditorAlignCenterToolbarItem/>
<telerik:RichTextEditorAlignRightToolbarItem/>
<telerik:RichTextEditorAlignJustifyToolbarItem/>
<telerik:SeparatorToolbarItem/>
<telerik:RichTextEditorTextColorToolbarItem/>
<telerik:RichTextEditorHighlightTextColorToolbarItem/>
<telerik:SeparatorToolbarItem/>
<telerik:RichTextEditorAddOrEditHyperlinkToolbarItem />
<telerik:RichTextEditorRemoveHyperlinkToolbarItem />
<telerik:RichTextEditorAddOrEditImageToolbarItem />
<telerik:SeparatorToolbarItem/>
<telerik:RichTextEditorBulletingToolbarItem />
<telerik:RichTextEditorNumberingToolbarItem />
<telerik:SeparatorToolbarItem/>
<telerik:RichTextEditorOutdentToolbarItem/>
<telerik:RichTextEditorIndentToolbarItem/>
<telerik:SeparatorToolbarItem/>
<telerik:RichTextEditorTextFormattingToolbarItem/>
<telerik:SeparatorToolbarItem/>
<telerik:RichTextEditorClearFormattingToolbarItem/>
<telerik:SeparatorToolbarItem/>
<telerik:RichTextEditorStrikethroughToolbarItem/>
<telerik:RichTextEditorSuperscriptToolbarItem/>
<telerik:RichTextEditorSubscriptToolbarItem/>
<telerik:SeparatorToolbarItem/>
<telerik:RichTextEditorUndoToolbarItem/>
<telerik:RichTextEditorRedoToolbarItem/>
<telerik:RichTextEditorHyperlinkNavigationToolbarItem />
<telerik:RichTextEditorImageNavigationToolbarItem />

</telerik:RadRichTextEditorToolbar>

<telerik:RadRichTextEditor x:Name="richTextEditor"  />
Style the Toolbar Items
Now, let’s style them a little bit differently. As the RichTextEditor’s Toolbar is based on the RadToolbar control, all toolbar items in the RichTextEditor inherit from ButtonToolbarItem. All styling properties available for the ButtonToolbarItem are also applicable to Editor’s toolbar items.
For example, to change the background of the items defined above, we can define the following style:
<Style  TargetType="telerik:ButtonToolbarItemView"  x:Key="commonStyle">
  <Setter  Property="MinimumWidthRequest"  Value="40"/>
  <Setter  Property="BackgroundColor"  Value="#804BDE74"/>
</Style>
And set it to them like this:
<telerik:RichTextEditorFontFamilyToolbarItem Style="{StaticResource commonStyle}"/>

To read more details about Telerik ToolBar for .NET MAUI and see what else it can offer, read the blog about ToolBar.
Select Text, Move the Caret or Make it Read-Only
Telerik RichTextEditor also offers an API to the .NET MAUI developer to manipulate the control:
GetSelectionAsyncmethod – Asynchronously returns aRichTextSelectionobject which defines the current text selection inside the editor (returnsnullif no text is selected). TheRichTextSelectionobject contains theTextitself as well as theStartandEndposition of the text characters.GetHtmlAsyncmethod of RichTextEditor – You can get the content created and updated inside the editor HTML.IsReadOnlyproperty – Controls the read-only state.
Style the RichTextEditor
As we saw already, the Telerik ToolBar can be customized, and this is true for the RichTextEditor itself as well. You can take advantage of the following styling properties: BorderColor, BorderThickness, CornerThickness and BackgroundColor.
For example, let’s apply them for the example above:
<telerik:RadRichTextEditor  x:Name="richTextEditor"
    BorderThickness="2"
    BorderColor="#808660C5"
    CornerRadius="5"  />
Handle Advanced Scenarios with Events
RadRichTextEditor is prepared to enable the .NET MAUI developers with flexibility to achieve more complex scenarios by handling the events.
The RichTextEditor component exposes the following events:
OpenHyperlinkError– Raised when users try to open invalid URLs in the editorIsReadOnlyChanged– Raised when the read-only mode of the RichTextEditor is switchedFontFamilyChanged– Raised when theFontFamilyproperty of the RichTextEditor is modifiedFontSizeChanged– Raised when theFontSizeproperty of the RichTextEditor is modifiedFontAttributesChanged– Raised when theFontAttributes, such as bold, italic, subscript or superscript, is modifiedTextDecorationsChanged– Raised when theTextDecorations, such as underline or strikethrough, is modifiedTextFormattingChanged– Raised when theTextFormatting, such as such as heading, paragraph or quotation, is modifiedHorizontalTextAlignmentChanged– Raised when theHorizontalTextAlignment, such as left, right, center or justify, is modifiedListTypeChanged– Raised when theListType, such as numbered or bulleted list, is modifiedTextColorChanged– Raised when theTextColorproperty of the RichTextEditor is updatedHighlightTextColorChanged– Raised when theHighlightTextColorproperty of the RichTextEditor is updatedSelectionRangeChanged– Raised when theSelectionRange, which defines the start and end position of the currently selected inside the editor text, is updatedIsHyperlinkSelectedChanged– Raised when a hyperlink inside the editor is selected
Migrating from Telerik UI for Xamarin
Telerik RichTextEditor for .NET MAUI shares the same API as Telerik RichTextEditor for Xamarin.Forms, so no big changes here. Still there two things to have in mind:
- ToolbarItems now receive the RichTextEditor prefix so as not to conflict with the brand-new RadToolBar for .NET MAUI component.
- Namespace of the control is changed from Telerik.XamarinForms.RichTextEditor to Telerik.Maui.Controls.
For more details, you can refer to the Telerik Migration from Xamarin article.
More Resources
Full examples illustrating the power of the Telerik UI for .NET MAUI RichTextEditor can be found in the Telerik SDK and Telerik Controls Samples.
More details about the API and using the component can be found in Telerik documentation.
Try It Yourself
Telerik RichTextEditor is just one of more than 60 powerful and feature-rich components in the Telerik UI for .NET MAUI suite, built to help you develop outstanding cross-platform applications. Try it for free now, and if there is anything you need—do not hesitate to share your feedback and ideas with the Telerik team on Telerik Feedback Portal or Telerik Forums.