Beginners and experts alike may learn a thing or two about Angular CLI best practices for creating and managing Angular projects in this blog post.
If you are working with Angular, you probably know how useful Angular CLI is. It simplifies the process of creating and managing Angular projects. With its intuitive command-line interface, it makes it easy to handle even complex tasks like generating components, services, pipes, directives and more.
But do you know how to use Angular CLI effectively? In this article, we will share 10 best practices and pro tips that will help you master Angular CLI. These are based on our own experience and the official documentation. They cover topics such as configuration, optimization, customization and debugging. Whether you are a beginner or an expert, you will find something useful in this list. So let’s dive in!
1. Start with the Essentials
When starting a new Angular project with the ng new command, you can use the --minimal flag to create a minimal starter project. This can be useful if you want to start with a clean slate
and only include the features and dependencies that you need for your project.
To use this flag, simply run the command ng new my-project --minimal, where my-project is the name of your new project. This will create a new Angular project with only the essential files
and dependencies, allowing you to build your project from the ground up.
2. Keep Your Code Clean and Consistent
ng lint is a command that checks your code for errors and style issues according to the rules specified in the tslint.json file. It helps you to keep your code clean and consistent with the Angular style guide.
For example, if you have a file called app.component.ts with the following code:
import { Component } from '@angular/core';

@Component({
  selector: 'app-root',
  template: `<h1>Hello {{name}}</h1>`
})
export class AppComponent {
  name = 'Angular';
}
You can run ng lint in your terminal and get the following output:
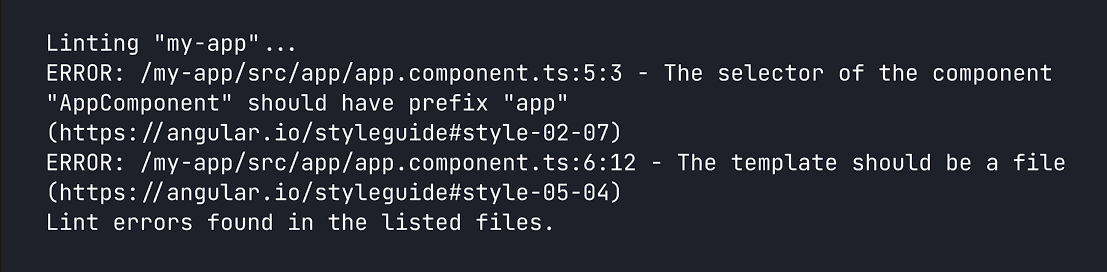
This means that you need to fix the selector and the template of your component to follow the Angular style guide. You can also use ng lint --fix to automatically fix some of the errors.
3. Enhance Your Style Sheets with Sass
Sass is a CSS preprocessor that allows you to write more concise and maintainable style sheets. It adds features like variables, mixins, nesting, inheritance, and more to plain CSS.
To use Sass with Angular CLI, you need to:
- Create a new project with the
--style=scssflag, which tells the CLI to generate .scss files instead of .css files. For example:ng new my-sassy-app --style=scss. - Write your styles in .scss files inside the src folder. You can use any Sass feature you like, such as variables, mixins, nesting, etc. The CLI will automatically compile your Sass files to CSS when you run
ng serveorng build. - Import your styles into your components using the
styleUrlsproperty in the component decorator. For example:@Component({ selector: 'app-root', templateUrl: './app.component.html', styleUrls: ['./app.component.scss'] }). You can also use thestylesproperty to write inline styles in Sass syntax.
4. Optimize Your Code for Production
ng build --prod is a command used in Angular CLI to build an Angular application for production. The --prod flag tells the CLI to use the production environment configuration and to apply
various optimizations to the build process.
When building for production, it’s important to ensure that the application is optimized for performance and size. The ng build --prod command applies several optimizations such as minification, tree shaking and
Ahead-of-Time (AOT) compilation to reduce the size of the application and improve its performance.
Using ng build --prod is a best practice when deploying an Angular application to a production environment. It ensures that the application is optimized and ready for use by end users.
5. Use ng generate to Save Time and Avoid Errors
ng generate is a command used in Angular CLI to generate new files and artifacts for an Angular application. It can be used to generate a variety of different artifacts such as components, services, directives and more.
Using ng generate is a best practice when creating new artifacts for an Angular application. It ensures that the new files are created in the correct location and follow the recommended structure and naming conventions.
6. Enhance Your App with Ease with ng add
ng add is a command in Angular CLI that allows you to add new libraries or packages to your Angular application. It automates the installation and configuration process, making it easier to integrate new features into
your project. Using
ng add is a best practice when adding new libraries to an Angular application, as it ensures that the library is installed correctly and configured properly.
7. Work Faster and Smarter with Shortcuts
It’s always helpful to know some shortcuts to speed up your workflow. For example, instead of typing out ng generate component, you can simply use the shortcut ng g c to quickly
generate a new component.
Here are some more helpful shortcuts:
ng g s: Shortcut forng generate service, used to generate a new service.ng g m: Shortcut forng generate module, used to generate a new module.ng g d: Shortcut forng generate directive, used to generate a new directive.ng g p: Shortcut forng generate pipe, used to generate a new pipe.
These shortcuts can save you time and make it easier to work with Angular CLI.
8. Share Your Code Across Projects
When working with Angular CLI, you might want to create a new library to share code across multiple projects within your workspace. To do this, you can use the ng generate library command. This command creates a new
project in the projects/ folder of your workspace, where you can develop and publish a reusable library. By using ng generate library, you can ensure that your new library is set
up correctly and follows the recommended structure and conventions.
9. Store Info About the Build Process to Keep Your App Running Smoothly
You can use the ng build --stats-json command to create a file called stats.json. This file has a lot of useful information about your app’s build, like how big the bundles are
and what’s in them. You can use this file with tools like webpack-bundle-analyzer to see what’s taking up space in your app and find ways to make it smaller and faster. It’s a great way to keep
your app running smoothly!
10. Ensure Your Code Works as Expected
Angular CLI provides a command ng test to run unit tests in a project. This command executes the Karma test runner, which is configured with the karma.conf.js file in the project’s
root directory.
For example, let’s say we have a simple component that displays a message:
import { Component } from '@angular/core';

@Component({
  selector: 'app-hello',
  template: '<h1>Hello, {{name}}!</h1>'
})
export class HelloComponent {
  name = 'World';
}
We can write a unit test for this component to check if it displays the correct message:
import { TestBed } from '@angular/core/testing';
import { HelloComponent } from './hello.component';

describe('HelloComponent', () => {
  beforeEach(() => {
    TestBed.configureTestingModule({
      declarations: [HelloComponent]
    });
  });

  it('should display the correct message', () => {
    const fixture = TestBed.createComponent(HelloComponent);
    fixture.detectChanges();
    const compiled = fixture.debugElement.nativeElement;
    expect(compiled.querySelector('h1').textContent).toContain('Hello, World!');
  });
});
Output
Using ng test is a great way to ensure that our code is working correctly and to catch any issues early on in development.
For more robust unit testing options, check out Progress Telerik JustMock.
Final Words
In conclusion, Angular CLI is a powerful tool that can help developers streamline their workflow and optimize their Angular applications. By following the best practices and pro tips outlined in this article, developers can take full advantage of the features and capabilities of Angular CLI to create high-quality, performant applications.
Remember to always keep learning and experimenting with new techniques to continuously improve your skills and your projects.