Test-driven development (TDD) is a software creation process used by many developers to write quality code. Check out in this article how TDD works and how to implement it in a .NET application.
Many developers have used TDD to create software with extreme quality because through this methodology it is possible to avoid future problems. Despite it being well known, many professionals do not use TDD because they believe it is complicated or difficult to implement.
In this post, we will have an introduction to what TDD is, and we will create a .NET application using this approach in a simple and clear way.
What Does TDD Mean?
Test-driven development (TDD) is a software development process or methodology where the developer basically starts the creation of the software through unit tests—unlike traditional approaches, where the software is developed and only at the end are test cases created to ensure successful implementation.
This process was introduced as part of a software design paradigm known as Extreme Programming (XP), which is part of the Agile software development methodology.
Why Should We Test?
The main reason why we must test our applications is that through previously executed tests, we guarantee that what the software proposes to do is working correctly.
A very common question when talking about unit tests is how to test something external, such as the return of an API that does not have an approval environment for example. To solve this problem, there are approaches such as the use of mocks that help to simulate almost any situation.
It is very common to find software that doesn’t work, that has bugs that are very easy to solve, and maybe a simple warning message would solve many problems faced by the customer service team. By making use of TDD, many of these problems are avoided.
Finally, testing the application avoids problems and guarantees the success of an application.
If Testing Is So Important, Why Don’t We Test?
All developers understand that testing the software they produce is important, so why are they often not tested? The main reason is the cost involved in writing tests.
Often the delivery time is short and unit tests do not directly bring value to
the customer, so many project managers decide to sacrifice unit tests to gain development time. Thus another system goes into production without testing and is subject to any failure type.
And when we talk about legacy systems, the problem is even bigger. In many cases, software is written imperatively and with a tight coupling between functions. To receive unit tests, this code would need to be refactored and so more time is spent on refactoring and more regression tests need to be created.
But as much as the cost of writing tests is high, unit tests should always be taken into account. There are many ways to explain to the customer the various advantages that tests bring to projects.
How Is TDD Implemented?
Normally TDD runs in a cycle called “Red Green Refactor.” This cycle consists of three short phases, described below:
- Red: Write a short test that will fail.
- Green: Create enough code to pass the newly written test.
- Refactor: Refactor the code until it is functional and clean.
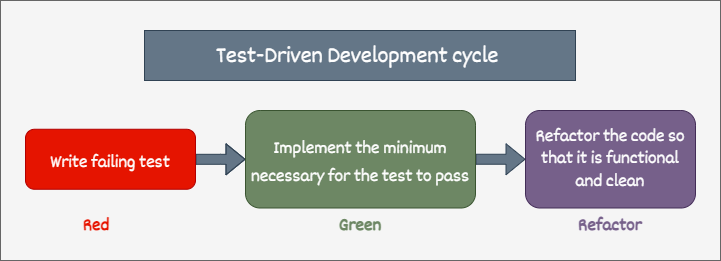
The idea behind this cycle is very simple and succinct.
First, you create a test that meets the necessary outline of what you will want to test for, eventually. This test will obviously fail because the classes and methods don’t exist yet (Red). Then you implement the classes and methods necessary for the test to pass successfully (Green). Lastly, you refactor the code to make it more cohesive and clean (Refactor).
This process can be a little more complex than the traditional approach, but don’t worry—it will ensure that you deliver quality code without worrying about last-minute testing.
Practicing TDD With .NET
Next we will create an application using the TDD approach.
You can access the complete source code of the project at this link: Source Code.
Prerequisites
You’ll need to have:
- .NET 6 SDK
- Visual Studio 2022
Creating the project in Visual Studio:
- Create new project
- Choose ASP.NET Core Web API
- Name : TDDExampleApp
- Next
- Choose .NET 6 (LTS)
- Uncheck the option “Use controllers”
- Create
Creating the project via the command line:
dotnet new web -o TDDExampleAppCreating the Test Project
As a scenario, our app will receive two properties ProductId and Quantity, and will return an entity (Item) with the properties ProductId, Quantity and Available.
If the Quantity is equal to zero, the Available field is equal to false. If the Quantity is greater than zero, the Available field is equal to true.
So we can create the test project in the project solution. For that, if you use Visual Studio, follow the steps below:
- Right-click on the solution
- Add New Project…
- Choose MSTest Test Project
- Next
- Name: TDDExampleApp.Test
- Choose .NET 6 (LTS)
- Create
Implementing the Red Phase
In the Red phase let’s create the unit tests. So rename the “UnitTest1.cs” file created by the test project to “InventoryResponse” and replace the existing code with this:
using Microsoft.VisualStudio.TestTools.UnitTesting;

namespace TDDExampleApp.Test
{
    [TestClass]
    public class InventoryResponse
    {
        [TestMethod]
        public void IfQuantityEqualsZeroReturnsUnavailable()
        {
            //arrange
            string productId = "p93531907";
            decimal quantity = 0;
            bool available = false;

            //act
            var item = new Item(productId, quantity);
            item.Available = available;

            //assert
            Assert.IsNotNull(item);
            Assert.IsTrue(item.Quantity == 0);
            Assert.IsTrue(item.Available == false);
        }

        [TestMethod]
        public void IfQuantityGreaterThanZeroReturnsAvailable()
        {
            //arrange
            string productId = "p93531907";
            decimal quantity = 9;
            bool available = true;

            //act
            var item = new Item(productId, quantity);
            item.Available = available;

            //assert
            Assert.IsNotNull(item);
            Assert.IsTrue(item.Quantity > 0);
            Assert.IsTrue(item.Available == true);
        }
    }
}
In the code above, we create two unit tests to meet the software requirements—which are “If quantity equals zero, the item must be unavailable” and “If the quantity is greater than zero the item must be available.”
As expected, both tests will fail. This is because the “Item” entity does not yet exist. But it shows what we need to safely implement the application’s requirements. After all, for the Item class to be instantiated, its constructor
must receive the required arguments, in this case the ProductId and Quantity properties.
So we can move on to the next Green phase, where we will implement the classes and methods necessary for the tests to pass successfully.
Implementing the Green Phase
First of all, for the tests to pass successfully, we need to create a class for the Item entity, with the properties ProductId and Quantity. And Available will also be necessary to create a constructor
for this class that contains the arguments ProductId and Quantity. Lastly, we need a method to check if the item is available.
So, create in the “TDDExampleApp” project a new folder called Models. Inside it, create a new folder called Response, and inside that folder create the class below:
Item
namespace TDDExampleApp.Models.Response;

public class Item
{
    public string ProductId { get; set; }
    public decimal Quantity { get; set; }
    public bool Available { get; set; }

    public Item(string productId, decimal quantity)
    {
        ProductId = productId;
        Quantity = quantity;
    }

    public bool AvailableVerify(decimal quantity) => quantity > 0;
}
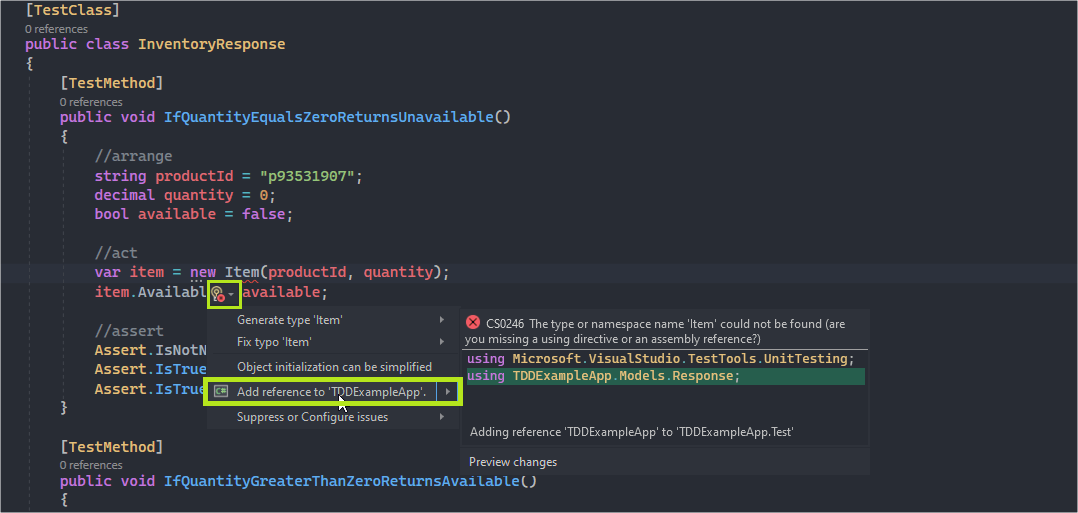
Finally, add the Item class reference to the test project, as in the image below:
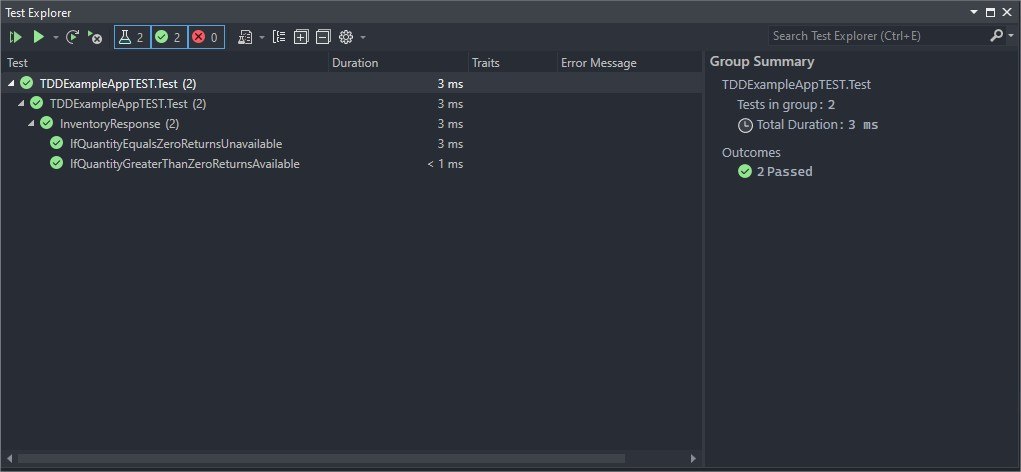
If you run the tests, you will see that now they pass successfully as in the image below, as the necessary conditions for this are implemented and thus the Green phase ends.
Implementing the Refactor Phase
In the last phase, we need to refactor the code to match what we need. First, we need to use the verification method created in the model class. For that, in the two test methods, below where the “item” variable is created, add the following line of code:
available = item.AvailableVerify(item.Quantity);
We also need to create the rest of the code for the API to be functional. So inside the “Models” folder create a new folder called “Request,” and inside it add the class below:
RequestItem
namespace TDDExampleApp.Models.Request;
public class RequestItem
{
    public string ProductId { get; set; }
    public decimal Quantity { get; set; }
}
And finally, in the Program.cs file add the API endpoint:
app.MapPost("/inventory/available-verify", (TDDExampleApp.Models.Request.RequestItem requestItem) =>
{
    var responseItem = new TDDExampleApp.Models.Response.Item(requestItem.ProductId, requestItem.Quantity);

    bool available = responseItem.AvailableVerify(responseItem.Quantity);
    responseItem.Available = available;

    return responseItem;
})
.WithName<RouteHandlerBuilder>("InventoryAvailableVerify");
Executing the Project
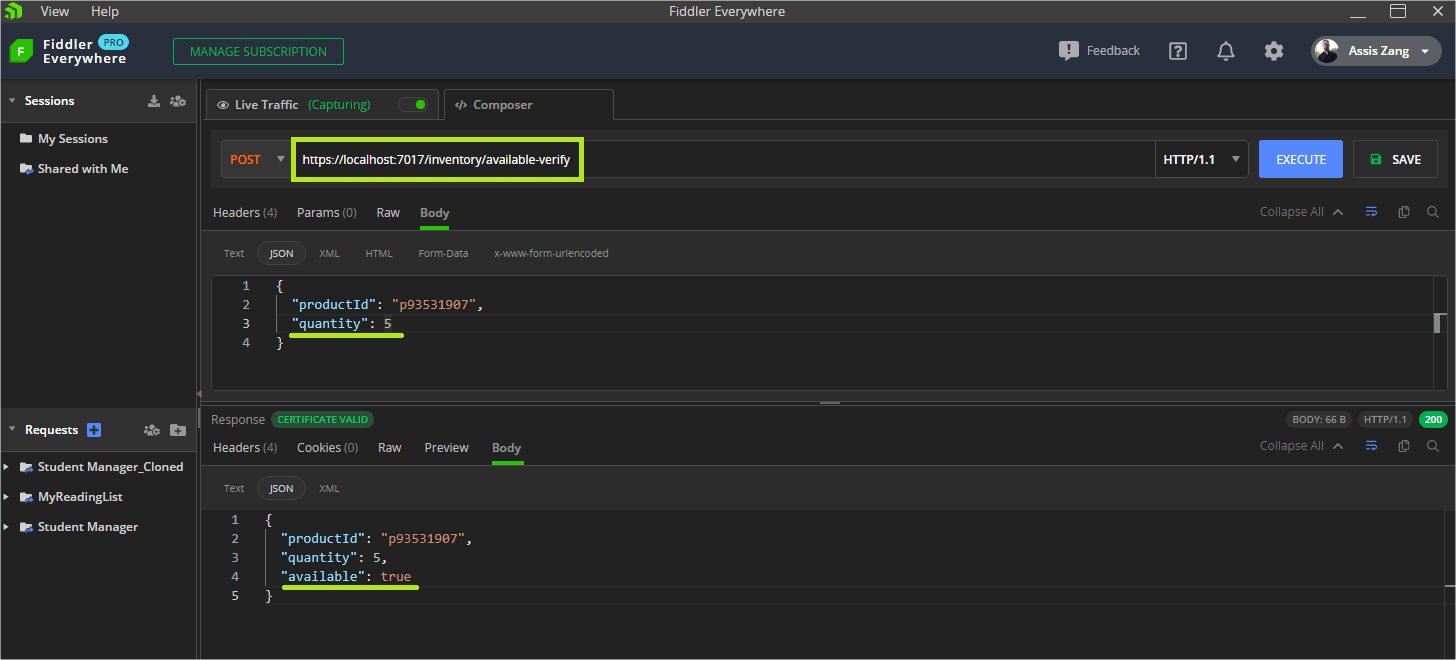
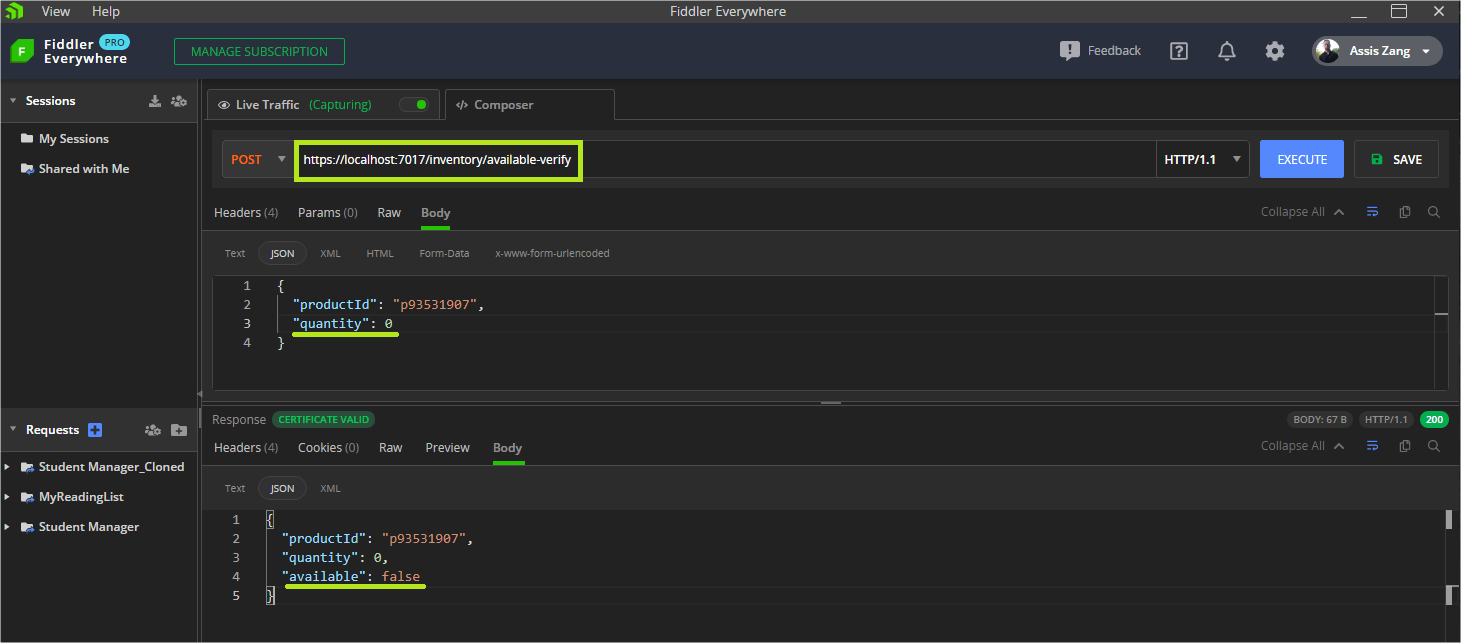
Now, our API is 100% functional. Just run the project and make a request. In the images below, I am using Fiddler Everywhere, a powerful secure web debugging proxy, to demonstrate what the requests return.
Request 1 – When we send a request with a Quantity greater than zero, the Available field returns true.
Request 2 – When we send the request with an amount equal to zero, the Available field returns false.
So we finalized our API, which is now fully functional and with its automated tests.
Conclusion
TDD is a software development process that focuses on building systems with extreme quality. This process consists of three phases: Red, Green and Refactor.
Its use is highly recommended as it avoids many problems caused by bad quality code and can predict possible failures.
If you want to delve into the subject, there is a lot of content related to TDD. Following are some of the tools and concepts you could look into:
- Extreme Programming (XP)
- .NET Test Frameworks (MS Test, XUnit, NUnit)
- Mock (Telerik JustMock)
- S.O.L.I.D.
- BDD (Behavior-Driven Development)
