Looking for an easy and versatile approach for processing the properties of any .NET object with the help of automatically generated built-in editors? All that plus the support for nesting and customizing the property definitions, and, of course, the capability to keep it all organized. You got it.
Ahoy, .NET lovers! How many instances of Visual Studio do you have running right at this moment? I bet it’s not just one, and I bet the Properties view is one of the things you use at least once a day. Yes, this one:
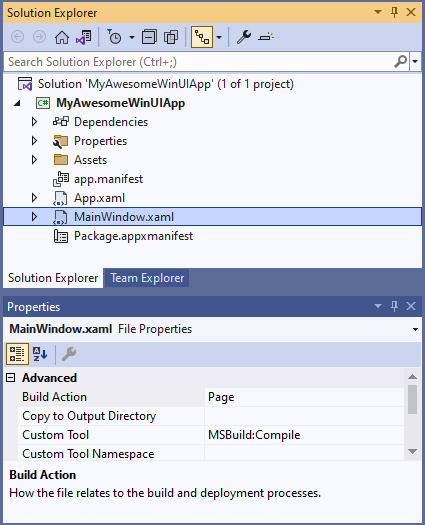
Wanna have it in your WinUI apps, too? Well, step aside and make some noise as the PropertyGrid comes through! Let’s examine the brightest star of the Telerik UI for WinUI’s 2.2.0 release together.
What To Expect?
An easy and versatile approach for processing the properties of any .NET object with the help of automatically generated built-in editors. Support for nested properties, as well as ability to customize the property definitions and the corresponding data editors. And last, but not least, the capability to organize the properties using sorting, grouping and filtering (searching). Read on in the next sections.
Where To Start?
You will not need any professional training before diving in the deep, but you will need a WinUI project and a reference to the Telerik.WinUI.Controls.dll assembly. And one more essential thing—a proper Item to assign to the PropertyGrid. Let’s try it out.
Here is a simple DataInfo class with various property types:
public class DataInfo
{
public int IntegerValue { get; set; }
public string StringValue { get; set; }
public bool BoolValue { get; set; }
public DateTime DateTimeValue { get; set; }
public MyEnum EnumValue { get; set; }
public ObservableCollection<string> StringsCollection { get; set; }
}

public enum MyEnum
{
ValueA,
ValueB,
ValueC
}
What’s left is to create an instance of it and assign it to the PropertyGrid’s Item property:
this.propertyGrid.Item = new DataInfo()
{
IntegerValue = 7,
StringValue = "My String Value",
BoolValue = true,
DateTimeValue = DateTime.Today,
EnumValue = MyEnum.ValueA,
StringsCollection = new ObservableCollection<string>() { "Collection Item 1", "Collection Item 2", "Collection Item 3" }
};
Ooops, but where is the PropertyGrid?
<telerikControls:RadPropertyGrid x:Name="propertyGrid"/>Eager to see what our powers of wizardry created?
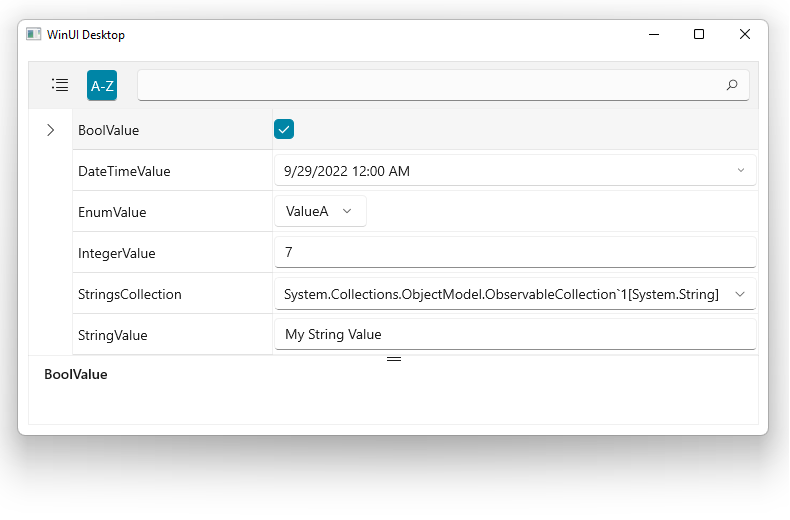
If this System.Collections.ObjectModel.ObservableCollection1[System.String] annoys you, here is the cure:
public class CoolerObservableCollection : ObservableCollection<string>
{
    public override string ToString()
    {
        return "MyAwesomeCollection";
    }
}
And then, change the StringsCollection to be of type CoolerObservableCollection. The result will be as follows:
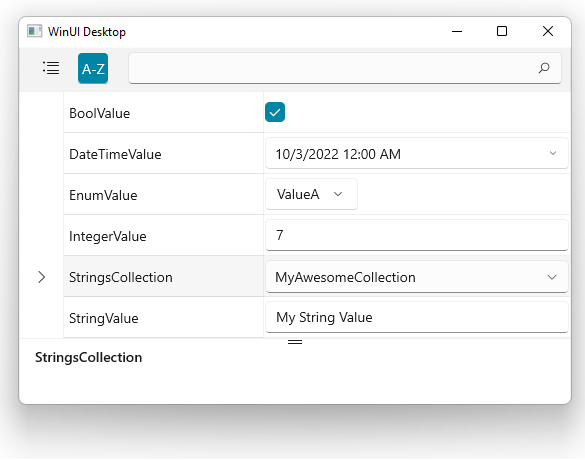
While we’re on the collections topic, here is another bonus: collection boosters. I am talking about the CollectionEditor and CollectionEditorPicker—two components used for visualizing the items in a collection and generating editors for each property using—guess what!—the built-in PropertyGrid control.
There is one more—the CollectionNavigator—which is a component providing seamless navigation and editing of a collection, plus built-in customizable commands, predefined customizable buttons and more. Be sure to check out the CollectionEditor and CollectionNavigator sections in the help documentation.
Now, let’s get back to the property grid and extend the data a little to peek at the nest.
What’s Inside the Nest?
The first thing that got to my mind was to create a simple system permissions class:
public class SystemPermissionsInfo
{
public bool CanRead { get; set; }
public bool CanWrite { get; set; }
public bool CanModify { get; set; }
}
Shall we add that to the DataInfo?
public SystemPermissionsInfo SystemPermissions { get; set; }And, of course, to the Item:
SystemPermissions = new SystemPermissionsInfo() { CanRead = true, CanWrite = false, CanModify = false }Don’t forget to set the NestedPropertiesVisibility to Visible like I did, because the only nest you will see is going to be an empty one.
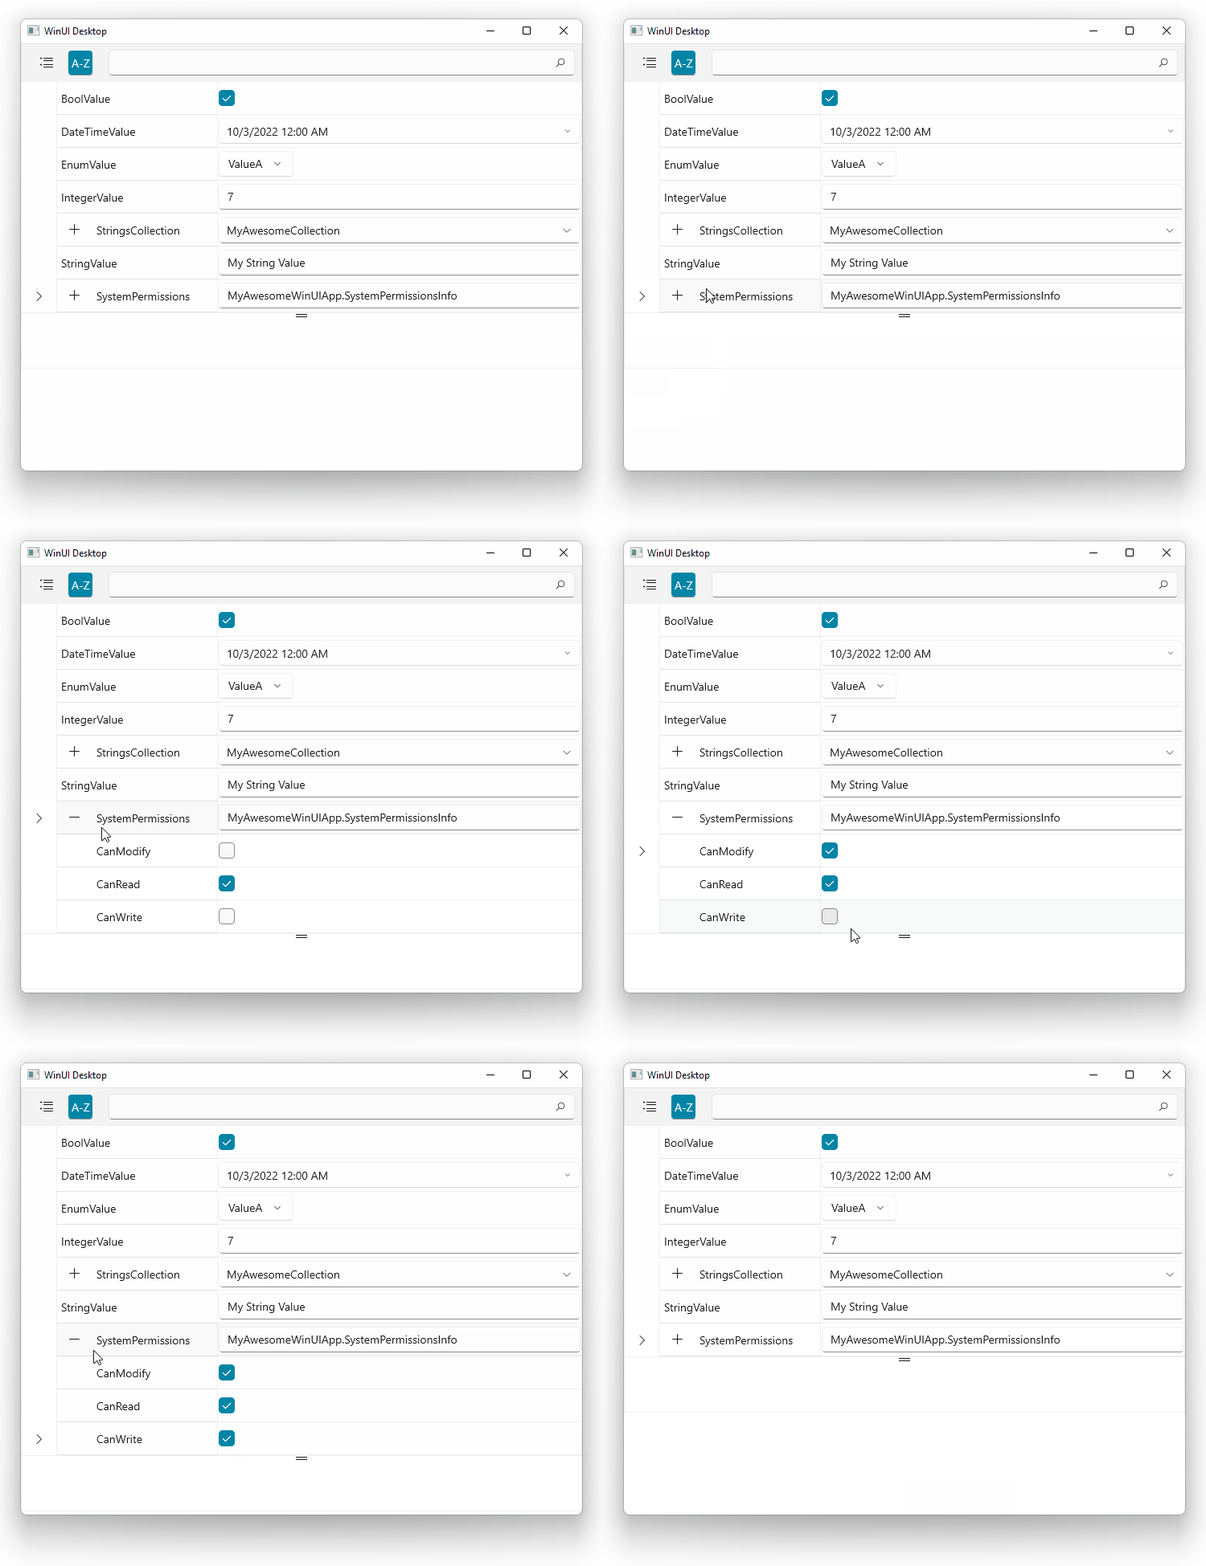
In the above GIF, you not only saw what’s inside the nest, but you also witnessed that the PropertyGrid allows for editing the property values displayed in the UI. You should totally check out the Editing section of the control’s online documentation to learn the tips and tricks for adjusting the editing process.
I think that a great possibility here would be to change the editor templates for the system permissions. Follow me.
<telerikControls:RadPropertyGrid x:Name="propertyGrid2"
                                 NestedPropertiesVisibility="Visible"
                                 AutoGeneratePropertyDefinitions="False"
                                 Margin="20">
    <telerikControls:RadPropertyGrid.PropertyDefinitions>
        <propertyGrid:PropertyDefinition DisplayName="SystemPermissions"
                                         Binding="{Binding SystemPermissions}">
            <propertyGrid:PropertyDefinition.NestedProperties>
                <propertyGrid:PropertyDefinition DisplayName="CanRead" Binding="{Binding CanRead}">
                    <propertyGrid:PropertyDefinition.EditorTemplate>
                        <DataTemplate>
                            <ToggleSwitch IsOn="{Binding SystemPermissions.CanRead, Mode=TwoWay}"/>
                        </DataTemplate>
                    </propertyGrid:PropertyDefinition.EditorTemplate>
                </propertyGrid:PropertyDefinition>
                <propertyGrid:PropertyDefinition DisplayName="CanWrite" Binding="{Binding CanWrite}">
                    <propertyGrid:PropertyDefinition.EditorTemplate>
                        <DataTemplate>
                            <ToggleSwitch IsOn="{Binding SystemPermissions.CanWrite, Mode=TwoWay}"/>
                        </DataTemplate>
                    </propertyGrid:PropertyDefinition.EditorTemplate>
                </propertyGrid:PropertyDefinition>
                <propertyGrid:PropertyDefinition DisplayName="CanModify" Binding="{Binding CanModify}">
                    <propertyGrid:PropertyDefinition.EditorTemplate>
                        <DataTemplate>
                            <ToggleSwitch IsOn="{Binding SystemPermissions.CanModify, Mode=TwoWay}"/>
                        </DataTemplate>
                    </propertyGrid:PropertyDefinition.EditorTemplate>
                </propertyGrid:PropertyDefinition>
            </propertyGrid:PropertyDefinition.NestedProperties>
        </propertyGrid:PropertyDefinition>
    </telerikControls:RadPropertyGrid.PropertyDefinitions>
</telerikControls:RadPropertyGrid>
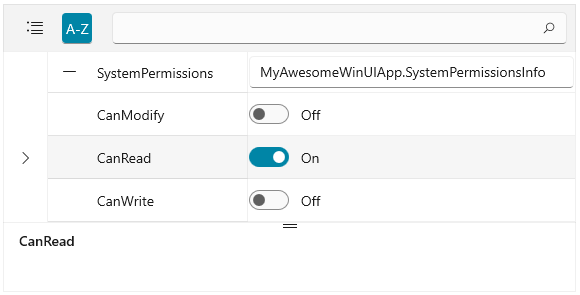
Yep, I created a second instance of the PropertyGrid and changed the editors for my permissions to ToggleSwitch instead of CheckBox. See how cool it is:
The Range of Arrangement
At the very start of my blog, I listed some expectations. For all these to be met, I need to show you the range of arrangement that the property grid offers. I told you that you can organize the properties through three very common and essential operations—sorting, grouping and filtering (searching).
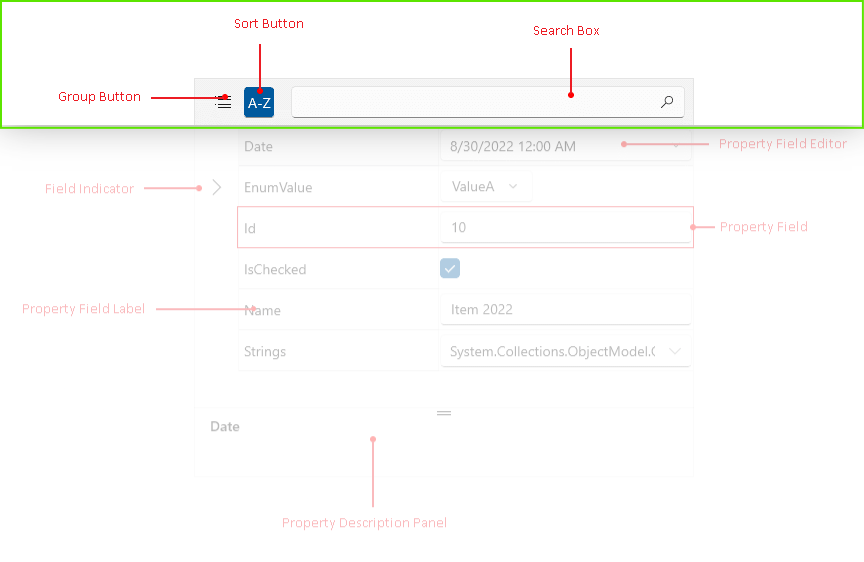
This is the visual structure of the PropertyGrid, but the focus is on the visual elements responsible for the above-mentioned operations. I got a great idea where you can see them all in action.
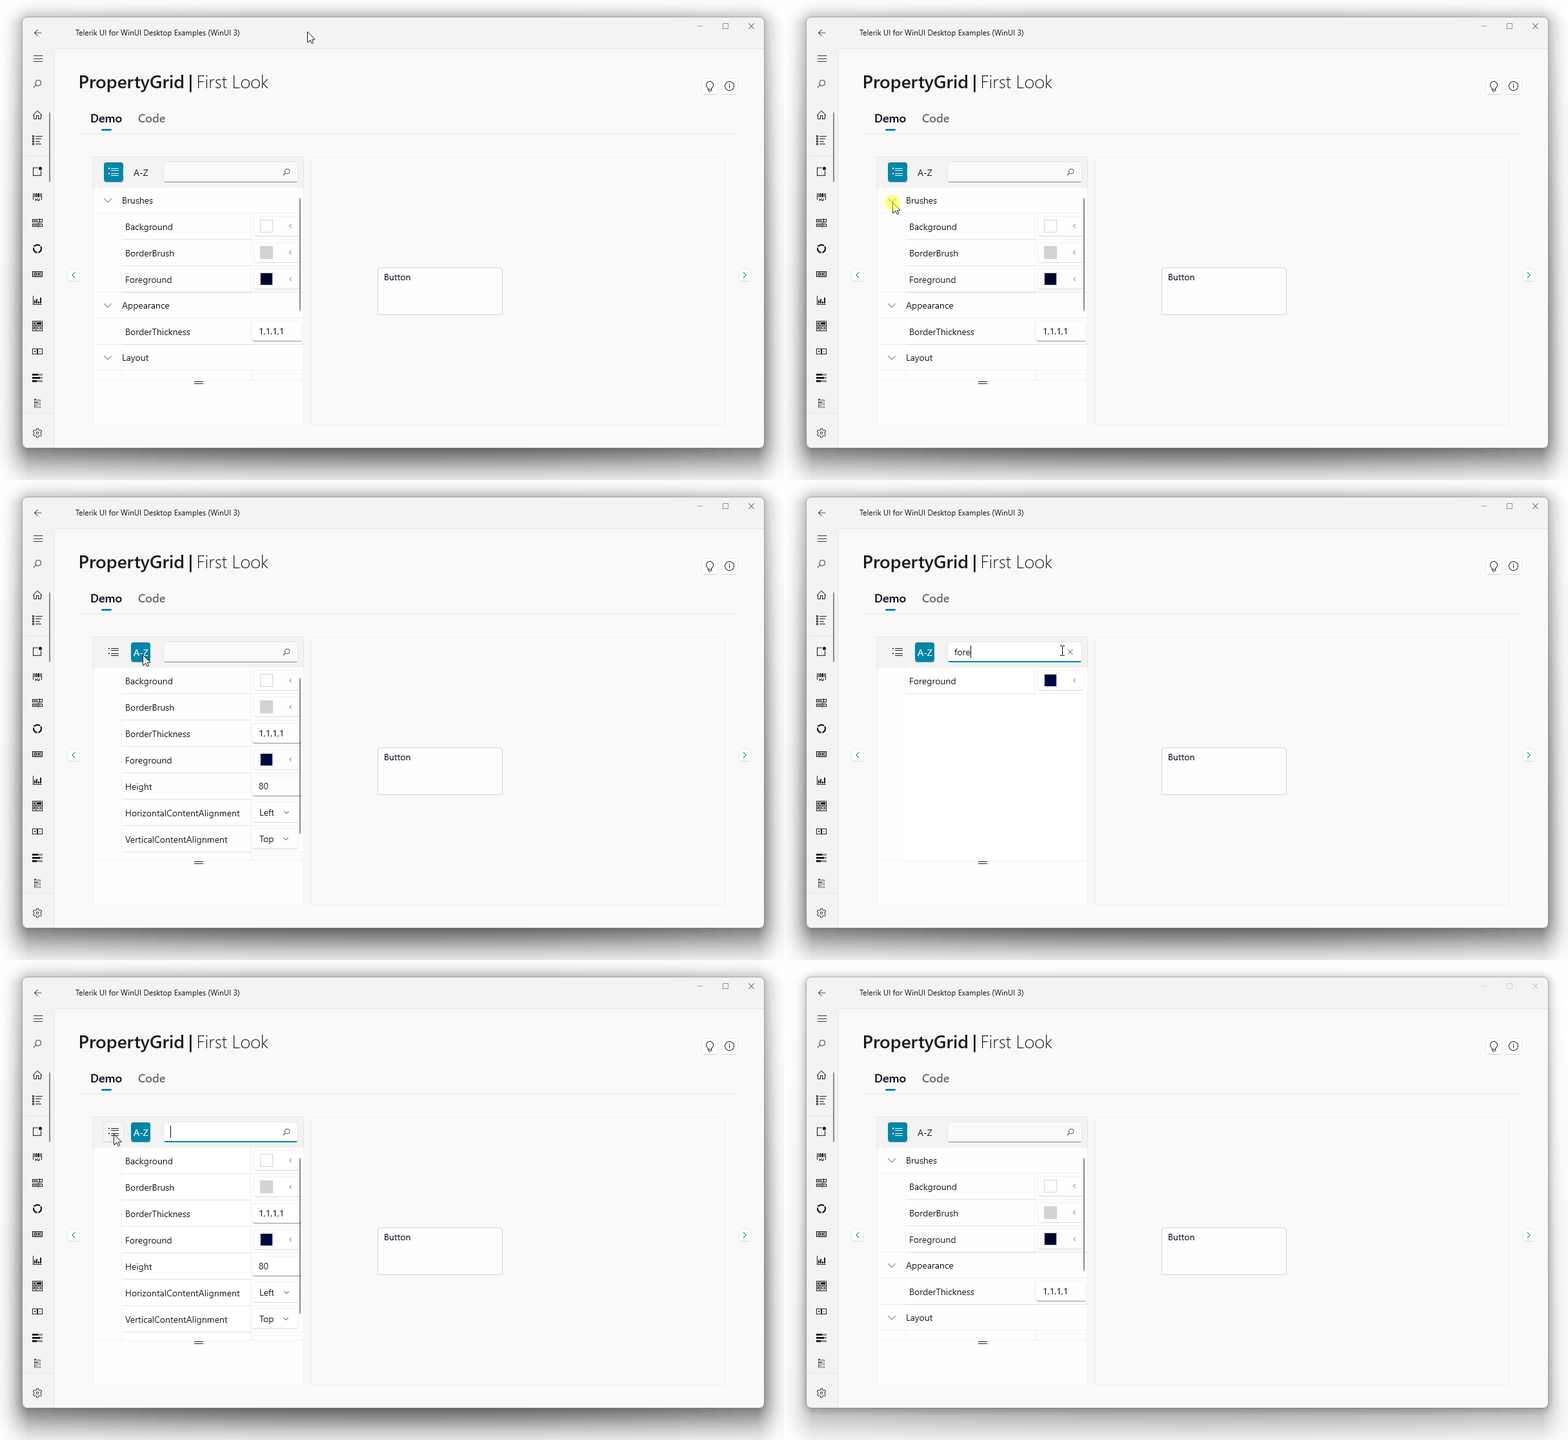
Ladies and gentlemen, this is just the First Look demo of this awesome component—there is more. Be sure to get the demos app and check the rest—it is totally worth it.
Be at the Wheel
Your feedback is very important since it helps us hear your voice and determine the direction to take with the development of the products. If you’d like to add or change something, do not stand still—share your thoughts in the comments below or use the Feedback Portal.
Plug the PropertyGrid in your WinUI app and let us know what impression it made. Existing customers can access the bits of Telerik UI for WinUI in their Telerik account. New users—follow the link below.