In this post, we will look into the Angular onChanges lifecycle hook and how we can use it in our workflows.
What Are Lifecycle Hooks?
Lifecycle hooks are basically methods used to respond to events within the lifecycle of a component—that is from before the component is added to the DOM, when the component is added, all the way to after it has been removed from the DOM. These
include:
changes, init, doCheck, afterContentInit, afterContentChecked, afterViewInit, afterViewChecked, onDestroy.
What Is Angular onChanges?
According to the official Angular Docs, the onChanges lifecycle hook is called when any data-bound property of a directive changes. You use it by
defining an ngOnChanges() method to handle the changes.
interface OnChanges {
  ngOnChanges(changes: SimpleChanges): void
}
It is usually called first before ngOnInit and then subsequently after any input property change.
What We Are Building
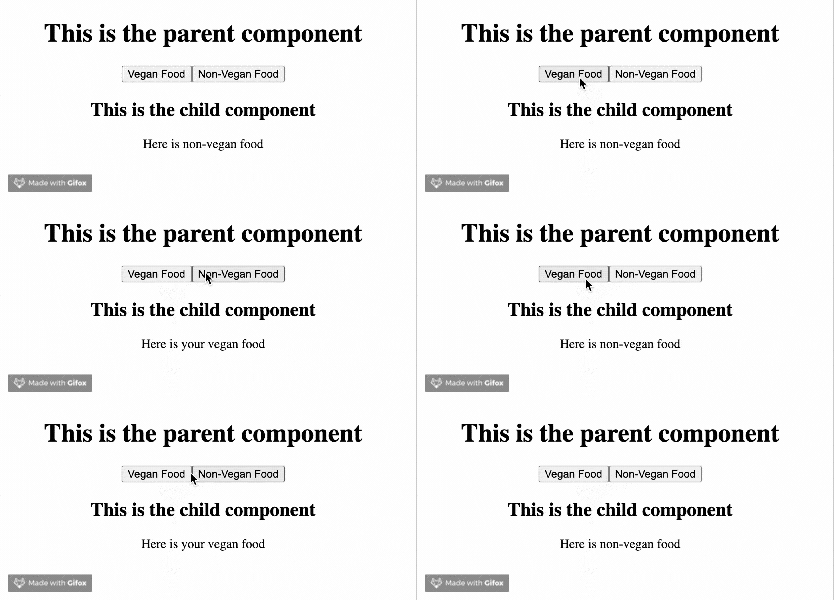
We are building a simple restaurant order application that serves vegan and non-vegan food. We will use it to then illustrate how we can use the onChanges lifecycle hook to handle the changes involved while making a food order.
Prerequisites
To be able to follow through in this article’s demonstration you should have:
- An integrated development environment like VS Code
- Node version 11.0 is installed on your machine
- Node Package Manager version 6.7 (it usually ships with Node installation)
- Angular CLI version 8.0 or above
- Version 12 or above of Angular
Other nice-to-have’s include:
- Working knowledge of the Angular framework at a beginner level.
Getting Started
Start with creating a new Angular project. Open your terminal in the folder of your choice and run this command:
ng new changes
After choosing no routing and CSS, a new Angular project will be created for you inside that folder. By default, this Angular project already has the app component, which we will use as our parent component. We’ll be using the input decorator to pass data from a parent to a child component. Let us create a child component:
ng generate component newcomp
This creates a new component in the source folder of our Angular application.
Your app module.ts file should look exactly like this:
import { BrowserModule } from '@angular/platform-browser';
import { NgModule } from '@angular/core';
import { AppComponent } from './app.component';
import { NewcompComponent } from './newcomp/newcomp.component';
@NgModule({
  declarations: [
    AppComponent,
    NewcompComponent
  ],
  imports: [
    BrowserModule
  ],
  providers: [],
  bootstrap: [AppComponent]
})
export class AppModule { }
Using the Input Decorator
Your app component file should look like this:
import { Component } from '@angular/core';
@Component({
  selector: 'app-root',
  templateUrl: './app.component.html',
  styleUrls: ['./app.component.css']
})
export class AppComponent {
  title = 'changes';
  veganValue = false;
}
We have a veganValue variable defined in the class and set to false. Inside your app component.html file, replace the content with the code block below:
<div style="text-align: center; padding: 30px;">
  <h1>This is the parent component</h1>
  <button (click)="veganValue=true">Vegan Food</button>
  <button (click)="veganValue=false">Non-Vegan Food</button>
  <app-newcomp [vegan]='veganValue'></app-newcomp>
  </div>
Here we are changing the value of veganValue variable depending on what button was clicked. We are also bringing in the newComp here telling Angular to take it as a child component and passing the current value of veganValue to vegan inside the child component. Inside your newcomp component file should look like this:
import { Component, OnInit, Input } from '@angular/core';
@Component({
  selector: 'app-newcomp',
  templateUrl: './newcomp.component.html',
  styleUrls: ['./newcomp.component.css']
})
export class NewcompComponent implements OnInit {
  @Input() vegan: boolean;
    constructor() { }
  ngOnInit(): void {
    }
  }
Here we are importing input decorator and using it to get the value from the parent component once the component is initialized on the DOM. The newcomp component HTML file should look like this:
<h2>This is the child component</h2>
<h4 *ngIf='!vegan; else elseBlock'>Here is your Chicken wings and fries</h4>
<ng-template #elseBlock><h4>Here is your Vegan salad</h4></ng-template>
Now save all the files and run the Angular serve command:
ng serve

Where ngOnChanges Comes In
What if you wanted to get notified by Angular itself when there is a change on a data-bound input property in the DOM? You can use the Angular onChanges lifecycle hook for that.
This hook receives an object called SimpleChanges, which contains values like:
- Previous value: Which tells you what the previous value was—for a boolean it would be true or false.
- Current value: Which tells you the current value at the moment.
- First change: Which says if this is the first time there is an input property change. This is usually true for the very first time, which is just right before onInit.
Adding ngOnChanges
We have to change the newcomp component from the OnInit lifecycle hook to the onChanges one.
import { Component, Input, OnChanges, SimpleChanges } from '@angular/core';
@Component({
  selector: 'app-newcomp',
  templateUrl: './newcomp.component.html',
  styleUrls: ['./newcomp.component.css']
})
export class NewcompComponent implements OnChanges {
  message: string
  @Input() vegan: boolean;
  constructor() { }
ngOnChanges(changes: SimpleChanges) {
    console.log(changes);
    const veganValue = changes['vegan'];
    if (veganValue.currentValue === true) {
      this.message = 'Here is your vegan food';
    } else {
      this.message = 'Here is non-vegan food';
    }
  }
}
Here we are bringing in the onChanges and the SimpleChanges object we earlier talked about. We are using the object variables to set the value of vegan food this time and then assigning it to message.
Change the content of the newcomp component HTML file to this:
<h2>This is the child component</h2>
<p>{{message}}</p>
Now if you save all the files and look at the browser console, you can see that object is logged.


Wrapping Up
You have learned about ngOnChanges lifecycle hook in Angular and where it can be used. You also saw the simpleChanges object and how useful it can be for writing logic that executes based on input property changes in your DOM.
Happy hacking!
Next up, you may want to check out our data binding series for Angular. Here is Part 1: Interpolation.