Web APIs are common especially in .NET development. But a question many developers have is how the endpoints of an API are consumed—that is, how is a Web API integrated with another application? In this article, we will do this integration in a simple way.
Web APIs are present in most modern systems due to their high performance and ease of integration between different systems. In this context, there is a lot of content available related to APIs, but a very common question, especially for ASP.NET Core beginners, is how to integrate with an API and consume its endpoints. In this article, we will create from scratch a simple Web API and an application in ASP.NET Core and integrate it with this API in a simple way.
Useful Information
The focus of this article will be the integration between a Web API and an ASP.NET Core application, so some subjects will not be covered in detail, such as “What is a Web API” for example. Feel free to browse the blog and deepen your knowledge of these subjects, if that is your objective.
Instead, we will take a hands-on approach and focus on the details of the integration between these technologies.
You can access the complete source code of the final project at this link.
Creating the Solution and Web API Project
First, we will create the solution project, then we will create the Web API project—in this case, a minimal API available in .NET 6—and add it to the solution. So, in the terminal run the following commands:
dotnet new sln --name WeatherForecast
dotnet new web --name WeatherForecast.Web.Api
dotnet sln add WeatherForecast.Web.Api/
Then you can open the file “WeatherForecast.sln” with your favorite IDE. In this article, I’ll use Visual Studio 2022.
Creating the Solution Entity
Our API will provide dummy weather data. Bellow, we will create an entity that will receive the properties, which will be displayed by the ASP.NET application that we will create later. So, inside the API project create a folder called “Models” and inside it create a class called “WeatherForecastModel.” Replace the generated code with the code below:
namespace WeatherForecast.Web.Api.Models
{
    public class WeatherForecastModel
    {
        public DateTime Date { get; set; }
        public int TemperatureC { get; set; }
        public int TemperatureF => 32 + (int)(TemperatureC / 0.5556);
        public string Summary { get; set; }
    }
}
Creating the Endpoints
Minimal APIs allow us to place the endpoints directly in the Program class; however, to make the code more organized, we will create them in a separate class. So, create a folder called “Endpoints.” Inside that, create a new class called “LocationEndpointsConfig” and replace the code with the below:
using WeatherForecast.Web.Api.Models;

namespace WeatherForecast.Web.Api.Endpoints
{
    public class LocationEndpointsConfig
    {
        private static readonly string[] Summaries = new[]
        {
            "Freezing", "Bracing", "Chilly", "Cool", "Mild", "Warm", "Balmy", "Hot", "Sweltering", "Scorching"
        };

        public static void AddEndpoints(WebApplication app)
        {
            app.MapGet("api/find", () =>
            {
                var rng = new Random();
                var weatherForecast = Enumerable.Range(1, 5).Select(index => new WeatherForecastModel
                {
                    Date = DateTime.Now.AddDays(index),
                    TemperatureC = rng.Next(-20, 55),
                    Summary = Summaries[rng.Next(Summaries.Length)]
                })
                .ToArray();

                return Results.Ok(weatherForecast);
            });
        }
    }
}
In this class, we are creating a GET endpoint that will generate some random data and return a “WeatherForecastModel” array filled with the generated data.
Configuring the Endpoints
Now that we’ve created the endpoint needed to return the data, we’ll add the configuration of the class that has the endpoints. So replace the code of the “Program” class with the code below:
using WeatherForecast.Web.Api.Endpoints;

var builder = WebApplication.CreateBuilder(args);
builder.Services.AddEndpointsApiExplorer();

var app = builder.Build();

LocationEndpointsConfig.AddEndpoints(app);

app.Run();
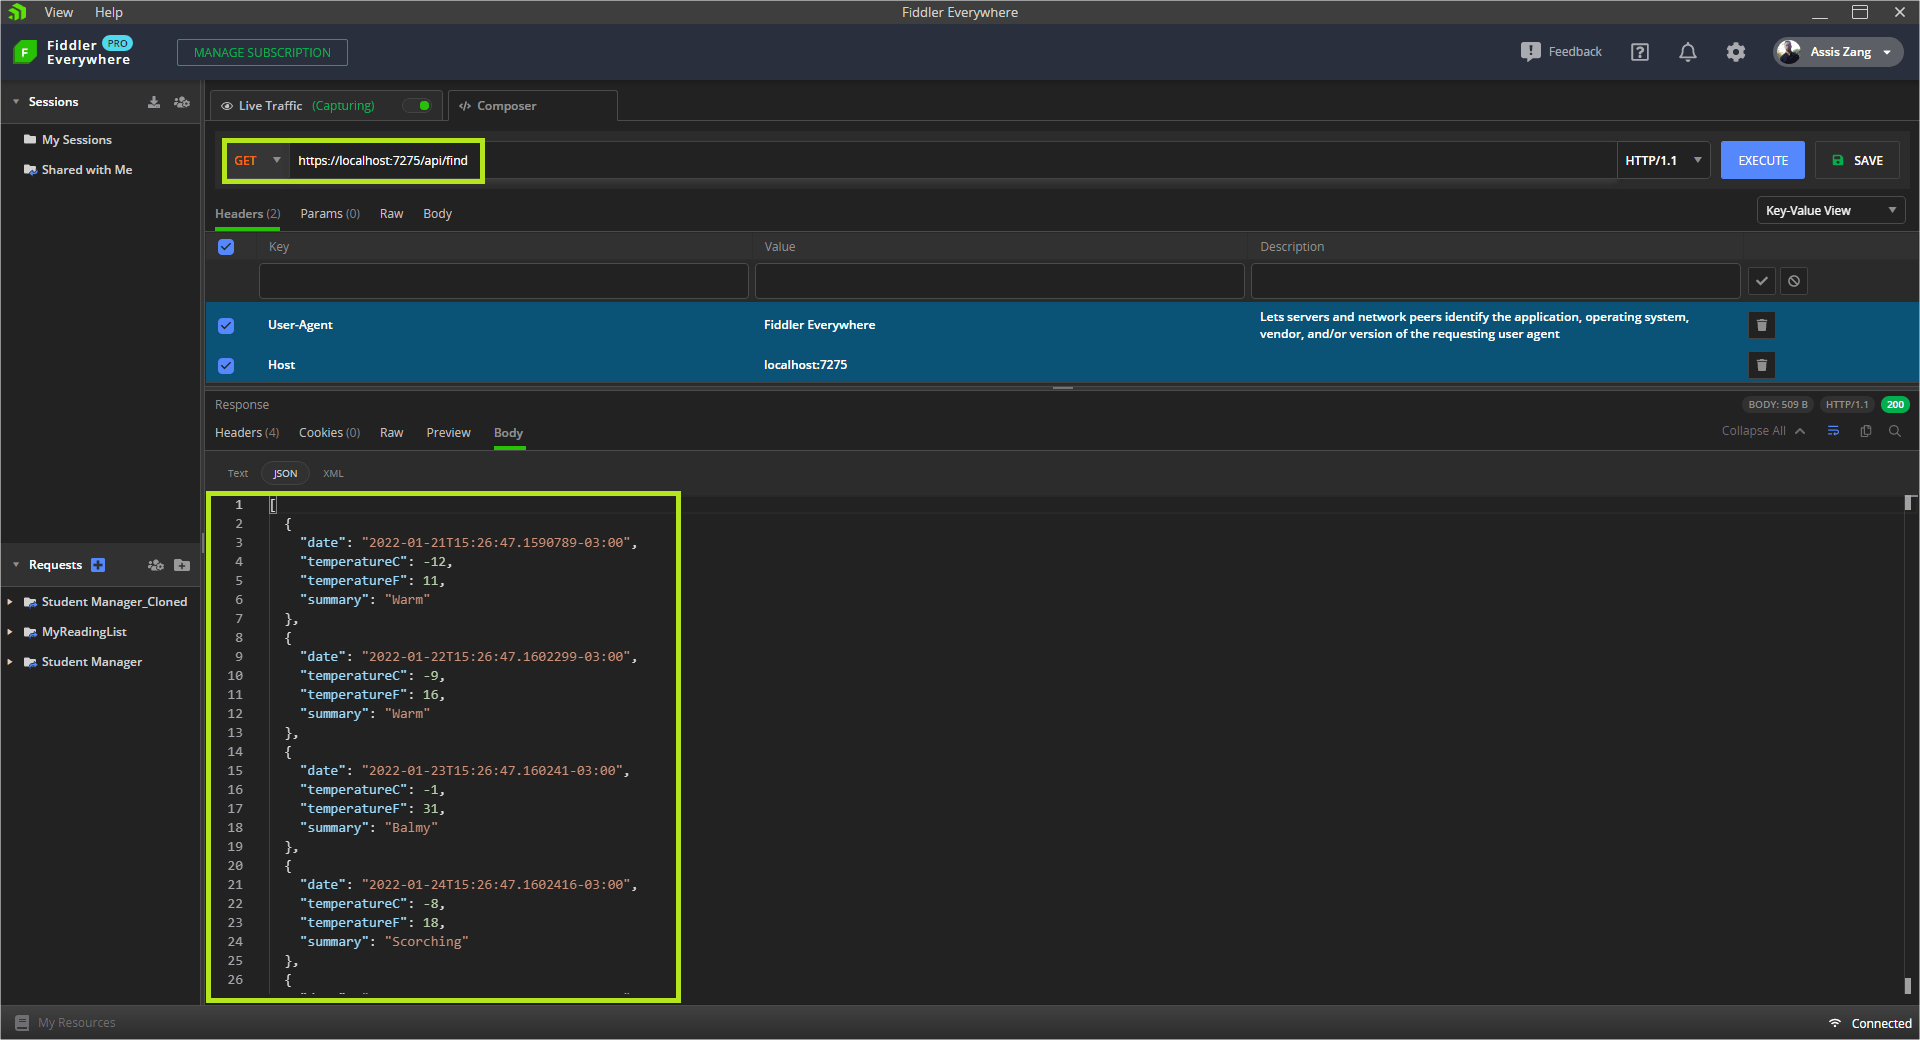
And then we can run the project. If we access the address “https://localhost:<PORT NUMBER>/api/find,” we will have the result below. In this article, Fiddler Everywhere will be used to consume the endpoint.
(As the data is random, it will probably be different on your machine.)
With that, our Web API is ready and working. Now we need to create the application that will consume the endpoint we created.
Creating the Web App Project
To consume the endpoint created earlier, we will create a simple application in ASP.NET Core MVC, which will make a request to the API and display the returned data. So, in the same directory where you created the API project, run the commands below, which will create the application project and add it to the solution.
dotnet new mvc --name WeatherForecast.Web

dotnet sln add WeatherForecast.Web/
Creating the Web App Entity
In the “WeatherForecast.Web” project inside the “Models” folder create a new class called “WeatherForecastModel,” and replace the generated code with the code below:
namespace WeatherForecast.Web.Models
{
    public class WeatherForecastModel
    {
        public DateTime Date { get; set; }
        public int TemperatureC { get; set; }
        public int TemperatureF { get; set; }
        public string Summary { get; set; }
    }
}
Creating the Client
The client will be responsible for direct communication with the API. It will contain a static method responsible for deserializing the API response and formatting it.
So, create a new folder called “Helpers” and add in it a new class called “HttpClientExtensions,” where you can replace the generated code with the code below:
using System.Text.Json;

namespace WeatherForecast.Web.Helpers
{
    public static class HttpClientExtensions
    {
        public static async Task<T> ReadContentAsync<T>(this HttpResponseMessage response)
        {
            if (response.IsSuccessStatusCode == false)
                throw new ApplicationException($"Something went wrong calling the API: {response.ReasonPhrase}");

            var dataAsString = await response.Content.ReadAsStringAsync().ConfigureAwait(false);

            var result = JsonSerializer.Deserialize<T>(
                dataAsString, new JsonSerializerOptions
                {
                    PropertyNameCaseInsensitive = true
                });

            return result;
        }
    }
}
Creating the Service
The service class will be responsible for implementing the methods available in the client we just created—in this case, fetching the data through the API.
So, create a new folder called “Services” and inside it, a folder called “Interfaces.” Inside that folder, create a new interface called “IWeatherForecastService” and replace the generated code with the code below:
using WeatherForecast.Web.Models;

namespace WeatherForecast.Web.Services.Interfaces
{
    public interface IWeatherForecastService
    {
        Task<IEnumerable<WeatherForecastModel>> Find();
    }
}
Now we will create the class that will implement the previous Interface. It will also consume the API endpoint through the route represented by the “BasePath” variable.
Inside the “Services” folder, create a class called “WeatherForecastService” and replace the generated code with the one below:
using WeatherForecast.Web.Models;
using WeatherForecast.Web.Helpers;
using WeatherForecast.Web.Services.Interfaces;

namespace WeatherForecast.Web.Services
{
    public class WeatherForecastService : IWeatherForecastService
    {
        private readonly HttpClient _client;
        public const string BasePath = "/api/find";

        public WeatherForecastService(HttpClient client)
        {
            _client = client ?? throw new ArgumentNullException(nameof(client));
        }

        public async Task<IEnumerable<WeatherForecastModel>> Find()
        {
            var response = await _client.GetAsync(BasePath);

            return await response.ReadContentAsync<List<WeatherForecastModel>>();
        }
    }
}
Creating the Controller
The new controller will use the service method we just created and return the data to the frontend. So, inside the Controllers folder, create a new controller called “WeatherForecastController,” and replace your code with the lines below:
using Microsoft.AspNetCore.Mvc;
using WeatherForecast.Web.Services.Interfaces;

namespace WeatherForecast.Web.Controllers
{
    public class WeatherForecastController : Controller
    {
        private readonly IWeatherForecastService _service;

        public WeatherForecastController(IWeatherForecastService service)
        {
            _service = service ?? throw new ArgumentNullException(nameof(service));
        }

        public async Task<IActionResult> WeatherForecastIndex()
        {
            var products = await _service.Find();
            return View(products);
        }
    }
}
Adding Service Settings
Now that we’ve created the client, service and controller, we need to add their settings to the Program class. So, replace the code of the Program class with the block below. (Replace “<PORT NUMBER>” with
the local API port.)
using WeatherForecast.Web.Services;
using WeatherForecast.Web.Services.Interfaces;

var builder = WebApplication.CreateBuilder(args);

// Add services to the container.
builder.Services.AddControllersWithViews();
builder.Services.AddHttpClient<IWeatherForecastService, WeatherForecastService>(c =>
c.BaseAddress = new Uri("https://localhost:<PORT NUMBER>/"));

var app = builder.Build();

// Configure the HTTP request pipeline.
if (!app.Environment.IsDevelopment())
{
    app.UseExceptionHandler("/Home/Error");
}
app.UseStaticFiles();

app.UseRouting();

app.UseAuthorization();

app.MapControllerRoute(
    name: "default",
    pattern: "{controller=Home}/{action=Index}/{id?}");

app.Run();
Configuring the Frontend
Our application is almost ready—we just need to configure the data display. For that, inside the “Views” folder, create a folder called “WeatherForecast” and inside it, a new view called “WeatherForecastIndex.cshtml,” where you can put the code below:
@model IEnumerable<WeatherForecast.Web.Models.WeatherForecastModel>

<br/>
<br/>
<table class="table">
        <tdead>
            <tr>
                <th>Date</th>
                <th>Temperature C</th>
                <th>Temperature F</th>
                <th>Summary</th>
            </tr>
        </tdead>
            <tbody>
                @foreach (var item in Model)
               {
                    <tr>
                        <td>@item.Date</td>
                        <td>@item.TemperatureC</td>
                        <td>@item.TemperatureF</td>
                        <td>@item.Summary</td>
                    </tr>
               }
            </tbody>
    </table>
</div>
And in the file Views > Shared > _Layout.cshtml add the following code below the Privacy tag:
<li class="nav-item">
    <a class="nav-link text-dark" asp-area="" asp-controller="WeatherForecast" asp-action="WeatherForecastIndex">Weather Forecast</a>
</li>
Running Both Projects
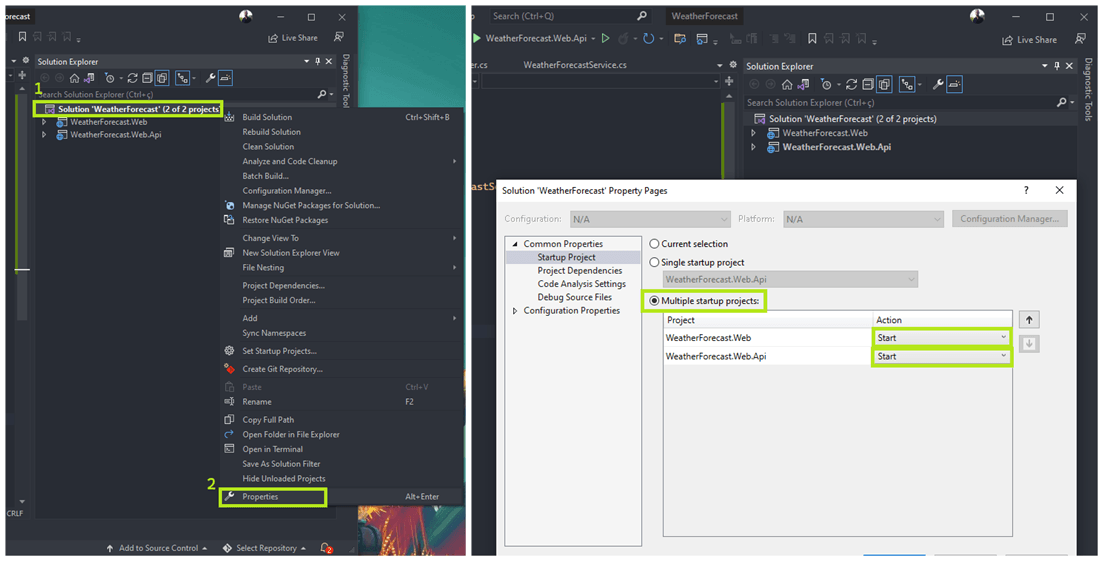
To run the API project at the same time as the application project, we need to configure it, as you can see in the image below:
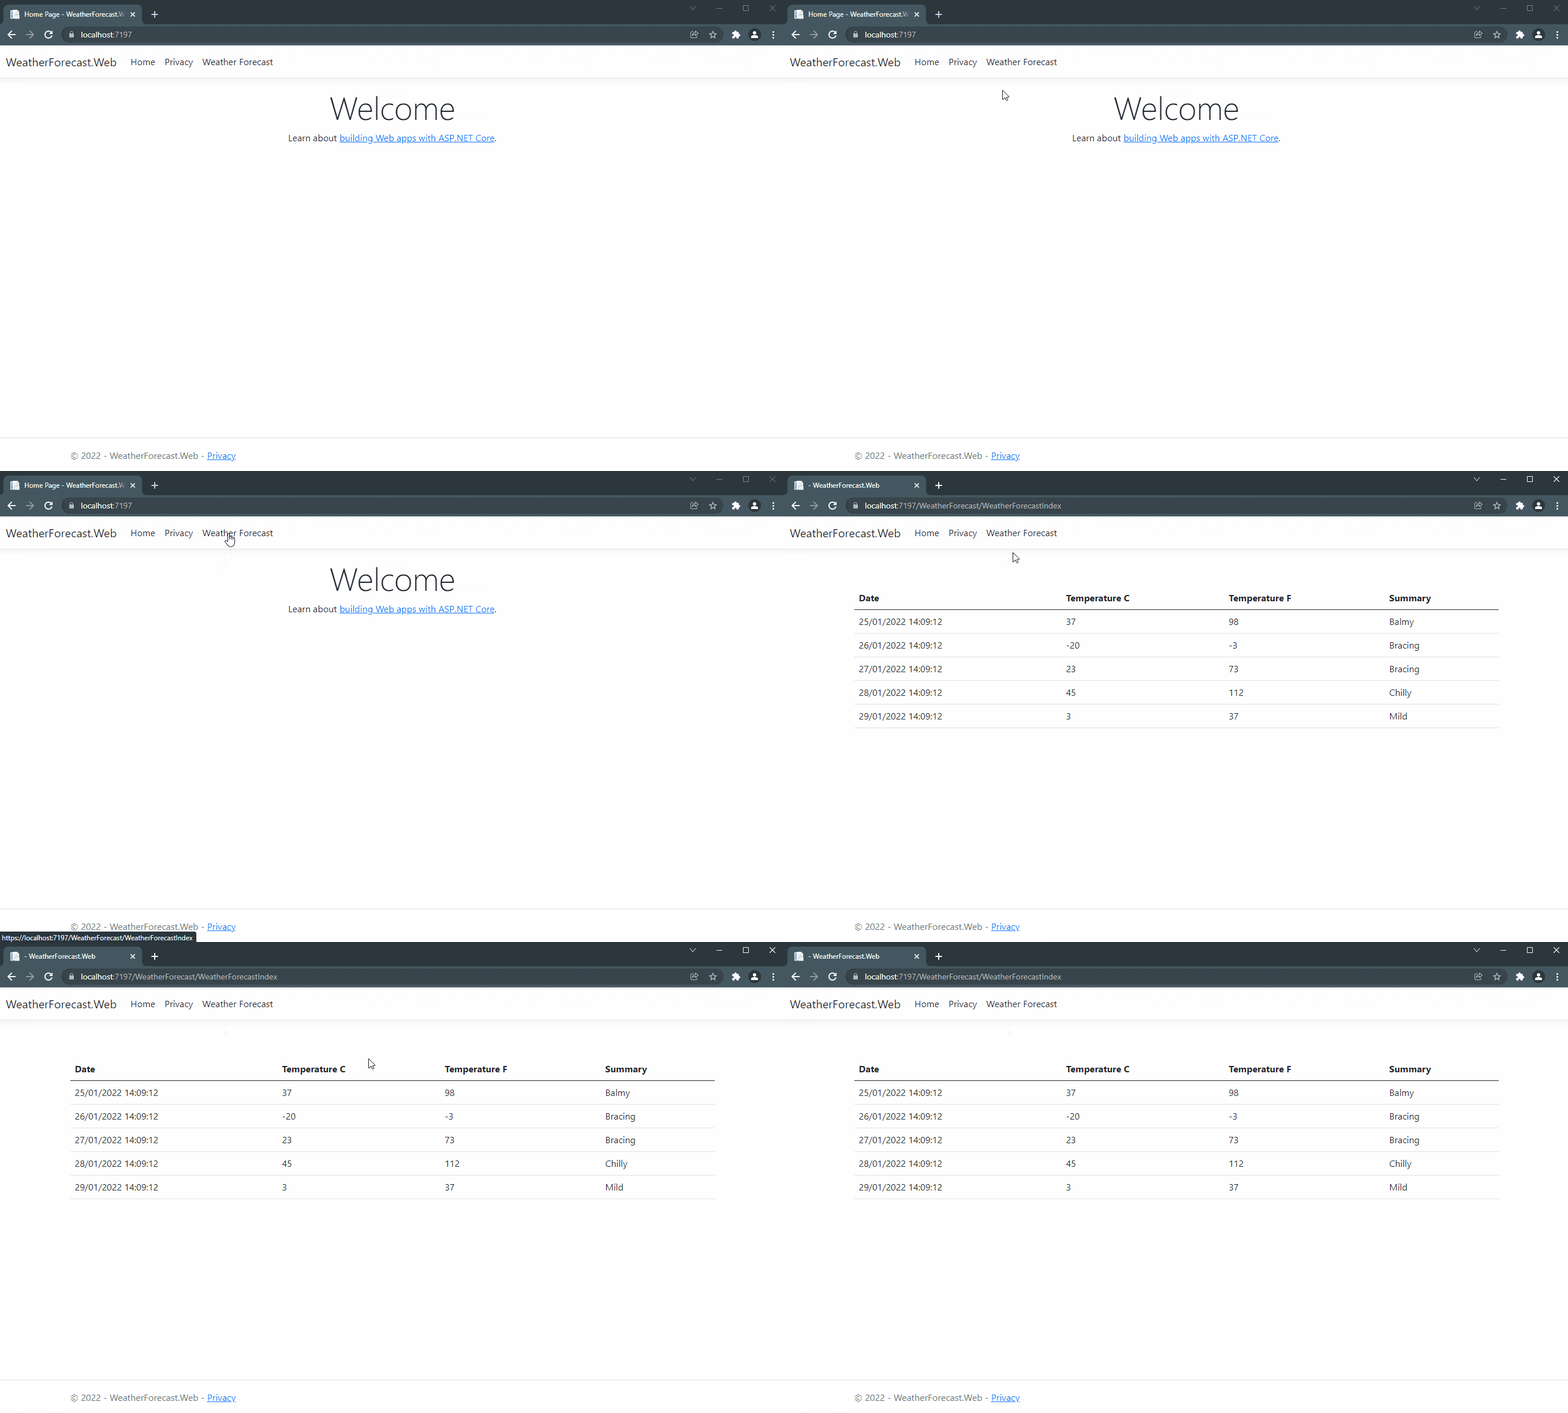
Finally, we can start the application—both the API project and the application project will be started. By clicking on the “Weather Forecast” menu, we will be redirected to another page where the API data will be displayed as in the GIF below:

Conclusion
In this article, we created a simple Web API and provided an endpoint to return random data. Next, we created an ASP.NET Core application that consumes this endpoint and displays the data in the browser.
There are many ways to do this communication, but the one taught in the article is certainly one of the simplest.

