Together we’ll build a signup UI in Xamarin Forms, step by step!
Howdy!! ♀ It’s a pleasure for me to have you here! This time we will be creating a simple UI in Xamarin.Forms based on a design obtained from Dribbble. We will be developing two screens which we will develop step by step so that you understand every added detail. Let’s get started!
Starting the Code From the First Screen
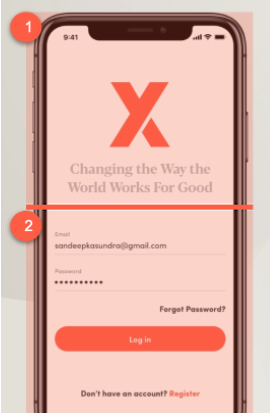
First, I would like to structure how we are going to develop the explanations of the screens. In the image shown below, you’ll see a set of numbered steps to better understand how we will do the explanations to have our first screen ready!

The screen needs to be designed on top of a main layout. To do it, let’s use a Grid. If you want to go a little deeper into the Grid, I recommend reading this article.
<!-- Main Layout-->
  <Grid RowDefinitions="Auto,Auto,Auto,Auto,Auto,Auto,Auto,Auto" RowSpacing="25" VerticalOptions="CenterAndExpand" Padding="30,0">

<!-- All the code corresponding to steps 1 and 2 of this screen will go here.→

  </Grid>
![Step One Step 1]() Image and Main Title
Image and Main Title
For this step, we have the main image of the application logo followed by a main title.
<!-- Logo-->
<Image Grid.Row="0" Source="Logo" HeightRequest="150" WidthRequest="150" Aspect="AspectFit"/>
<!-- Main title-->
<Label Grid.Row="1" FontAttributes="Bold" TextColor="Silver" FontSize="30" HorizontalTextAlignment="Center" Text="Changing the Way the World works for good"/>
<!-- Don't forget to add the code of the next step below →
⚠ Tip: To give a line break in your XAML, you can use
as I used in the example.
![Step Two Step 2]() Login Information
Login Information
This step is made up of the email and password entry fields, in addition to the label to change the password and the button to send the data.
For the Entries, we will implement Telerik RadEntry. If you haven’t used it before, I recommend the article Xamarin.Forms Controls / Entry—it’s super easy to use!
First, let’s see how to add the fields for Email and Password.
<!-- Fields-->
  <Label Grid.Row="2" Text="Email" TextColor="#a6a5a0" FontSize="15" />
  <telerikInput:RadEntry Grid.Row="3" BorderStyle="{StaticResource EntryBorderStyle}" WatermarkText="yourname@domain.com" HeightRequest="40" BackgroundColor="#fdfbf6" />
  <Label Grid.Row="4" Text="Password" TextColor="#a6a5a0" FontSize="15" />
  <telerikInput:RadEntry Grid.Row="5" BorderStyle="{StaticResource EntryBorderStyle}" IsPassword="True" WatermarkText="******" HeightRequest="40" BackgroundColor="#fdfbf6"/>
<!-- Don't forget to add the code of the next step below →
Now, let’s see how to add the Forgot Password Label and the Login button.
<!-- Forget password label-->
  <Label Grid.Row="6" Text="Forgot your password?" FontAttributes="Bold" FontSize="15" HorizontalOptions="End" />
  <Button Grid.Row="7" BackgroundColor="#fd684d" Text="Log in" TextColor="White" CornerRadius="20" FontSize="15" FontAttributes="Bold" HorizontalOptions="FillAndExpand"/>
<!-- Don't forget to add the code of the next step below →
Finally …
We will stop here to create the “Don’t have an account?” label. Here we can see a label composed of two styles. We can do this with a single label so you can save resources. You can do this with the FormattedText, as I show you below:
<Label Grid.Row="8" FontAttributes="Bold" HorizontalTextAlignment="Center">
  <Label.FormattedText>
    <FormattedString>
      <Span Text="Don't have an account? "/>
      <Span Text="Register" TextColor="#fd684d"/>
    </FormattedString>
  </Label.FormattedText>
</Label>
If you want to read more information about FormattedText, you can access it here.
Let’s Continue With the Second Screen
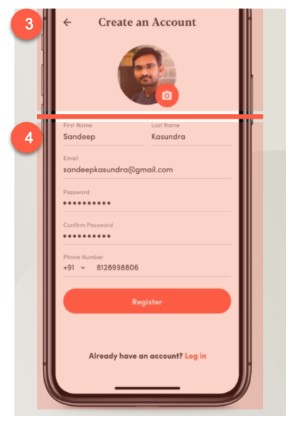
We will use the same dynamic as in the first screen—we will see the structure of steps in which we will divide our explanation.

Let’s Establish the Main Layout
I created another screen called CreateAccountPage, and we will also be using the Grid as the main layout.
<!-- Main Layout-->
  <Grid RowDefinitions="Auto,Auto,Auto,Auto,Auto,Auto,Auto,Auto,Auto,Auto,Auto,Auto,Auto,Auto" RowSpacing="20" ColumnDefinitions="*,*" ColumnSpacing="20" VerticalOptions="CenterAndExpand" Padding="30,0">

    <!-- All the code of the steps of our screen will be housed here→

  </Grid>
![Step Three Step 3]() Let’s Continue With the Create Account Image
Let’s Continue With the Create Account Image
When developing UIs, attention to detail is extremely important so that everything is as identical as possible. In this step, you will be able to identify two elements—a profile image and a button to load the image accompanied by an icon that references that action. Let’s see how to do it in code.
<!-- Title-->
  <Label Grid.Row="0" Grid.Column="0" Grid.ColumnSpan="2" FontSize="25" FontAttributes="Bold" HorizontalTextAlignment="Center" Text="Create an account"/>
  <!-- Rounded Profile imagen-->
  <Frame Grid.Row="1" Grid.Column="0" Grid.ColumnSpan="2" BorderColor="White" VerticalOptions="Start" HorizontalOptions="Center" WidthRequest="150" HeightRequest="150" CornerRadius="75" HasShadow="False" Padding="0" IsClippedToBounds="True">
    <Image Source="Profile" Aspect="AspectFill"/>
  </Frame>
  <Button Grid.Row="1" Grid.Column="0" Grid.ColumnSpan="2" BackgroundColor="#fd684d" HeightRequest="54" WidthRequest="54" CornerRadius="27" TranslationX="65" ImageSource="Camera" HorizontalOptions="Center" VerticalOptions="End"/>

<!-- Don't forget to add the code of the next step below →
![Step Four Step 4]() Final Step: Let’s Continue With the Data Forms
Final Step: Let’s Continue With the Data Forms
For this form, we will also use Telerik RadEntry.
<!-- Basic information-->
  <!-- First name-->
  <Label Grid.Row="2" Grid.Column="0" Text="First name" TextColor="#787878" FontSize="15"/>
  <telerikInput:RadEntry Grid.Row="3" Grid.Column="0" BorderStyle="{StaticResource EntryBorderStyle}" HeightRequest="40" BackgroundColor="#fdfbf6"/>
  <!-- Last name-->
  <Label Grid.Row="2" Grid.Column="1" Text="Last name" TextColor="#787878" FontSize="15"/>
  <telerikInput:RadEntry Grid.Row="3" Grid.Column="1" BorderStyle="{StaticResource EntryBorderStyle}" HeightRequest="40" BackgroundColor="#fdfbf6"/>
  <!-- Email-->
  <Label Grid.Row="4" Grid.Column="0" Text="Email" TextColor="#787878" FontSize="15" />
  <telerikInput:RadEntry Grid.Row="5" Grid.Column="0" Grid.ColumnSpan="2" BorderStyle="{StaticResource EntryBorderStyle}" HeightRequest="40" WatermarkText="yourname@domain.com" BackgroundColor="#fdfbf6"/>
  <!-- Password-->
  <Label Grid.Row="6" Grid.Column="0" Text="Password" TextColor="#787878" FontSize="15" />
  <telerikInput:RadEntry Grid.Row="7" Grid.Column="0" Grid.ColumnSpan="2" IsPassword="True" BorderStyle="{StaticResource EntryBorderStyle}" HeightRequest="40" WatermarkText="******" BackgroundColor="#fdfbf6"/>
  <Label Grid.Row="8" Text="Confirm Password" TextColor="#787878" FontSize="15" />
  <telerikInput:RadEntry Grid.Row="9" Grid.Column="0" Grid.ColumnSpan="2" IsPassword="True" BorderStyle="{StaticResource EntryBorderStyle}" HeightRequest="40" WatermarkText="******" BackgroundColor="#fdfbf6"/>
  <!-- Phone number-->
  <Label Grid.Row="10" Grid.Column="0" Text="Phone number" TextColor="#787878" FontSize="15" />
  <Picker Grid.Row="11" Grid.Column="0" Margin="0,0,100,0">
    <Picker.ItemsSource>
      <x:Array Type="{x:Type x:String}">
        <x:String>+91</x:String>
        <x:String>+92</x:String>
      </x:Array>
    </Picker.ItemsSource>
  </Picker>
  <telerikInput:RadEntry Grid.Row="11" Grid.Column="1" Margin="-100,0,0,0" BorderStyle="{StaticResource EntryBorderStyle}" HeightRequest="40" WatermarkText="(XXX) XXX-XXXX" BackgroundColor="#fdfbf6"/>

<!-- Don't forget to add the code of the next step below →
And finally, let’s add the Register button, followed by the “Already have an account?” label. For this, we will use the same style as the previous screen.
<!-- Register button-->
  <Button Grid.Row="12" Grid.Column="0" Grid.ColumnSpan="2" BackgroundColor="#fd684d" Text="Register" TextColor="White" CornerRadius="20" FontSize="15" FontAttributes="Bold" HorizontalOptions="FillAndExpand"/>

  <Label Grid.Row="13" Grid.Column="0" Grid.ColumnSpan="2" FontAttributes="Bold" HorizontalTextAlignment="Center" >
    <Label.FormattedText>
      <FormattedString>
        <Span Text="Already have an account? "/>
        <Span Text="Log in" TextColor="#fd684d"/>
      </FormattedString>
    </Label.FormattedText>
  </Label>
Conclusion
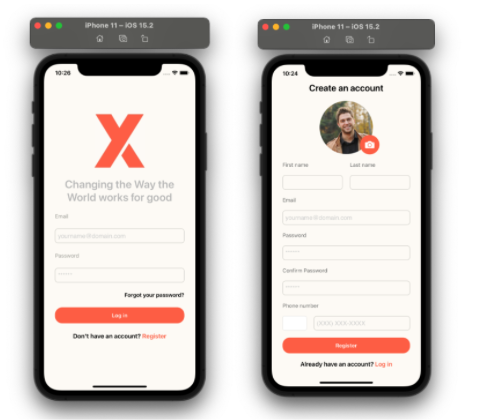
And done! Our screens are ready! Here you can see our final result!

If you want to see the complete code, you can go to the Github repository.
Thanks for reading!
 Image and Main Title
 Login Information
 Let’s Continue With the Create Account Image
 Final Step: Let’s Continue With the Data Forms