Welcome to the Telerik Crypto Tracker demo app: a real use-case sample crypto application that tracks the cryptocurrency market, built with the latest .NET technologies and UI controls.
.NET MAUI and Telerik UI for .NET MAUI are actively being developed and we know that many of you are already curious about how to build a cross-platform app, and how this app will work on iOS, Android, Windows and macOS.
Cryptocurrencies are one of the biggest trends these days, and that is why we decided to create an app that demonstrates a real-world scenario for visualizing the fluctuations in cryptocurrency prices. The application you are about to see is built entirely with Telerik UI for .NET MAUI controls. Let’s take it for a spin!

In this blog post series dedicated to the Telerik UI for .NET MAUI Crypto Tracker Application, we will walk you through the entire development process. In this first part, we will describe the challenges we faced in achieving a mobile and desktop friendly look and feel, and review the application structure.
You can directly explore the Crypto Tracker application source code in GitHub.
Before you start with CryptoTracker.sln, make sure that you have everything set up for .NET MAUI and that Telerik UI for .NET MAUI is downloaded and installed on your machine (the controls are currently in preview and they are free to experiment with).
Main Idea
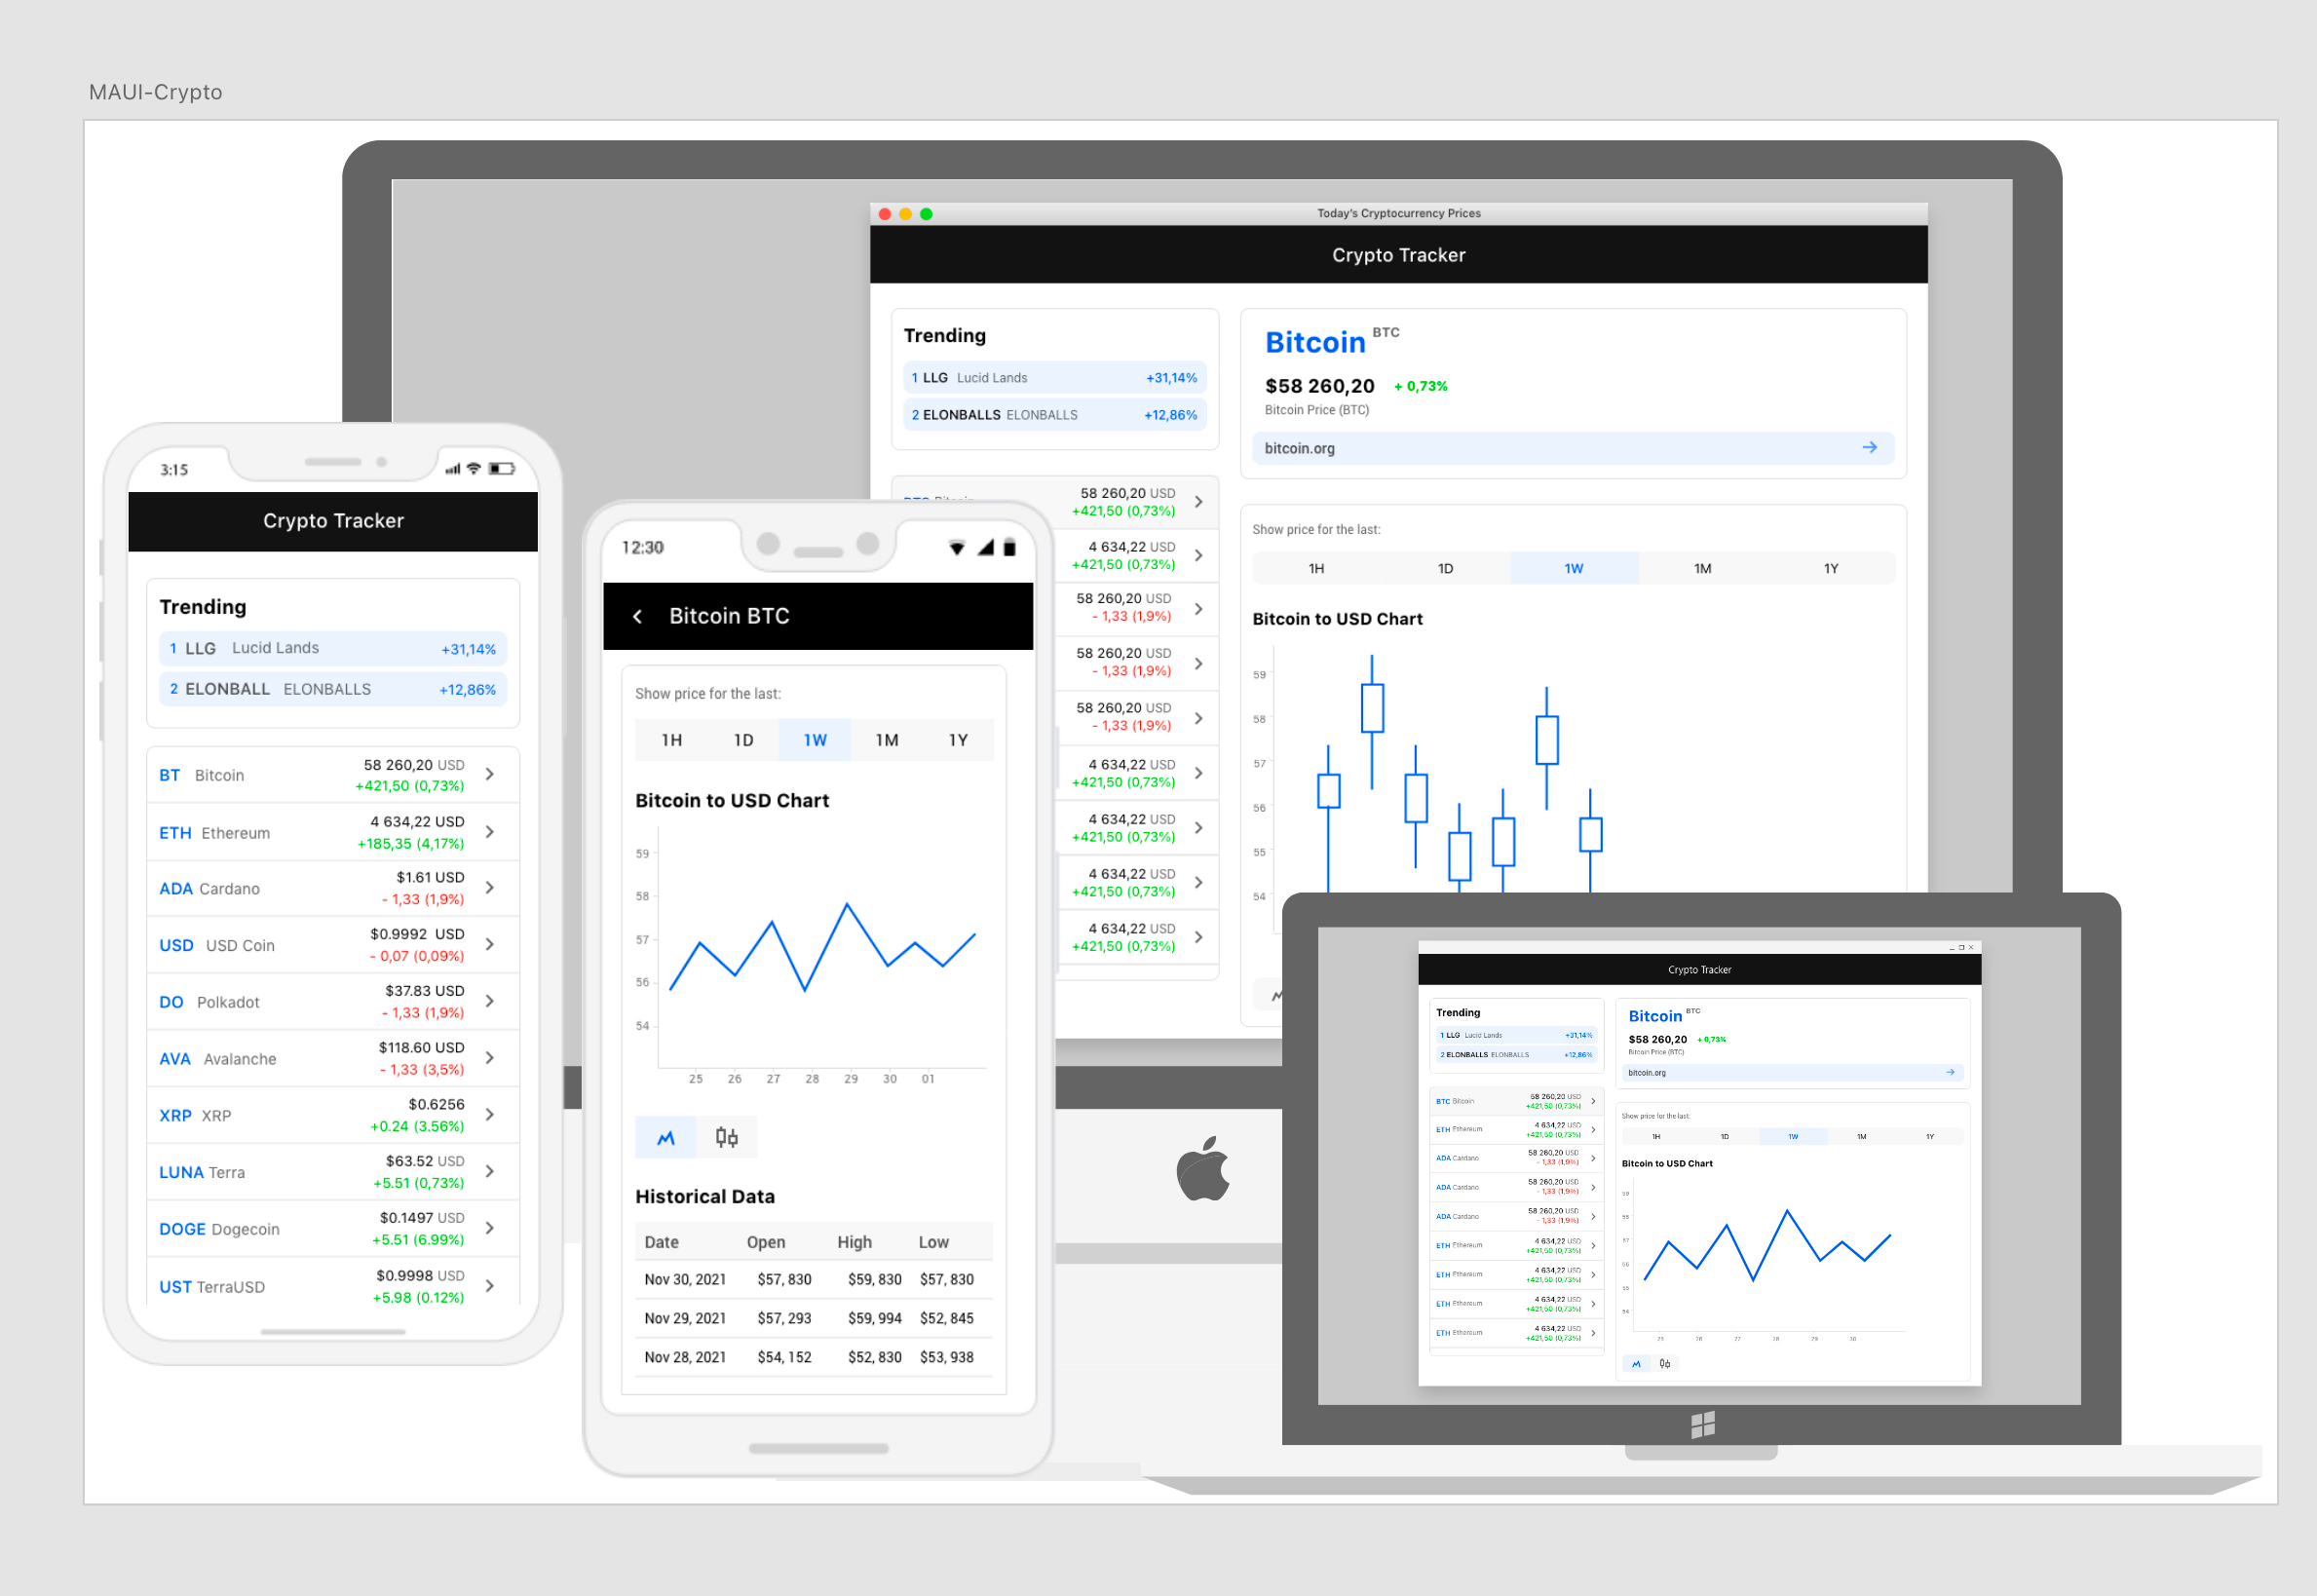
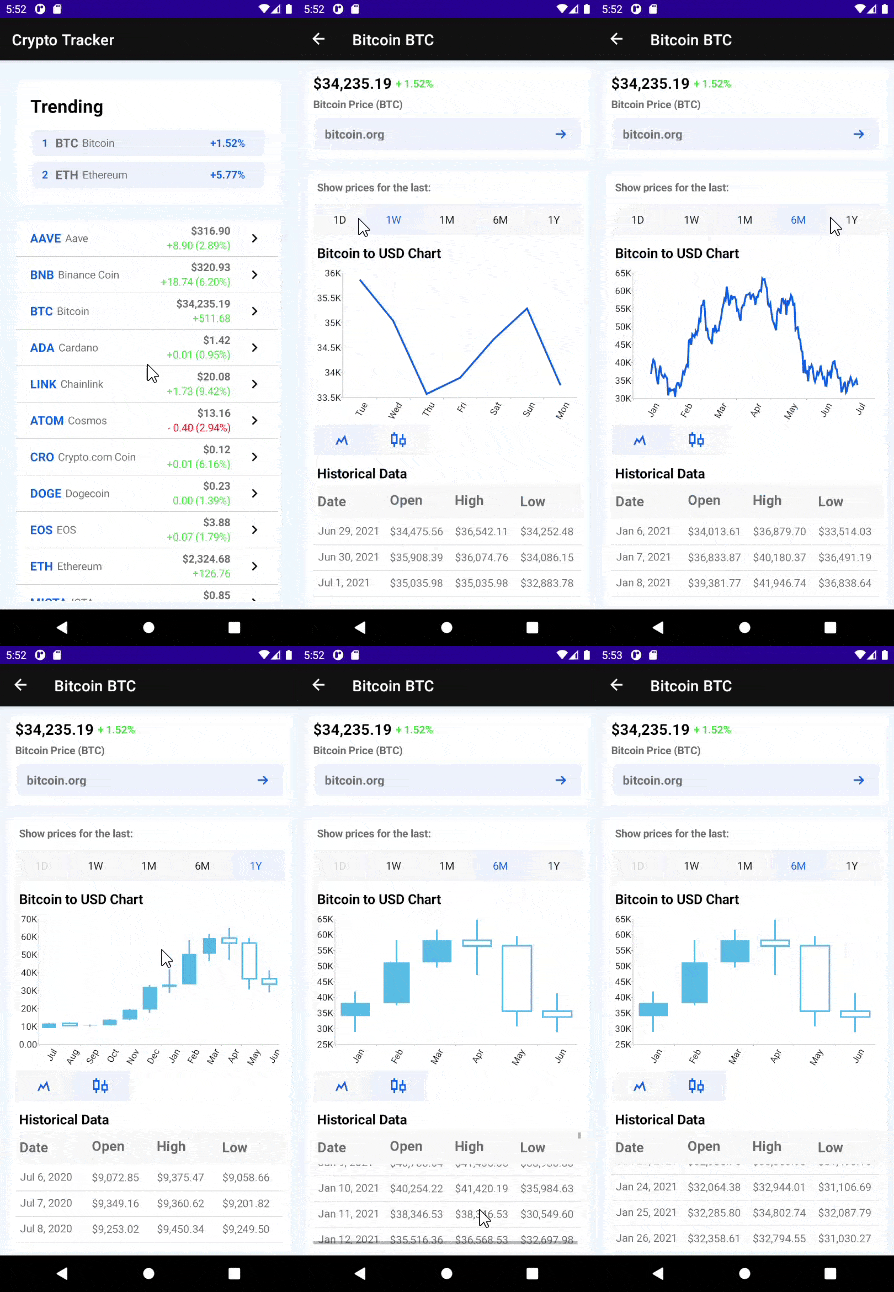
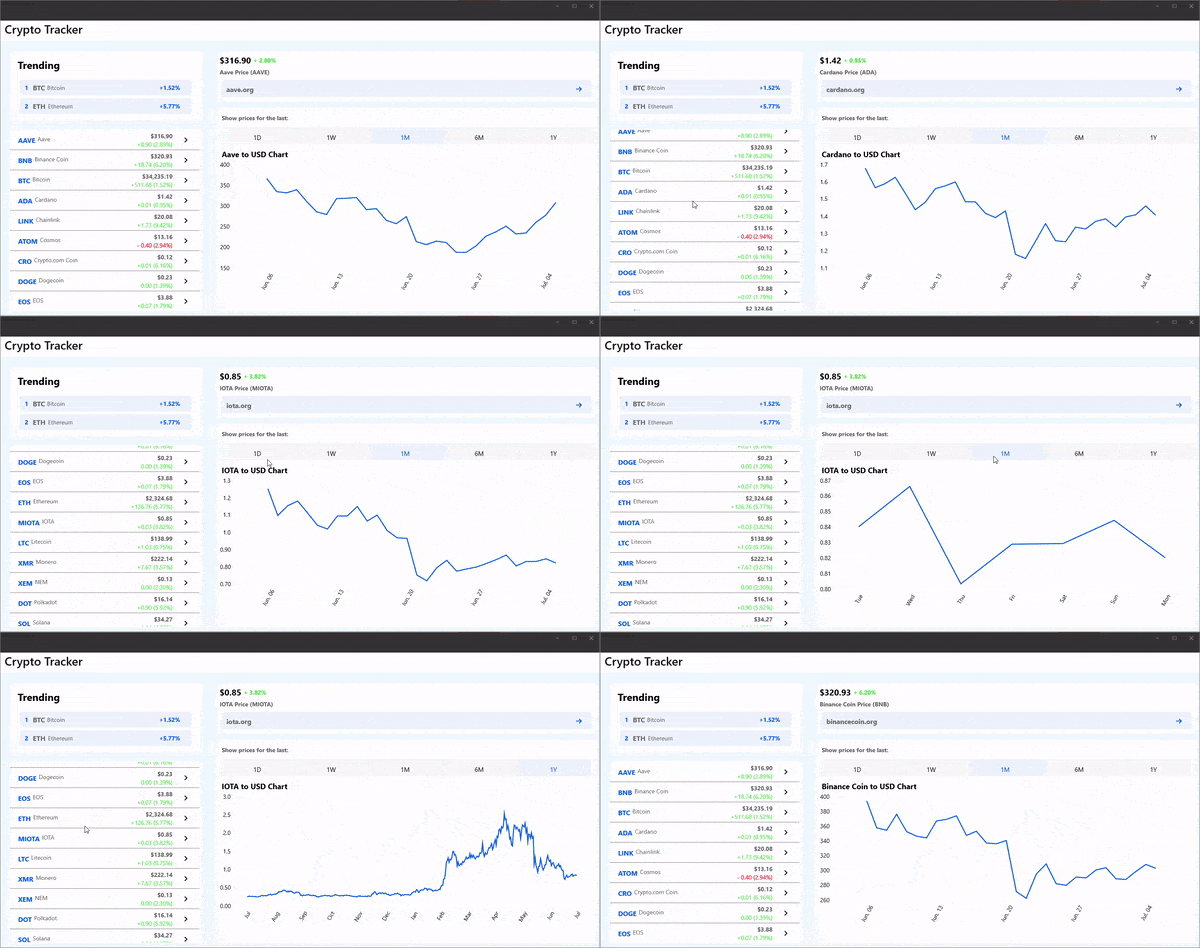
When I started developing this brand-new .NET MAUI application, I had a clear idea of how it should look. Due to the volatility of the crypto market, the interface presents you with a a collection of various cryptocurrencies, and upon tapping on one of them, a chart showcasing their price history and trends appears. Additionally, a grid-like control loads the data in rows and columns.
And here you can see the Telerik UI for .NET MAUI controls in action —for data management, the ListView and DataGrid controls, and for data visualization, the beautiful Telerik UI for .NET MAUI Charts.
The Desktop and Mobile Look
How to design a .NET MAUI application with a modern look and feel for both desktop and mobile, you might ask? What are the challenges here? On one hand, it should have two pages on mobile phones since the screen is smaller, and when we select a coin it should redirect us to its actual data. But, on the other hand, when we open the application on desktop (either macOS or Windows), it should contain a single page, and the list from the first mobile page should be on the left and data from the second mobile page should be on the right. That was tricky at first—however, .NET MAUI is quote unquote built different.
The Mobile Look
The app has two pages with implemented navigation between them. We navigate to the second page when selecting a coin and go back to the main page pressing a back button.

The Desktop Look
Here we use a single page where the coin selection and visualization happen dynamically.

But how did we make our code function one way on mobile and another on desktop? To achieve this functionality, we created three ContentPages (CoinSelectionPage, CoinInfoPage, DesktopPage) containing one or two ContentViews (CoinSelectionView, CoinInfoView).
Let’s review the CryptoTracker Application structure and explain the magic behind the mobile and desktop look.
The CryptoTracker App Structure
![]()
Pages and Views
-
Let’s start with the pages and views needed for achieving the desired desktop and mobile look.
![crypto-app-pages crypto-app-pages]()
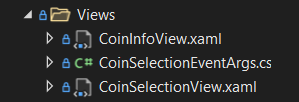
![crypto-app-views crypto-app-views]()
-
The CoinSelectionPage shows all crypto coins and allows you to select a coin from a list of coins. The Page contains a single view—the CoinSelectionView:
<ContentPagexmlns="http://schemas.microsoft.com/dotnet/2021/maui"xmlns:view="clr-namespace:CryptoTracker.Views"x:Class="CryptoTracker.Pages.CoinSelectionPage"Title="Crypto Tracker"x:Name="mainPage"><view:CoinSelectionViewCoinSelected="OnCoinSelected"/></ContentPage> -
The CoinInfoPage contains the CoinInfoView—the view which displays all data for the selected coin.
<ContentPagexmlns="http://schemas.microsoft.com/dotnet/2021/maui"xmlns:view="clr-namespace:CryptoTracker.Views"x:Class="CryptoTracker.Pages.CoinInfoPage"x:Name="coinInfoPage"BackgroundColor="{DynamicResource RadBorderColor}"><view:CoinInfoViewx:Name="coinInfoView"/></ContentPage> -
As we want the UI on desktop to be a combination of both pages, the DesktopPage is the key. It contains a GridLayout with both views—CoinInfoView and CoinSelectionView.
<ContentPagexmlns="http://schemas.microsoft.com/dotnet/2021/maui"x:Class="CryptoTracker.Pages.DesktopPage"xmlns:Views="clr-namespace:CryptoTracker.Views"Title="Crypto Tracker"BackgroundColor="AliceBlue"x:Name="mainPage"><GridLayoutColumnDefinitions="500, *"><Views:CoinSelectionViewCoinSelected="OnCoinSelected"/><Views:CoinInfoViewx:Name="selectedCoinInfo"Margin="0,15,0,5"GridLayout.Column="1"/></GridLayout></ContentPage>As .NET MAUI is still in Preview, creating new content pages and content views has its challenges. The easiest way that worked for me was to simply copy and paste the MainPage.xaml and change its name and type. If you decide to go this way—to copy and paste the MainPage—keep in mind that you have to edit the .csproj file afterward. You must delete this:
<ItemGroup><CompileUpdate="Pages\MainPage - Copy.xaml.cs"><DependentUpon>%(Filename)</DependentUpon></Compile></ItemGroup><ItemGroup><MauiXamlUpdate="Pages\MainPage - Copy.xaml"><Generator>MSBuild:Compile</Generator></MauiXaml></ItemGroup>When we are ✔with the pages, let’s create the views.
-
In the Crypto Tracker public GitHub repo, you can review the full version of the CoinSelectionView code and the CoinInfoView code.
-
We need preprocessor directives to our App.xaml.cs file like so:
#if MACCATALYSTMainPage =newDesktopPage();#elif WINDOWSMainPage =newNavigationPage(newDesktopPage()){BarBackgroundColor = Colors.White,BarTextColor = Color.FromArgb("#121212"),};#elseMainPage =newNavigationPage(newCoinSelectionPage()){#if IOSBarBackgroundColor = Colors.White,BarTextColor = Color.FromArgb("#121212"),#elseBarBackgroundColor = Color.FromArgb("#121212"),BarTextColor = Colors.White,#endif};#endif -
The last step is to make the CoinSelectionPage our Navigation Page that will redirect the user to the CoinInfoPage every time we tap on a coin. How? We will review in the second part. Stay tuned and wait for it❗
The Coin Object
Let’s create a folder Data with a CoinData class for the cryptocurrency.

And have properties like Name, OpeningPrice, ClosingPrice, Date, etc.:
public class CoinData{ public string Name { get; set; } public string Symbol { get; set; } public double OpeningPrice { get; set; } public double ClosingPrice { get; set; } public double Price24Low { get; set; } public double Price24High { get; set; } public DateTime Date { get; set; } public double ChangeInPriceAmount => this.ClosingPrice - this.OpeningPrice; public double ChangeInPricePercentage => (this.ChangeInPriceAmount / this.OpeningPrice) * 100;}The ChangeInPriceAmount and Percentage will calculate the difference between the coin’s opening and closing price. Our date will be given in days.
After defining our CoinData class, we’ll need a custom EventArgs class that will store the currently selected coin. In other words, we have a separate class which inherits EventArgs and updates its only property every time we tap on a cryptocurrency:
public class CoinSelectionEventArgs : EventArgs{ public CoinSelectionEventArgs(CoinData selectedCoin) { this.SelectedCoin = selectedCoin; } public CoinData SelectedCoin { get; }}Display the Coins in a List
For the coins’ container, we’ll use the Telerik ListView for .NET MAUI. We just have to include it in our XAML files like so:
xmlns:telerikDataControls="clr-namespace:Telerik.XamarinForms.DataControls;assembly=Telerik.Maui.Controls.Compatibility"The Telerik .NET MAUI ListView is populated with data using the ItemsSource property. We will use an MVVM approach and create a ViewModel. In the ViewModel, let’s define a property named Source of type List<CoinData>.
public class CoinsViewModel{ public CoinsViewModel() { var coinService = DependencyService.Get<ICoinDataService>(); this.Source = coinService.GetAllCurrentCoins(); this.TrendingCoins = new List<TrendingCoinData>(); var counter = 0; foreach (var coin in this.Source) { if (coin.Name == "Bitcoin" || coin.Name == "Ethereum") { this.TrendingCoins.Add(new TrendingCoinData() { Data = coin, Index = ++counter, }); } } } public IList<CoinData> Source { get; } public IList<TrendingCoinData> TrendingCoins { get; }}Last bind the ListView’s ItemsSource to the Source property:
<telerikDataControls:RadListView ItemTapped="OnListViewItemTapped" SelectionMode="None" x:Name="listView" ItemsSource="{Binding Source}"> ...... <telerikDataControls:RadListView.BindingContext> <local:CoinsViewModel/> </telerikDataControls:RadListView.BindingContext></telerikDataControls:RadListView>We have the ItemsSource set, but let’s represent the data in a way we want. For this purpose, we will use a DataTemplate to customize the look of the ListView Cell.
ec6868f8a1c947fcb189f1ff1cbf7503.png?sfvrsn=bca12f07_0)
Thus, our ListView is all filled up. If you want the ListView to look more appealing, you can check out the CoinSelectionView.xaml and App.xaml files for the styles, and since we used the RadBorder control to give the ListView a nice background color, just can check that out, too.
Next we’ll go back to the navigation approach—more information about this in the second part.
Your Feedback Is Important—Let Us Know What You Think
Have we caught your interest with this application? You can share your feedback in the Telerik UI for .NET MAUI Forum or create an issue in our Github repository.
If you are new to Telerik UI for .NET MAUI, you can learn more about it via the product page. The Telerik UI for .NET MAUI controls are currently in preview and they are free to experiment with, so don’t wait—jump on the cross-platform development bandwagon!

