When your browser or website manages to keep Test Studio’s visual recorder from getting every keystroke you need, you have a solution: Write a coded step. And you don’t even have to learn a new SDK to do it!
One of the most important innovations in automated testing was the invention of visual recorders that allow testers, developers or end users to build a test by working their way through an application’s user interfaces. Test Studio’s visual recorder is a great example of how this technology can both enable users to participate in testing and speed creating tests.
However, there will probably always be some part of some web browsers that visual recorders will struggle with—primarily because browser technology changes faster than new versions of visual recorders can be released (I’ve updated my copy of Chrome twice in the last few weeks, for example). Plus, of course, it’s also quite amazing what some website designers have gotten JavaScript to do … so amazing that it can bewilder a visual recorder. As robust as Test Studio’s recorder is, even Test Studio will occasionally run into something that challenge its recorder.
That’s where the ability to add coded steps to your Test Studio scripts is useful: You can always write code to deal with some browser’s (or just some website’s) new “feature” that the current Test Studio visual recorder hasn’t caught up with yet. The good news here is that Test Studio itself provides all the examples you’ll need when you do need to write a coded step—including support for Test Studio’s data-driven testing.
Handling the November 2021 Chromium DatePicker
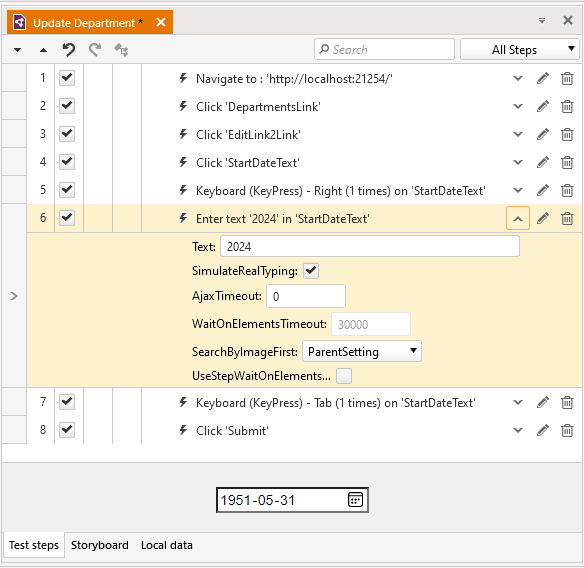
As a case study for how to write a coded step, I’m going to use the Chromium date picker that’s invoked when a page in either Chrome or Edge contains an input element of type date. As I write this (November 2021), the current datepicker in Chromium is virtually invisible to the current Test Studio’s current visual recorder. While the recorder captured my cursor movements as I arrowed around in the data textbox, it wouldn’t replay my text entries and, as a result, when I ran my test, the date remained unchanged.
A caveat: Do recognize that, by the time you read this, this particular case study may no longer be true. In fact, I studiously ignored the “Update available” notice in my Test Studio status bar while I worked on this post in case the upgrade would cause the recorder to handle the datepicker. I figured I was lucky enough to find one example to use in this post and, if that example was taken away from me, I didn’t think I could find another.
The actual solution to this problem is pretty simple: Right-click on the step, selected View in Code, and comment out the first line in the method that’s displayed. However, other problems may require more or different code than you have in the default method—what will you do then? So, using the datepicker as my example, here’s a more comprehensive solution to creating a coded step.
And it’s not hard to do. Creating a simple coded step just requires you to do three things:
- Add a text entry step to your test script at the point where you’ve navigated to the date picker
- Change the text entry step to a coded step
- Customize the provided code
1. Add Text Entry Step
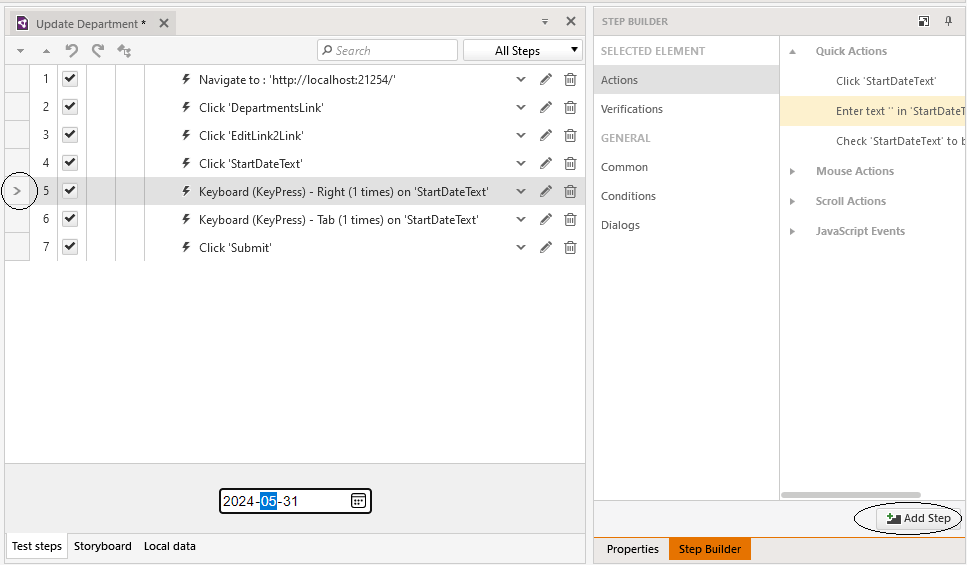
To add a text entry step for the datepicker to your recorded test script, first click on the step in your script where you arrive at the date textbox (for creating a script see this step-by-step guide. Make sure that the gray box to the left of the step is showing the greater than arrow (“>”)—that arrow controls where your step will be inserted.
From the Step Builder pane on the right, select the Actions entry, then expand the Quick Actions node to the right of that.

Under the Quick Actions node, select “Enter text in ‘StartDateText’” and then, at the bottom of the Step Builder pane, click the Add Step button. Test Studio will add the new text entry step to your script. If you expand that step, you can see the options you can set, including the text the step will enter. As a guide for the next step in the process, enter the year you want for your date in the Text box and collapse the step (I used “2024”).

2: Convert to a Code Step
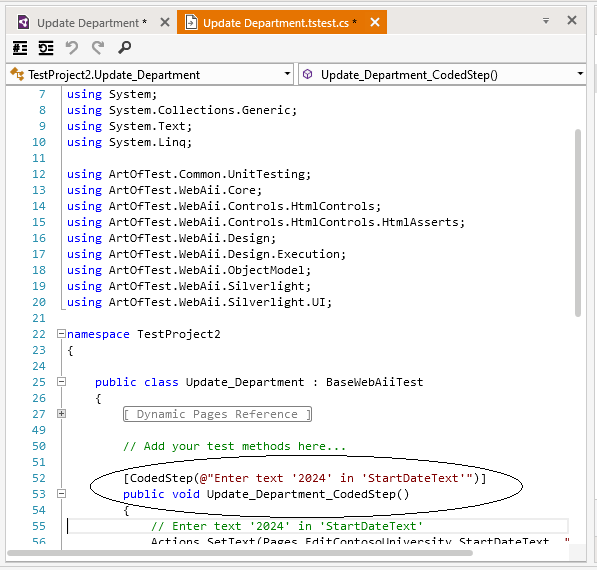
This step is easy. Right-click on the step you just added and select the Edit in Code choice. You’ll first be asked to pick your language (I selected C#). After that, a new tab will display in place of your test script, showing the default code generated by Test Studio for your new step.

3: Customize the Provided Code
You can now use the default code generated by Test Studio as your guide to creating your own code. Typical default code looks like this (the CodedStep attribute on this method flags the method as one that can appear in a test script and provides some text that appears in the test script’s display):
[CodedStep(@"Enter text '' in 'StartDateText'")]
public void Update_Department_CodedStep()
{
   Actions.SetText(Pages.EditContosoUniversity.StartDateText, "");
   Pages.EditContosoUniversity.StartDateText.ScrollToVisible(
              ArtOfTest.WebAii.Core.ScrollToVisibleType.ElementCenterAtWindowCenter);
   ActiveBrowser.Window.SetFocus();
   Pages.EditContosoUniversity.StartDateText.Focus();
   Pages.EditContosoUniversity.StartDateText.MouseClick();
   Manager.Desktop.KeyBoard.TypeText("2024", 50, 100, true);
}
And you don’t have to learn the SDK that’s being leveraged here. You can use Test Studio’s code as your guide to creating the code you need.
Stealing Code
For example, in this method, the line of code you’re interested in is the last one: It’s the line that types the text you entered for this step (“2024,” in my case). From all the code in the default method, that line is the only one you’re going to need. Similarly, you can convert other steps to coded steps to get other examples of the Test Studio code you can use.
For example, if you convert a step that uses the left arrow key twice, you’ll find this useful line in the default code that shows how to mimic the user pressing on the left arrow key:
ActiveBrowser.Manager.Desktop.KeyBoard.KeyPress(
      ArtOfTest.WebAii.Win32.KeyBoard.KeysFromString("Left"), 150, 2);
Similar conversions will let you assemble all the code you need to handle the datepicker. If this seems like cheating, recognize that there are at least two benefits to using Test Studio’s default code as your guide:
- You don’t have to actually learn a whole new SDK.
- You’re taking advantage of both the latest code and best practices from the Test Studio team.
Dealing With the DatePicker
With the code you need in hand, your next step is to work out what you need to do if you were interacting with the page yourself. If, for example, you were to try actually typing a date into a datepicker-enabled textbox in either Chrome or Edge, you’d find that these steps would let you enter your data:
- Click on the date textbox.
- Use the left arrow key (twice) to move to the year field.
- Enter the year.
- Use the right arrow key (once) to move to the month field.
- Enter the month.
- Use the right arrow key (once) to move to the day field.
- Enter the day.
Leveraging the code from the steps you’ve used as example, it’s pretty easy to create a code block like this (this example enters the date 1953-05-31):
ActiveBrowser.Manager.Desktop.KeyBoard.KeyPress(
          ArtOfTest.WebAii.Win32.KeyBoard.KeysFromString("Left"), 150, 2);
Manager.Desktop.KeyBoard.TypeText("1953", 50, 100, true);
ActiveBrowser.Manager.Desktop.KeyBoard.KeyPress(
          ArtOfTest.WebAii.Win32.KeyBoard.KeysFromString("Right"), 150, 1);
Manager.Desktop.KeyBoard.TypeText("05", 50, 100, true);
ActiveBrowser.Manager.Desktop.KeyBoard.KeyPress(
          ArtOfTest.WebAii.Win32.KeyBoard.KeysFromString("Right"), 150, 1);
Manager.Desktop.KeyBoard.TypeText("31", 50, 100, true);
Once you’ve written the code, you can save your changes, run your test script and see your coded step enter your data into the datepicker.
Refactoring the Code
By now, you’ll have noticed that the Test Studio code file is just plain old .NET C#. If you have multiple datepickers in your test, there’s nothing stopping you from refactoring the code to create a reusable routine. A refactored version of my previous code might look like this:
public void EnterText(string text)
{
    Manager.Desktop.KeyBoard.TypeText(text, 50, 100, true);
}

public void Arrow(string direction, int times)
{
     ActiveBrowser.Manager.Desktop.KeyBoard.KeyPress(
           ArtOfTest.WebAii.Win32.KeyBoard.KeysFromString(direction), 150, times);
}

private void DatePicker(string year, string month, string day)
{
   Arrow(“left”, 2);
   EnterText(year);
   Arrow(“right”, 1);
   EnterText(month);
   Arrow(“right”, 1);
   EnterText(day);
}
Now, for any coded step, I just need this one line of code to get a date entered into a datepicker (I’ve even updated the CodedStep attribute’s text to make this step easy to spot in my test script):
[CodedStep(@"Enter text 2024-05-31 in the StartDateText datepicker")]
public void Update_Department_CodedStep()
{
            DatePicker(“2024”,”05”,”31”);
}
Dealing With Data
If you’re using a data-driven test, it’s also easy to integrate your coded step into that process. Again, you can leverage an existing step—a quick look at the code for a data-driven step bound to a column called FirstName will show a line like this:
Manager.Desktop.KeyBoard.TypeText(
   ((string)(System.Convert.ChangeType(Data["FirstName"], typeof(string)))), 50, 100, true);
Using that code as a guide, it’s not hard to update your coded step to extract data from a field in your data source. Assuming that my data source has columns called StartYear, StartMonth and StartDay, then my updated, data-driven coded step will look like this:
[CodedStep(@"Enter Date from Data Source into the StartDateText datepicker")]
public void Update_Department_CodedStep()
{
   string year = (string)(System.Convert.ChangeType(Data["StartYear"], typeof(string)));
   string month = (string)(System.Convert.ChangeType(Data["StartMonth"], typeof(string)));
   string day = (string)(System.Convert.ChangeType(Data["StartDay"], typeof(string)));
   DatePicker(year,month,day);
}
As you can see, you’re not only able to create a coded step that will deal with anything your visual recorder has problems with, you can also tie it into Test Studio’s powerful data-driven capabilities. And you can do that by leveraging the code samples that Test Studio will deliver to you.
But, if you’ll excuse me, since I’ve now got this case study working, I’ll click that Update Available link and see what’s been added to Test Studio lately. I’m almost hoping that the datepicker is still an issue—I’ve grown fond of this code.