Traditional development has many quirks; GitHub Codespaces provides a better development experience and a better choice for improved productivity and workflow.
In 2020 GitHub Codespaces was released—a revolutionary platform that refines the perception of application development to a whole new level. Initially released in beta, it’s now available as a pay-as-you-go service for GitHub teams and enterprises.
In this post, we will be looking at the flaws of the traditional development environment and then GitHub Codespaces and the good stuff it has in store for developers. Without any further ado, let’s get started.
The Problem
The access-from-anywhere feature provided by the web-based source code management and version control systems (GitHub) means that developers can easily collaborate on a given codebase, make modifications and improvements based on the project requirements from their local machine, and pull changes remotely to ensure that the codebase is appropriately synchronized.
That also means that the developer’s machine has to put up with the continuously changing updates from the project and is just expected to work well with whatever comes. This sometimes works, but not in all cases.
As the codebase gets larger, the project configuration changes, dependencies changes, newer versions of tools are introduced, etc. That puts so much stress on the developer’s machine. Local development becomes very frail, and developers tend to spend more time doing unnecessary things like fixing issues that came with pulling new updates and going through ReadMe files, struggling to set up their environment.
The bamboozling experience for a new teammate or contributor to create a working setup instead of just focusing on writing code is a severe setback to productivity and makes the local development environment setup a nightmare.
What Is GitHub Codespaces?
GitHub Codespaces is a service that provides developers with on-demand access to a secure development environment running a given codebase (Git repository) on a remote server. It also allows the developer to debug, maintain and make changes via a full-featured (with syntax highlighting, themes, extensions, version control, etc.) browser-based or locally installed Visual Studio Code IDE from their local machine.
GitHub Codespaces uses virtualization tools under the hood, such as containers and virtual machines. Codespaces can be thought of as having a backend part and a frontend part—the usual client-server architecture, nothing fancy. The backend part is where all the application code is usually run in a Docker container (you don’t need to install Docker to use Codespaces) with the required runtime and tools, and the frontend part is the IDE, which interfaces with the running application.
Generally, Codespaces provides developers with the following advantages:
-
Remote development means that a developer can work with fast machines, which improves the developer’s productivity and takes away a burden on their local machine setup.
-
Highly secured—only authorized entities have access to codespaces, preventing any unauthorized access.
-
It allows developers to efficiently work with any tech stack of their choice and different versions of tools without tampering with their local machine’s configuration.
-
Developers can easily manage dependencies and extensions on a per-project basis or globally scoped to different codespaces.
-
The “it works on my laptop” issue doesn’t suffice in development, as the codebase always runs consistently for each developer.
-
Browser-based coding experience means that development can be done on any device, such as iPads, tablets, etc.—hence improved code portability.
Basically, all the advantages of Codespaces revolve around removing the developer’s machine imperfections and the barriers to shipping quality code, while providing a great development experience.
Setting Up a Codespace for Your Project
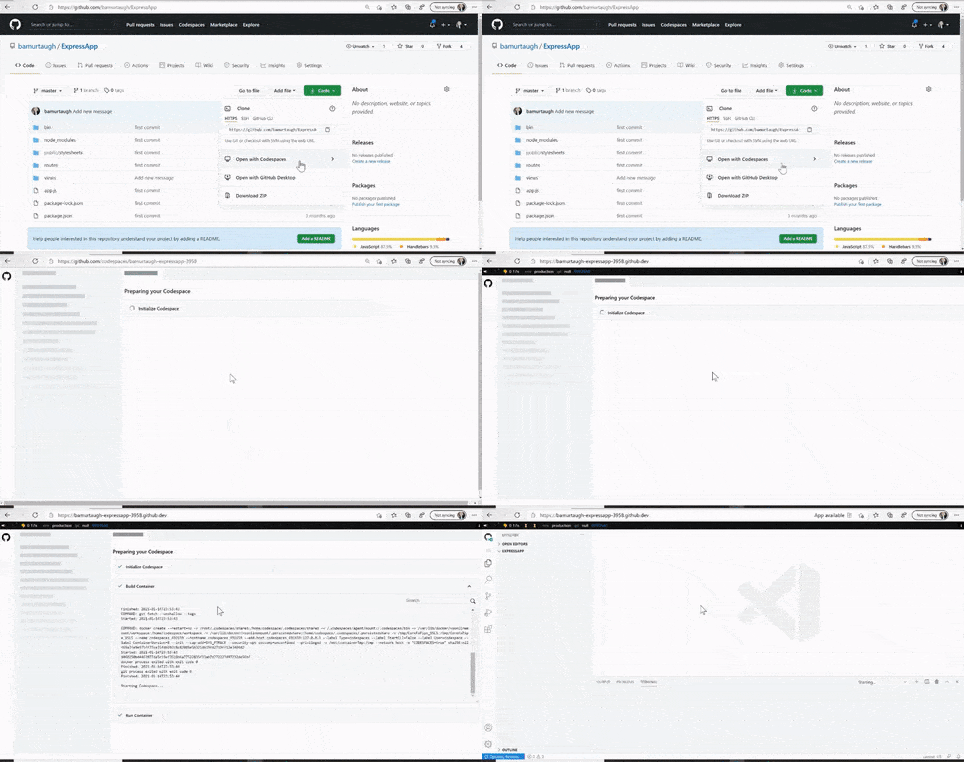
Setting up a codespace involves the following steps.
- Navigate to the GitHub repository of your choice.
- Click on the “Code” button and select the “Open with Codespace” option in the dropdown.
- Select the “New codespace.”

Under the Hood
Before a codespace is made available to the developer, the following events occur—though this does not include every little detail but just a clue of the core processes involved at each stage.
Note: If you don’t see the “Open with Codespaces” option, that’s because it’s a feature provided as a paid service on GitHub.
-
A shallow clone of the GitHub repo is first executed, i.e., the repo is cloned with only the latest commits. This is done to speed up build time; the complete clone is done at a later time.
-
A dedicated virtual machine is allocated to your project on a remote server with all the necessary storage and compute resources (CPU, RAM, etc.) required.
-
A container running your project files is then created and run on the virtual machine for you based on your configuration, which could be contained in the project’s root or located on another repository. If none is found, the default configuration provided is used to create the development container using the default Linux-based image, which contains most of the runtimes (e.g., C++, Python, Node, PHP, Java, etc.) and tools (e.g., Git, Yarn, Git CLI, etc.) required for your project.
-
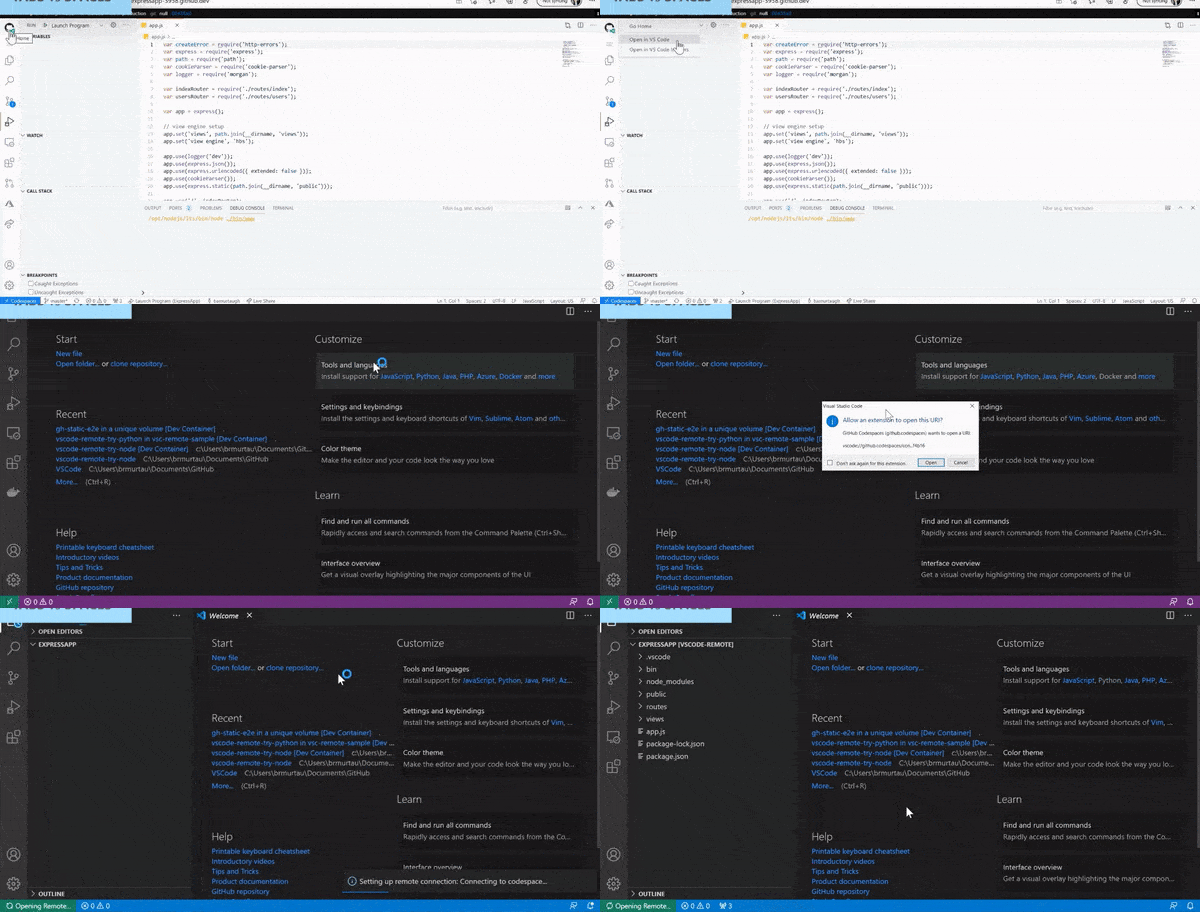
Finally, the codespace setup and appropriate commands are run based on your project’s configuration and then made available to access via the browser-based or locally installed IDE. Access is direct for the browser-based IDE; to access it on your local IDE, you have to do the following:
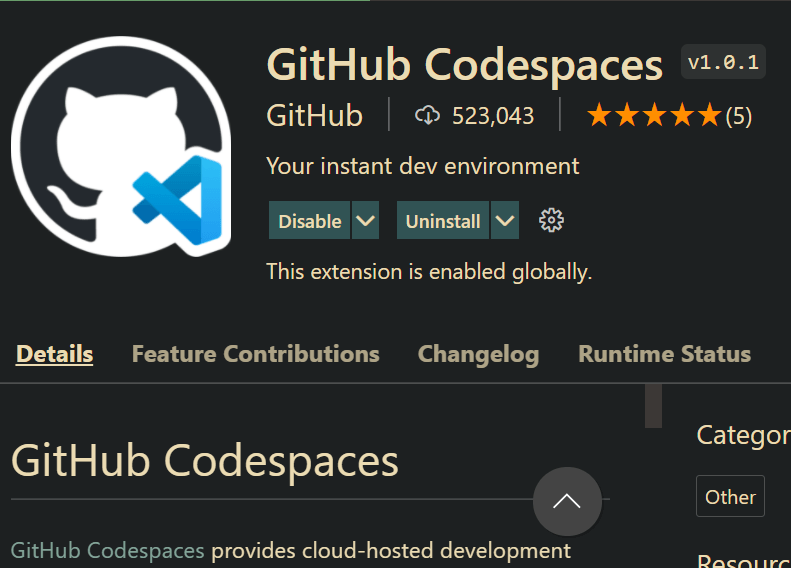
- Install the “GitHub codespaces” extension on your local VS Code IDE.

- Click on the GitHub icon from the browser-based IDE and select the “Open with VS Code” option. When granted, it requests permission first, then creates a new window in the locally installed VS Code IDE and runs the development container as expected.

- Since Git repos vary in size and, therefore, startup time, optimizations are built in to get things ready as soon as possible. One such optimization is the prebuild optimization, which ensures that the codespace is prepared upfront and made available just in time for the developer to begin work. Stats show that GitHub Codespaces can spin up a development environment running a 35GB container in 10s, which is remarkable.
Customizing Your Codespace
GitHub Codespaces allows developers to configure their development environment to suit their workflow and unique preferences regardless of the device they choose.
Generally, configurations fall into two categories:
- Project-based configurations
- User-specific configurations
Project-Based Configurations
These are configurations that are applied only on the codespace. Some standard configurations include:
- Extensions to be installed
- Choice of an image used to spin up your development container, which could be pulled from any container registry, such as Docker Hub or Microsoft Container Registry
- Lifecycle commands, i.e., scripts to be run before and after the dev container is started
- Environment variables (editor settings), such as terminal choice, extension-specific settings, etc.
- Port mapping/forwarding (ports that you want to be made accessible from your computer by a remote server), etc.
- Other possible configurations listed here
These configurations are contained in a .devcontainer.json file in the project’s root or a devcontainer.json file in a .devcontainer folder found in the root of your project.
A Dockerfile may also be included in this folder and linked to the devcontainer.json file to describe the image to be used to generate the development container. (Other use cases can be found here.) This folder can be created manually or using the “remote containers” extension.

Note: Ensure that the .devcontainer folder is added and committed to version control to ensure the configurations that live in it are persisted. Also, when modified, rebuild the development container again to apply new changes.
User-Specific Configurations
Like the project-based configurations, these are developer-specific and meant to be applied globally to whatever codespace a developer works on, but not to others using the codespace. They can be thought of as the developer’s personal preferences suited to their style and workflow during development.
These settings are applied via the following:
-
The settings synchronization feature allows the usage of local VS Code IDE settings and makes them available for use across other Visual Studio Code editor instances. (See more here.)
-
Dotfiles (files that begin with a dot, including .gitignore, .eslintrc, .vscode, .zshrc, etc.) can share settings when a setting on a codespace is cloned and appropriate install scripts are run to apply configurations to the codespace. This applies to dotfiles containing applications and tool-specific settings unique to each developer, such as version control settings, terminal preferences, etc., contained in their respective files on a public (bare or working) Git repository. (Learn more here about managing dotfiles here.)
Conclusion
Remote development is a game-changer to the previous ways of writing code. With GitHub Codespaces at the forefront, possibilities are limitless to what lies ahead for a richer development experience. Hopefully, with this guide, we have a good headstart with using Codespaces in our future projects.