A modern desktop dashboard powered by real-time communications. Let's go.
Life happens in real time and information exchange should be the same way. This is easier said than done and the challenges transcend technology stacks. However, as communications between servers/clients get smarter, developers have been able to leverage sophisticated techniques to build for real-time communications between application platforms. Real-time apps, however, do not need to be for web apps only and can power desktop solutions for various enterprise workflows.
With modern open source frameworks like SignalR abstracting away network stack complexities, developers can focus on real-time app functionalities that enable powerful solutions. Desktop apps often embody busy UI and richness in functionality, quite a classic match for building real-time digital Dashboards—full of data visualizations to keep the user informed. And if building apps to target Windows, desktop app developers will be well served choosing the latest WinUI 3, a native UI framework for modern Windows desktops apps. Let's grab two popular .NET technologies—WinUI 3 to build a realistic dashboard with efficient UI, powered by real-time communications with a SignalR backend.
The SignalR Backend
SignalR facilitates adding real-time communication to web applications running on ASP.NET stack and connected clients across wide variety of platforms. Given a specific server/client pair, SignalR expertly chooses the best transport mechanism for real-time exchanges, with gracious fall-back plans. SignalR provides APIs for bidirectional remote procedure calls (RPCs) between server and client and abstracts away real-time communication complexities. SignalR uses the concept of Hub on the server side—an in-memory object that all clients connect up to for real time communications. The Hub allows SignalR to send and receive messages across machine boundaries, thus allowing clients to call methods on the server and vice versa. In addition to method invocation across programming paradigms, Hubs allows transport of named/strongly typed parameters over JSON or MessagePack data protocols.
The Hub
To build a real-time dashboard, let us first begin with a SignalR powered backend. This backend would, in essence, be the source of truth—collecting data from variety of inputs and pushing out the information to interested connected clients in real-time. First, we have to begin with the server-side SignalR Hub that will power our dashboard. We'll start with a new ASP.NET Core web application project and define a custom Dashboard Hub using the already included server-side SignalR plumbing in ASP.NET Core 3.1 shared framework:
using Microsoft.AspNetCore.SignalR;
using System.Text.Json.Serialization;
using System.Threading.Tasks;

namespace SignalRBackend.Hubs
{
    public class DashboardHub : Hub
    {
        public async Task SendDashboardUpdate(string dashupdate)
        {
            await Clients.All.SendAsync("ReceiveDashUpdate", dashupdate);
        }

        public async Task SendObjectUpdate(ChartData[] chartUpdate)
        {
            await Clients.All.SendAsync("ReceiveObjUpdate", chartUpdate);
        }
    }

    public class ChartData
    {
        public string Category { get; set; }
        public int Value { get; set; }
    }
}
We're declaring two Hub methods here - SendDashboardUpdate() to update some data indicator on a dashboard and SendObjectUpdate() to perhaps update a dashboard object databound to some UI. SignalR Hubs can work with simple data types, as well as, complex business objects. Notice the ChartData class here—while an oversimplification, this demonstrates a SignalR Hub accepting and passing along a C# data object. Serialization/Deserialization comes free. ReceiveDashUpdate() and ReceiveObjUpdate() are two methods this SignalR Hub would look to invoke in every connected client and pass along parameters.
Next up, we tweak the configurations in ASP.NET Core app's Startup.cs file—essentially adding a SignalR middleware to route appropriate requests to the SignalR Dashboard Hub:
public void ConfigureServices(IServiceCollection services)
{
    services.AddRazorPages();
    services.AddSignalR();
}

public void Configure(IApplicationBuilder app, IWebHostEnvironment env)
{
    ...
    ...
    app.UseEndpoints(endpoints =>
            {
                endpoints.MapRazorPages();
                endpoints.MapHub<DashboardHub>("/dashboardHub");
            });
}
Normally, simply invoking AddSignalR() is enough to establish the SignalR workflow and the Hub works as an in-memory object. This, however, has consequences when the web app if put behind a server farm or load balancing and a common resort is to use a Redis Backplane to keep all connected clients in sync across servers. If however, you do not wish to host SignalR yourself, Azure SignalR Service is here to help—a managed service to take away to complexity of SignalR Hubs and offer lots of scaling.
Letting Azure Signal Service do the heavy lifting is easy—the web app can stay local, but SignalR Hub communications can be handled by Azure. We simply need to pull in the Azure.SignalR Nuget package and augment with AddAzureSignalR() in our configurations.
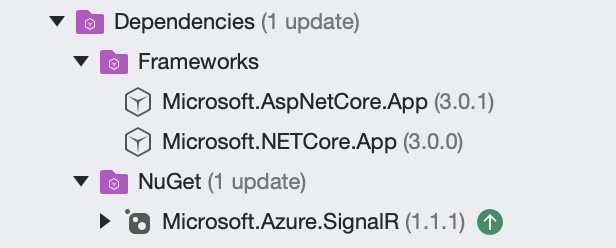
public void ConfigureServices(IServiceCollection services)
{
    services.AddRazorPages();
    services.AddSignalR().AddAzureSignalR();
}
All you need to let Azure SignalR Service to manage Hub communications is to pull in the Connection String and Access Token from the corresponding Azure service. .NET CLI provides a handy Secrets Manager tool to store the configuration settings instead of adding them to code—when deployed, this could be an Application setting read from Azure Secrets.
The Web Client
Next up, let's build the first client that will connect up to our Dashboard SignalR Hub—a web client within the project itself. This is akin to Admin users of the dashboard having a web interface to push information to clients or automate the flow of information. SignalR web clients have some JavaScript dependencies, commonly brought in using Library Manager (LibMan) to get the bits from Unpkg, thus providing content delivery node functionality across usage geographies. The libman.json file spells out dependencies that are brought down to local wwwroot folder:
{
  "version": "1.0",
  "defaultProvider": "unpkg",
  "libraries": [
    {
      "library": "@microsoft/signalr@latest",
      "destination": "wwwroot/js/signalr",
      "files": [
        "dist/browser/signalr.js",
        "dist/browser/signalr.min.js"
      ]
    }
  ]
}
Let us add a little bit of UI to our web client as in the Dashboard.cshtml page. Assuming we'll be driving a real-time dashboard from the SignalR backend, there is a user input to update a data value and two buttons—potentially to update a Gauge and a Grid that the client dashboard may have.
@page
<div class="container">
<div class="row"> </div>
<div class="row">
<div class="col-2">Gauge Value</div>
<div class="col-4"><input type="text" id="gaugeValue" /></div>
</div>
<div class="row"> </div>
<div class="row">
<div class="col-6">
<input type="button" id="sendDashButton" value="Gauge Update" />
<input type="button" id="sendObjButton" value="Grid Update" />
</div>
</div>
<div class="row">
<div class="col-12">
<hr />
</div>
</div>
<div class="row">
<div class="col-6">
<ul id="dashUpdateList"></ul>
</div>
</div>
</div>
<script src="https://www.telerik.com~/js/signalr/dist/browser/signalr.js"></script>
<script src="https://www.telerik.com~/js/dashboard.js"></script>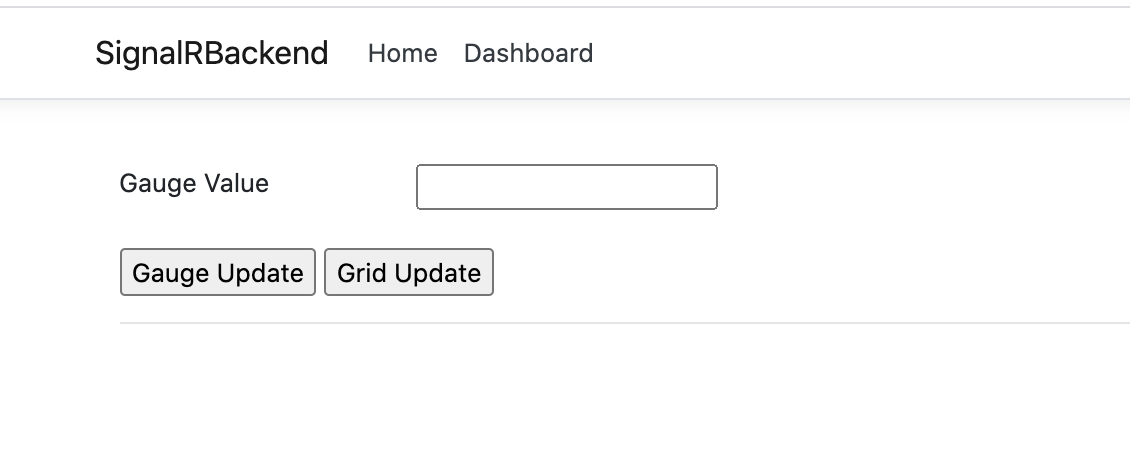
The simple web interface works for what it meant to do—if desired, we could add any number of inputs so the Admin users could change variety of values to be passed down to client dashboards. Now comes hooking everything up in dashboard.js file, as referenced in our page.
"use strict";

var connection = new signalR.HubConnectionBuilder().withUrl("/dashboardHub").build();

connection.on("ReceiveDashUpdate", function (dashupdate) {
    var encodedMsg = "Dash Update: " + dashupdate;
    var li = document.createElement("li");
    li.textContent = encodedMsg;
    document.getElementById("dashUpdateList").appendChild(li);
});

document.getElementById("sendDashButton").addEventListener("click", function (event) {
    var gaugeupdate = document.getElementById("gaugeValue").value;
    connection.invoke("SendDashboardUpdate", gaugeupdate).catch(function (err) {
        return console.error(err.toString());
    });
    event.preventDefault();
});

document.getElementById("sendObjButton").addEventListener("click", function (event) {
    var chartdata = [{ "category": "A", "value": 5 }, { "category": "B", "value": 10 }];
    connection.invoke("SendObjectUpdate", chartdata).catch(function (err) {
        return console.error(err.toString());
    });
    event.preventDefault();
});

connection.start().then(function () {
}).catch(function (err) {
    return console.error(err.toString());
});
Few key things going on here. The sendDashButton's click event handler is wired up to grab the user input and pass it back to the SendDashboardUpdate() Hub method. The sendObjButton's click event handler news up a JSON object representing an array of ChartData values—hard coded here, but could easily be driven by user input. The SendObjectUpdate() Hub method is invoked next, passing along the JSON serialized content, which would deserialized/acted upon Hub-side and sent back down to every connected client. We also use the HubConnectionBuilder() to point the web client back to the Dashboard Hub and start up the SignalR connection. That's it, our SignalR backend is now ready for dashboard clients to connect up to and receive updates from the Hub.
WinUI Dashboard
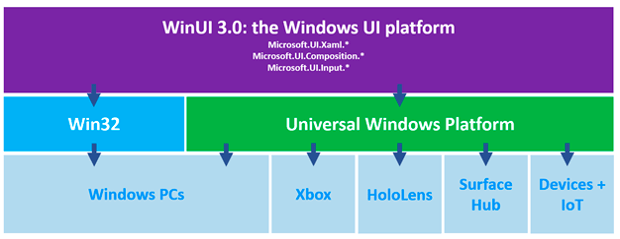
Windows UI Library (WinUI) 3 is in Preview 4 as of writing and is the way of the future for Windows apps. WinUI 3 represents the next generation UI framework that is abstracted from Windows updates and promises to work over .NET Native/.NET runtimes. While there are several ways to target the Windows desktop, choosing WinUI 3 for greenfield projects makes things future proof—combining the best tooling and latest in UI technology stacks.
A Dashboard needs UI
WinUI provides a great starting point in terms of UI components, many of which exude the Fluent Design System. But a full-featured desktop dashboard could likely use complex visualizations—Telerik UI for WinUI can help. Telerik WinUI components provide performant feature-rich UI controls that sport intuitive APIs, MVVM support and built-in accessibility/localization. Telerik UI for WinUI suite is growing fast and can provide some of the data visualization needed for our WinUI dashboard.

So for our WinUI dashboard, we'll spin up a new WinUI project for a Blank App that runs over UWP and then bring in the Telerik UI for WinUI dependency, either through NuGet package or referencing bits. To give our dashboard a realistic look and feel, let us start with a Radial Gauge. a Linear Gauge and the ubiquitous DataGrid—the world is your oyster to provide the dashboard with all the visualization your app demands. Here is the markup in our MainPage.xaml:
<Page
x:Class="WinUIDashboard.MainPage"
xmlns="http://schemas.microsoft.com/winfx/2006/xaml/presentation"
xmlns:x="http://schemas.microsoft.com/winfx/2006/xaml"
xmlns:local="using:WinUIDashboard"
xmlns:d="http://schemas.microsoft.com/expression/blend/2008"
xmlns:mc="http://schemas.openxmlformats.org/markup-compatibility/2006"
xmlns:telerikGrid="using:Telerik.UI.Xaml.Controls.Grid"
xmlns:telerik="using:Telerik.UI.Xaml.Controls.DataVisualization"
mc:Ignorable="d"
Background="{ThemeResource ApplicationPageBackgroundThemeBrush}">

<StackPanel Orientation="Vertical" Margin="30">
    <telerik:RadRadialGauge x:Name="RadialGauge" LabelStep="20" TickStep="10" MaxValue="120" LabelRadiusScale="1.10" Width="400" Height="200">
        <telerik:RadRadialGauge.DataContext>
            <local:DummyViewModel/>
        </telerik:RadRadialGauge.DataContext>
        <telerik:ArrowGaugeIndicator Brush="Blue" Thickness="3" ArrowTailRadius="2" Value="{Binding GaugeValue}"/>
        <telerik:SegmentedRadialGaugeIndicator Value="120">
            <telerik:BarIndicatorSegment Stroke="Green" Length="3"/>
            <telerik:BarIndicatorSegment Stroke="Yellow" Length="2" />
            <telerik:BarIndicatorSegment Stroke="Red" Length="1" />
        </telerik:SegmentedRadialGaugeIndicator>
    </telerik:RadRadialGauge>

    <telerik:RadLinearGauge x:Name="LinearGauge" LabelStep="40" TickStep="10" MaxValue="120" Width="400" Height="50">
        <telerik:RadLinearGauge.DataContext>
            <local:DummyViewModel/>
        </telerik:RadLinearGauge.DataContext>
        <telerik:LinearBarGaugeIndicator Brush="Blue" Thickness="5" telerik:RadLinearGauge.IndicatorOffset="-10" Value="{Binding GaugeValue}"/>
            <telerik:SegmentedLinearGaugeIndicator Value="120">
                <telerik:BarIndicatorSegment Stroke="Green" Length="3"/>
                <telerik:BarIndicatorSegment Stroke="Yellow" Length="2" />
                <telerik:BarIndicatorSegment Stroke="Red" Length="1" />
            </telerik:SegmentedLinearGaugeIndicator>
    </telerik:RadLinearGauge>

    <Grid>
        <telerikGrid:RadDataGrid x:Name="DataGrid" Height="500" />
    </Grid>
</StackPanel>
</Page>
What is to be noted are the namespaces that bring in the Telerik assemblies—with the correct references, we can render our Gauges and the Grid. We're also using a local DummyViewModel as a DataContext for the Gauges UI and data binding the Gauge pointers/indicators to a GaugeValue variable.
Getting Ready Data Binding
We would like the dashboard Grid/Gauges to be data bound. This makes the UI dynamic and for the dashboard data to be set from outside, like from our SignalR backend. Here is the code-behind:
using System;
using System.Collections.Generic;
using System.IO;
using System.Linq;
using System.Runtime.InteropServices.WindowsRuntime;
using Windows.Foundation;
using Windows.Foundation.Collections;
using Microsoft.UI.Xaml;
using Microsoft.UI.Xaml.Controls;
using Microsoft.UI.Xaml.Controls.Primitives;
using Microsoft.UI.Xaml.Data;
using Microsoft.UI.Xaml.Input;
using Microsoft.UI.Xaml.Media;
using Microsoft.UI.Xaml.Navigation;
using Microsoft.AspNetCore.SignalR.Client;
using System.Threading.Tasks;
using Telerik.UI.Xaml.Controls.DataVisualization;

namespace WinUIDashboard
{
    public sealed partial class MainPage : Page
    {
        DummyViewModel vm = new DummyViewModel();

        public MainPage()
        {
            this.InitializeComponent();
            this.DataGrid.ItemsSource = vm.GridValues;
        }
    }

    public class DummyViewModel
    {
        public int GaugeValue { get; set; }
        public List<GridData> GridValues { get; set; }

        public DummyViewModel()
        {
            this.GaugeValue = 0;

            this.GridValues = new List<GridData> {
                            new GridData { Category = "A", Value = 20 },
                            new GridData { Category = "B", Value = 30 }
                            };
        }
    }

    public class GridData
    {
        public string Category { get; set; }
        public int Value { get; set; }
    }
}
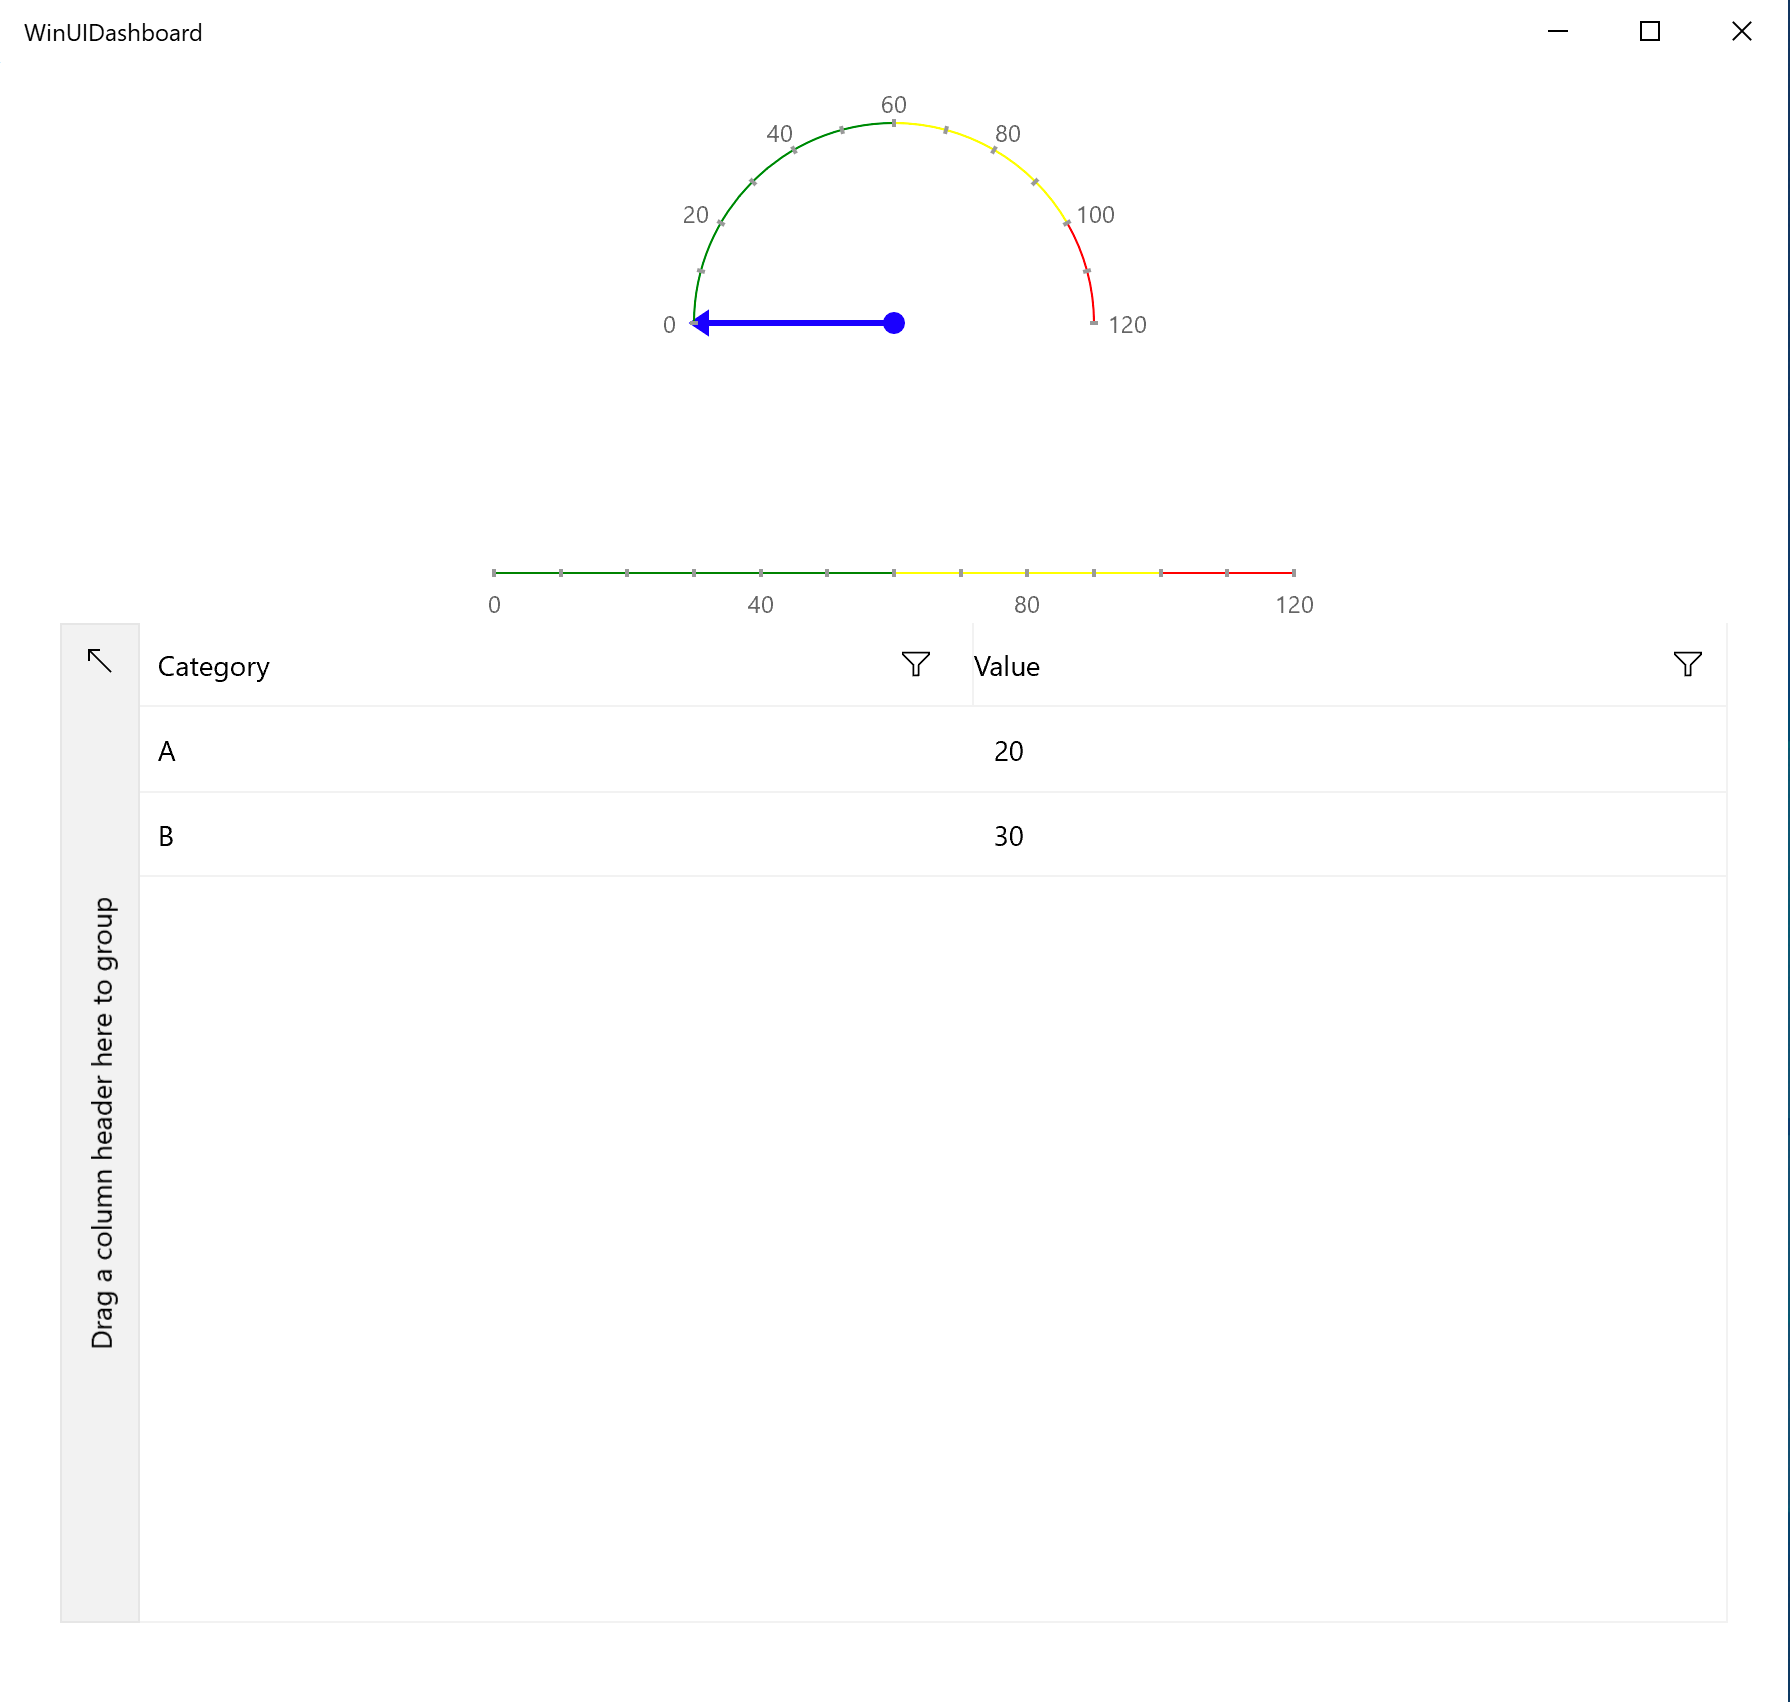
As evident, the GridData class is the same as the ChartData class the SignalR backend knows how to work with—this being bound to the DataGrid using the DummyViewModel. And the GaugeValue property drives the pointers used in both the Radial and Linear Gauges. With the default data values initialized, we can fire up our WinUI app—and voila, we see a dashboard that is ready for real-time updates.
Bringing in Real-Time with SignalR
Now, all that is left to do is for the WinUI app to connect up to the SignalR backend Hub. Let's sprinkle in some real-time communications in our MainPage.xaml.cs:
namespace WinUIDashboard
{
    public sealed partial class MainPage : Page
    {
        DummyViewModel vm = new DummyViewModel();
        HubConnection hubConnection;

        public MainPage()
        {
            this.InitializeComponent();
            this.DataGrid.ItemsSource = vm.GridValues;
            DoRealTimeSuff();
        }

        async private void DoRealTimeSuff()
        {
            SignalRDashSyncSetup();
            await SignalRConnect();
        }

        private void SignalRDashSyncSetup()
        {
            hubConnection = new HubConnectionBuilder().WithUrl($"https://LocalHost or Hosted URL/dashboardHub").Build();

            hubConnection.On<string>("ReceiveDashUpdate", (dashupdate) =>
            {
                var receivedDashUpdate = dashupdate;
                ((ArrowGaugeIndicator)this.RadialGauge.Indicators[0]).Value = Int32.Parse(dashupdate);
                ((LinearBarGaugeIndicator)this.LinearGauge.Indicators[0]).Value = Int32.Parse(dashupdate);
            });

            hubConnection.On<GridData[]>("ReceiveObjUpdate", (gridUpdate) =>
            {
                var receivedChartUpdate = gridUpdate;
                this.DataGrid.ItemsSource = gridUpdate;
            });
        }

        private async Task SignalRConnect()
        {
            try
            {
                await hubConnection.StartAsync();
            }
            catch (Exception ex)
            {
                // Connection failed.
            }
        }
    }
}
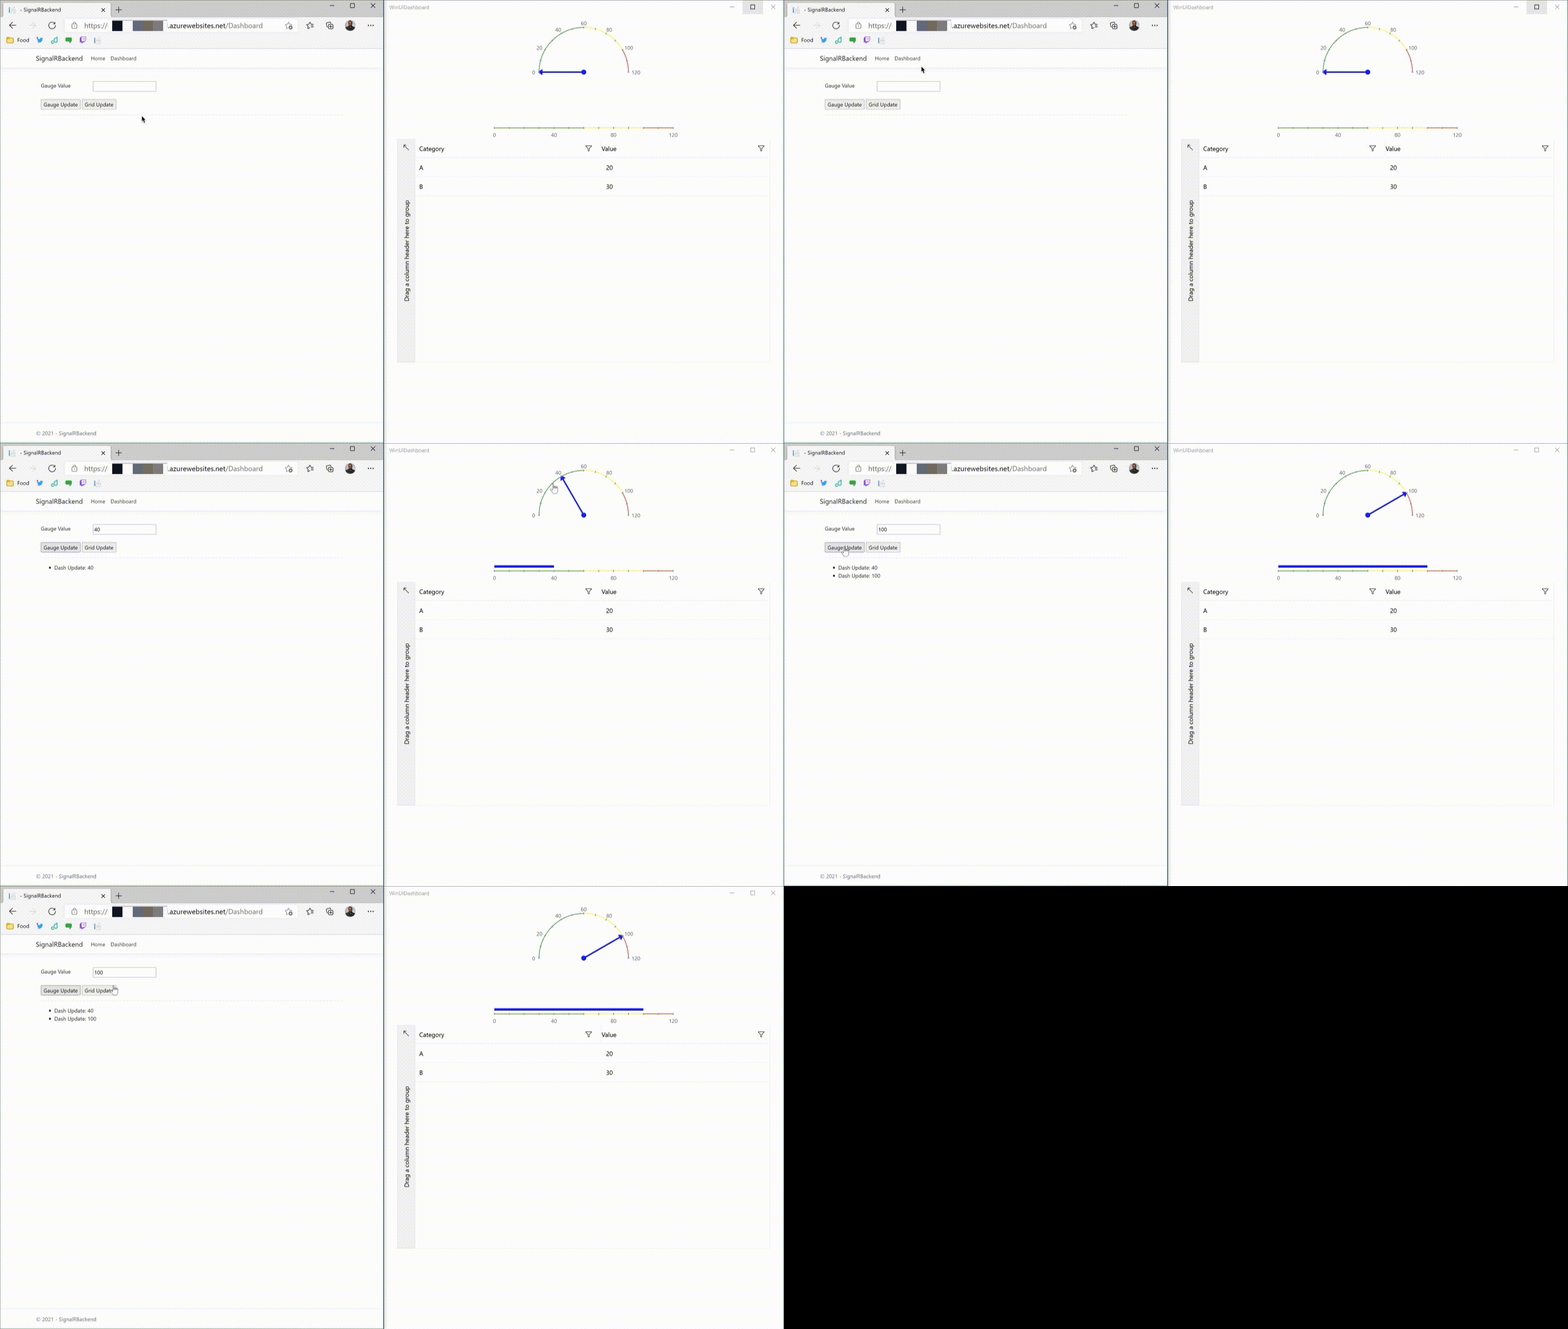
As evident, we're using the HubConnection to point our app to the SignalR backend's Dashboard Hub—this could be Localhost, an NGrok URL if testing on Localhost outside of machine domain or a remote URL if the SignalR backend web app is hosted in the cloud. Once the connection is started up, we listen in with two client-side event handlers that the SignalR Hub can invoke—ReceiveDashUpdate() updates the pointers/indicators on the two Gauges and ReceiveObjUpdate() receives the updated object collection before rebinding to the DataGrid. The result—a real-time WinUI dashboard that is powered by the SignalR backend. Hallelujah!
Conclusion
Desktop apps are here to stay and power a lot of enterprise workflows. When building for Windows desktop, WinUI 3 represents the future—a modern UI framework that rides over several runtimes and welcomes various programming paradigms. Desktop apps also need not be boring and can feature complex dashboard powered by rich data visualizations. And what good is data if not real time? SignalR is a wonderful piece of technology that abstracts network stack complexities to enable real time communications across app platforms. SignalR sits on top of ASP.NET technology stack and can empower real-time solutions across variety of clients, including desktop of course.
All the needed technology is here—modern Windows desktop app in the form of a WinUI dashboard powered by real-time communications from a cloud-hosted SignalR backend. What's left to do is to reimagine workflows and sprinkle in some real-time magic. Cheers to that.