Sponsored by the Kendo UI for Angular team
Want to learn more about creating great Angular web apps? It all starts out with Kendo UI for Angular - a complete UI component library that allows you to quickly build high-quality, responsive apps. It includes everything you need, from grids and charts to dropdowns and gauges.
We on the Kendo UI for Angular team are committed to bringing you the latest tips and tricks in the world of Angular development. We hope you enjoy the post!
In this tutorial, you’ll see how easy it is to get started using Kendo UI components for Angular, and how to create a rich editor using the Editor component from Kendo UI.
Angular is a JavaScript framework for creating web applications. It promotes best practices and provides tools to ease the development process for software developers. Angular uses declarative templates, dependency injection and Observables to power applications that can be run on several platforms.
We’ll be using Kendo UI’s Editor component to create a web rich editor application. With this application, users can directly convert text to markup.
To follow this tutorial, you need a basic understanding of Angular. Ensure that you have Node and npm installed before you get started.
If you have no prior knowledge of Angular, kindly follow the official tutorial here. You can return to the article when you’re done.
We’ll be building the application using the following tools:
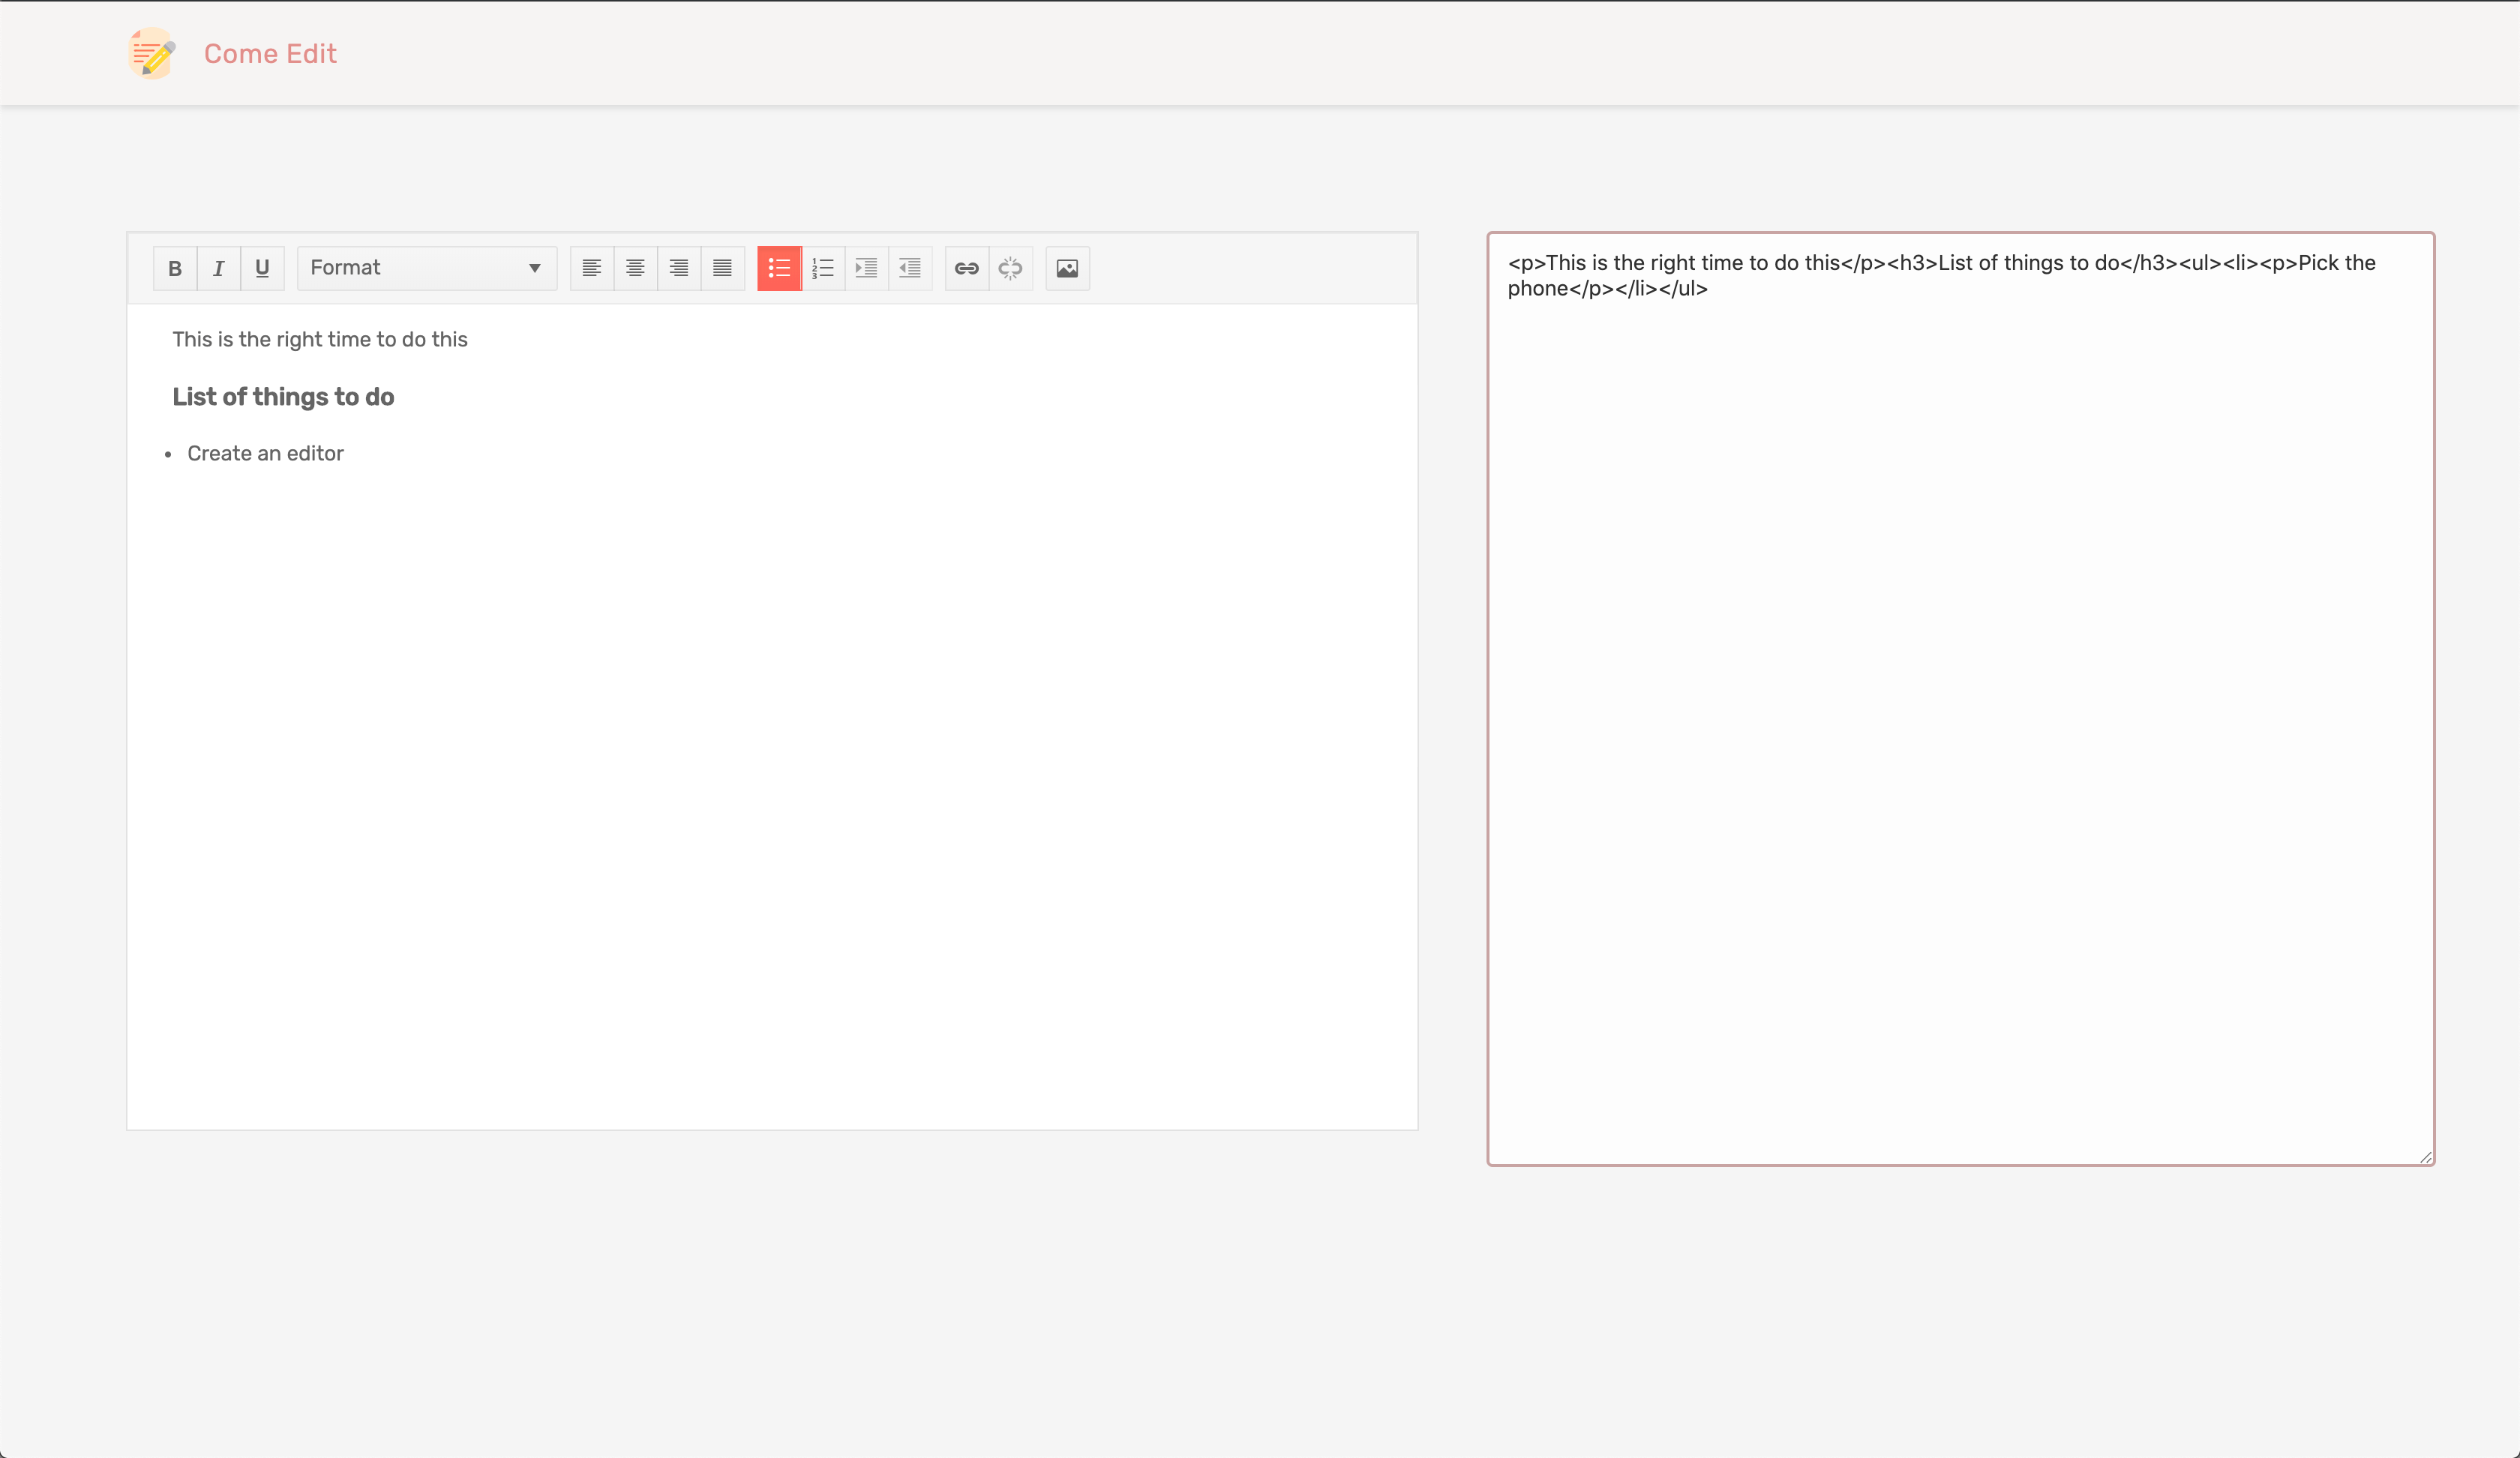
Here’s a screenshot of the application we’ll be building:


Initializing Application and Installing Dependencies
To get started, we will use the CLI (Command Line Interface) provided by the Angular team to initialize our project.
First, install the CLI by running npm install -g @angular/cli. npm is a package manager used for installing packages. It will be available on your PC if you have Node installed; if not, download Node here. To create a new Angular project using the CLI, open a terminal and run:
ng new angular-editor --style=scss
This command is used to initialize a new Angular project; the project will be using SCSS as the pre-processor. Next, run the following command in the root folder of the project to install dependencies:
ng add @progress/kendo-angular-editor
Start the Angular development server by running ng serve in a terminal in the root folder of your project.
Header Component
The header component will display the application logo and very little information. This component is mostly a display component. Run the following command to create the header component:
ng generate component header
Next, open the src/app/header/header.component.html file and update it with the code below:
<!-- src/app/header/header.component.html --><header><divclass="brand"><imgsrc="/assets/document.svg"alt="avatar"><h5>Come Edit</h5></div></header>Note: Image asset used can be found here in the GitHub repository. The logo is from https://flaticon.com.
Next, we’ll style the header. Open the header.component.scss file and update it with the snippet below:
header {display: flex;background-color: white;margin:0;padding:17px 5%;color: whitesmoke;box-shadow:02px 4px 0rgba(0, 0, 0, 0.1);background:#fbf3f259;.brand {flex:1;display: flex;align-items: center;img {height:35px;border-radius:50%;margin-right:17px;}h5 {font-size:18px;margin:0;font-weight: normal;letter-spacing:0.4px;color:#d8625e;opacity:0.7;text-transform: capitalize;}}}Here, we’ve added a couple of styles to beautify the header. Next, we’ll render the header component in the app.component.html file, open the file and replace the contents with the snippet below:
<main><app-header></app-header></main>Since we’ll be using external fonts, we’ll update the src/index.html file with a link tag alongside the src/styles.scss file.
<!-- index.html --><!doctype html><htmllang="en"><head><metacharset="utf-8"><title>AngularEditor</title><basehref="/"><metaname="viewport"content="width=device-width, initial-scale=1"><linkhref="https://fonts.googleapis.com/css?family=Rubik:400,500"rel="stylesheet"><linkrel="icon"type="image/x-icon"href="favicon.ico"></head><body><app-root></app-root></body></html>Then we’ll select Rubik as our default font family. We’ll also negate the default padding and margin on the body and html elements. Open the styles.scss file and update it with the following content:
// styles.scssbody, html{margin:0;padding:0;font-family:'Rubik', sans-serif;background-color: whitesmoke;}This is the current view of the page after rendering the header component:


Next, we’ll create the editor component to enable users to create rich textual content.
Editor Component
Kendo UI provides a component that is useful for creating content using a simple WYSIWYG interface. The component features a rich set of controls for generating markup language elements.
Since we’ve already installed the @progress/kendo-angular-editor package using the CLI, it’ll be available in the app.module.ts file.
We’ll create an editor component that will render the component from Kendo UI. To create the component, run the following command:
ng generate component editor
Open the editor.component.html file and copy the following content into the file:
<!-- src/app/editor/editor.component.html --><section><div><kendo-editor(valueChange)="valueChange($event)"></kendo-editor></div><div><textareaname="editorOutput"id=""cols="30"rows="10"[innerHTML]="value"></textarea></div></section>The template will render the editor component from Kendo UI and a textarea element that shows the generated markup for the content created in the editor interface. We attached an event listener on the kendo-editor component, so whenever the content is updated, the innerHTML of the textarea component is updated too.
The editor component can take several controls alongside custom controls that can be rendered within the element. You can also use the component with forms by attaching the ngModel directive to the component.
Next, we’ll add some styles to the component. Open the editor.component.scss file and copy the styles into the file:
// src/app/editor/editor.component.scsssection {width:90%;margin:5% auto 0;display: flex;div:nth-child(1){width:57%;.k-editor {height:600px;}}div:nth-child(2){width:40%;margin-left:3%;textarea {height:100%;width:100%;border:2px solid rosybrown;border-radius:4px;font-size:14px;opacity:0.8;padding:10px 12px;}}}Next, we’ll update the editor.component.ts file to declare the variables used in the template file. Open the file and update it to be similar to the snippet below:
import{ Component, OnInit }from'@angular/core';
@Component({
  selector:'app-editor',
  templateUrl:'./editor.component.html',
  styleUrls:['./editor.component.scss'],})exportclassEditorComponentimplementsOnInit{constructor(){}
  value ='';valueChange(e){this.value = e;}ngOnInit(){}}
Next, we’ll render the editor component in the main component file. Open the app.component.html file and render the editor component:
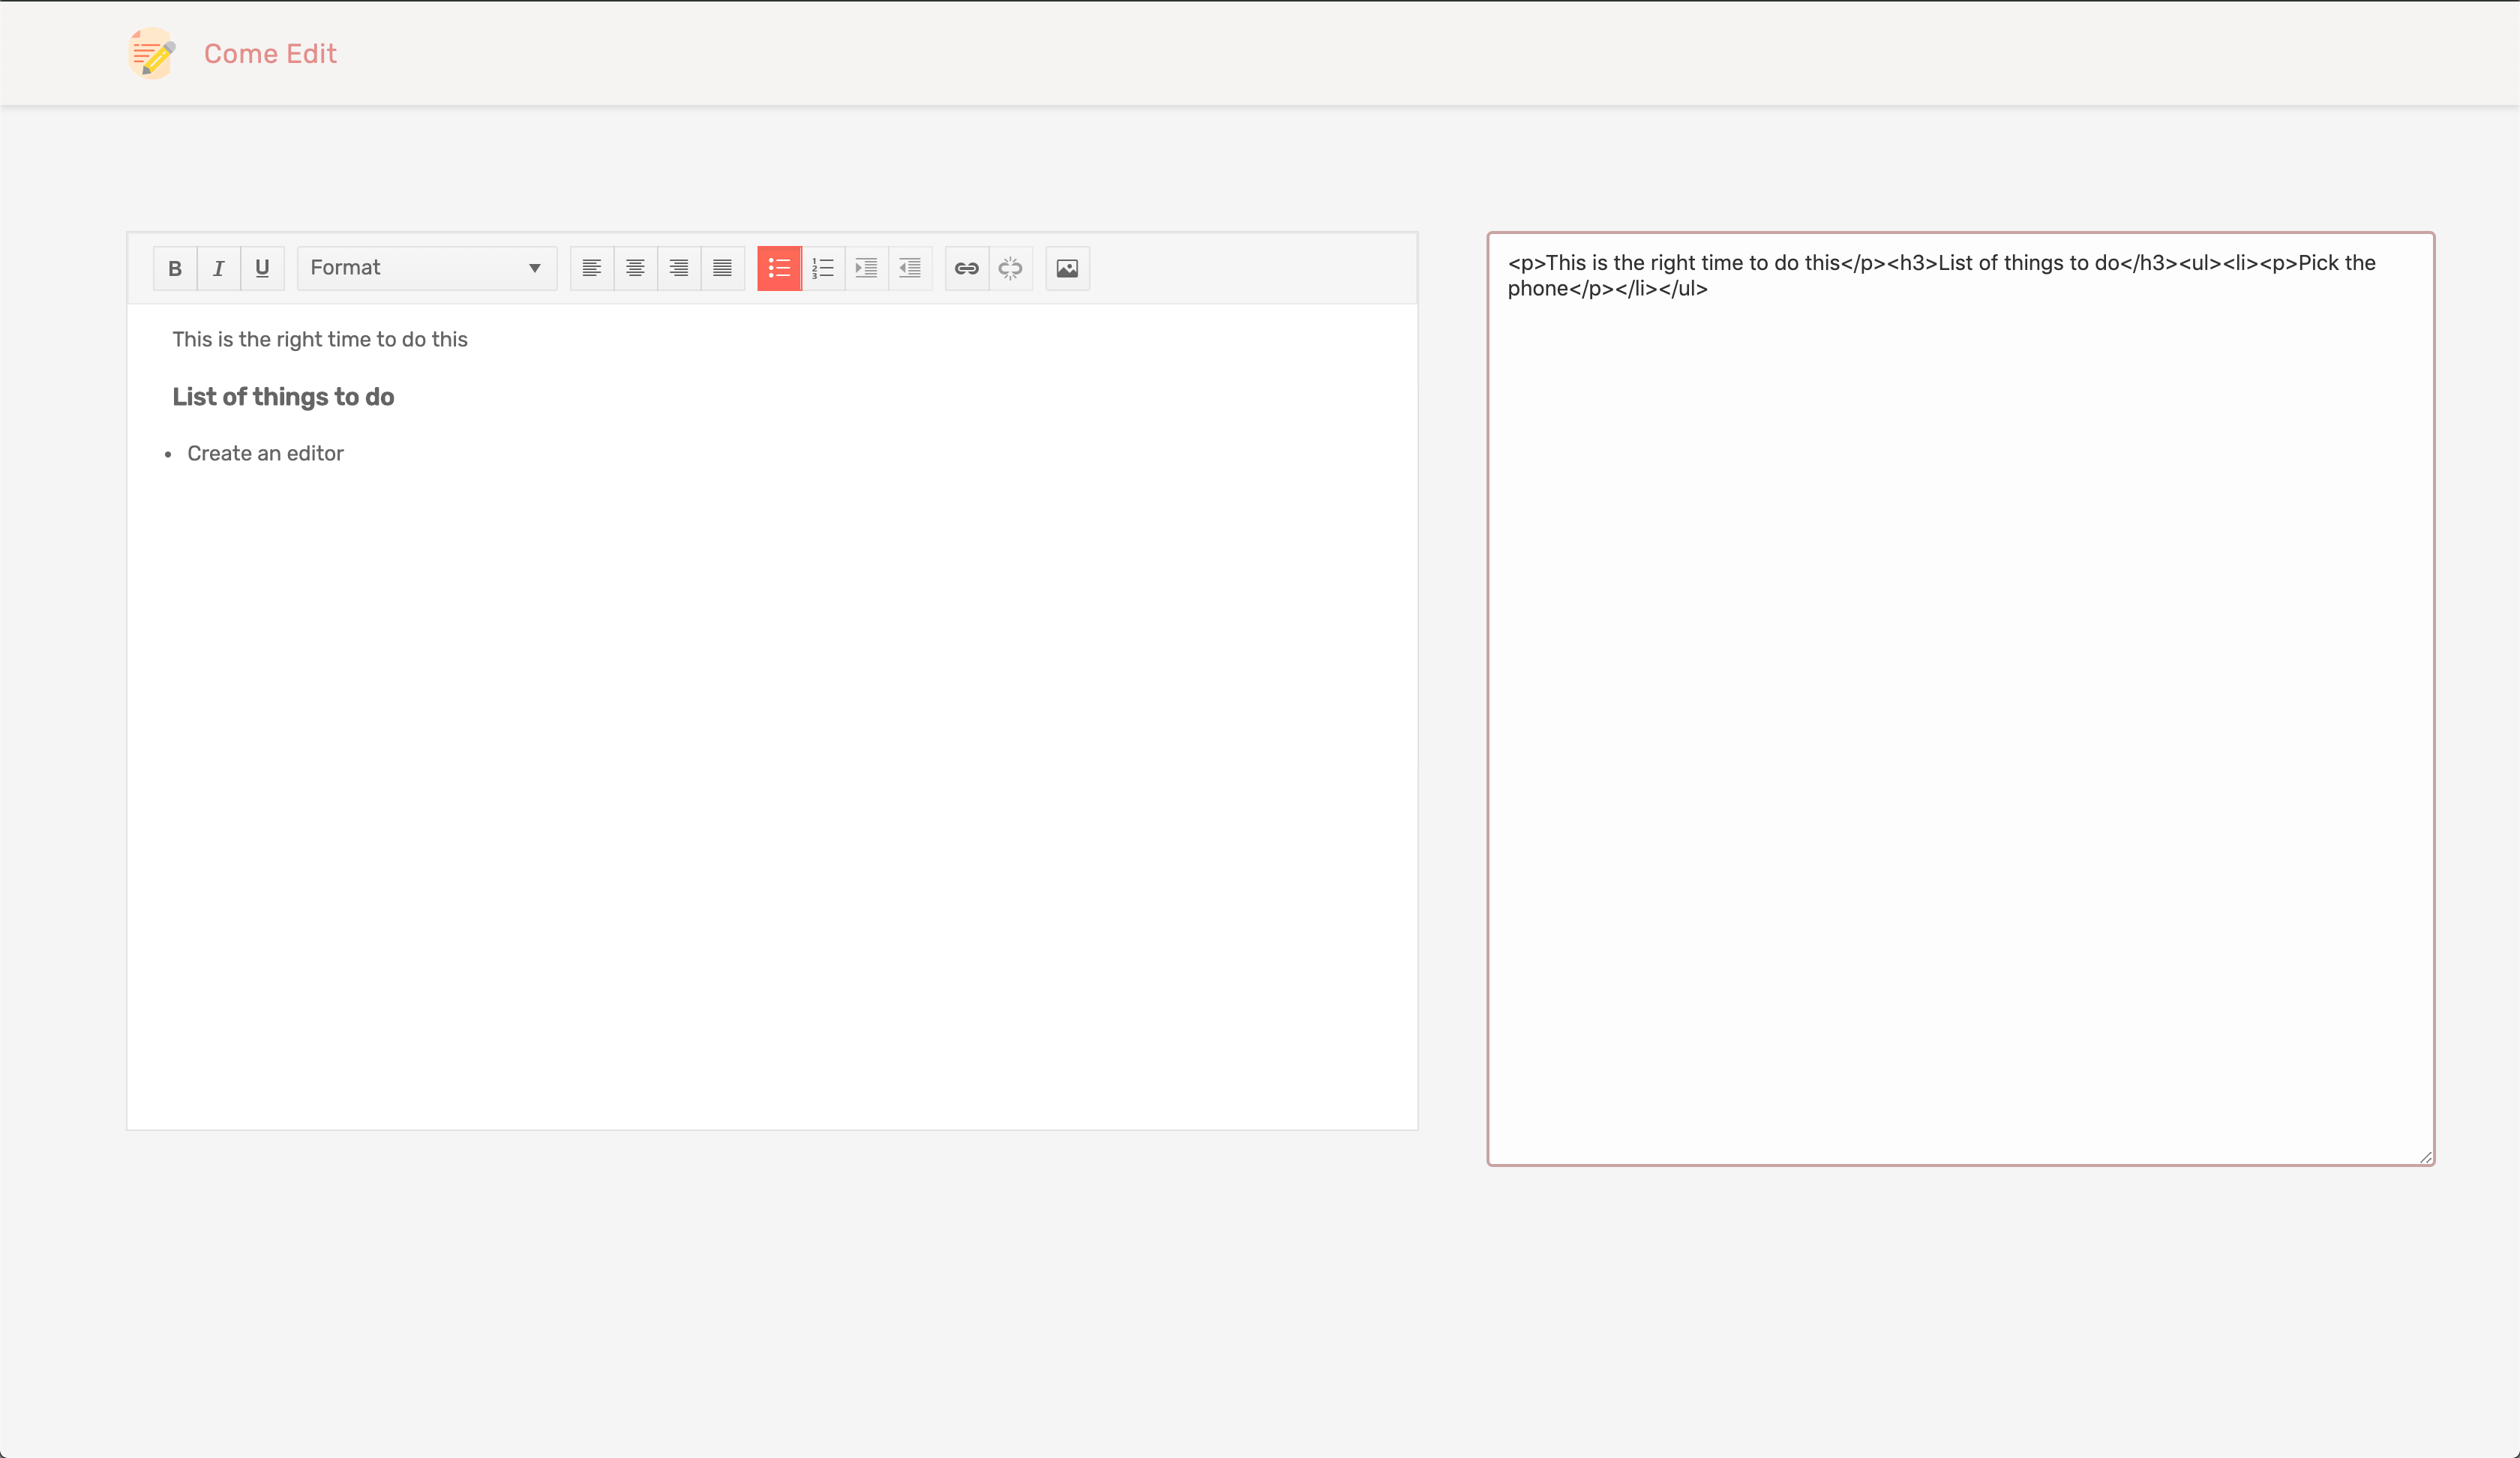
<main><app-header></app-header><app-editor></app-editor></main>Now if you visit http://localhost:4200 you should see the editor displayed:


Conclusion
In this article, we saw how we could utilize one of Kendo UI’s collection of robust components to create a rich content WYSIWYG editor. Alongside this component, Kendo UI also provides components that can be easily integrated into any Angular application, like DatePickers, DropDown components, Chat interface, Dialogs, Grids and a load of other components. Visit their official documentation page to get started. You can find the source code for the demo here.
