Over the past year, we've been bringing .NET Core support to the Telerik Document Processing Libraries. We’ve recently added PdfProcessing to that list. Let's try it in an Azure Function with a quick and powerful demo walkthrough.
The Telerik Document Processing Libraries are a set of components that allow you to create, import, modify and export Excel, Word and PDF documents without external dependencies. Until recently, these libraries only worked in a .NET Framework environment.
Over the past year, we’ve been putting in a lot of work into making the libraries cross-platform by porting the APIs to work in .NET Core and Mono environments via .NET Standard 2.0 support. We started with the release of the RadSpreadStreamProcessing and RadZipLibrary. In the last release, 2019 R2, we’ve added RadPdfProcessing to that list.
In this article, I will demonstrate the ability to run RadPdfProcessing in an Azure Function that can create a 10,000-page PDF document in 8 seconds! Let’s get started.
Setup
Before moving forward, double check that you have the prerequisites installed. You’ll need:
- Visual Studio 2019 installed with the Azure development workload
- Have the Azure Functions tools installed.
- An Azure account is optional, but recommended (you can test functions locally without it)
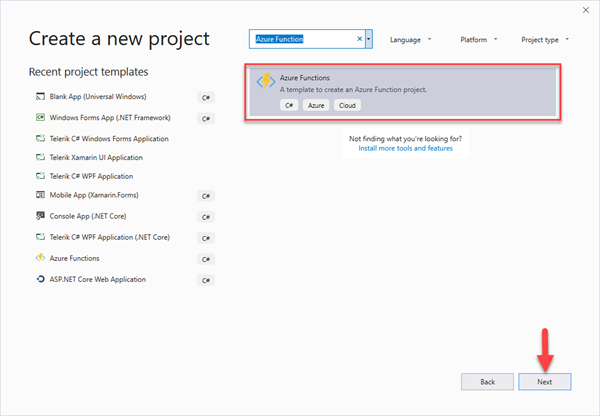
To get started, open Visual Studio 2019 and create a new C# Azure Functions project (Fig.1).
Fig.1 (click to enlarge any figure)
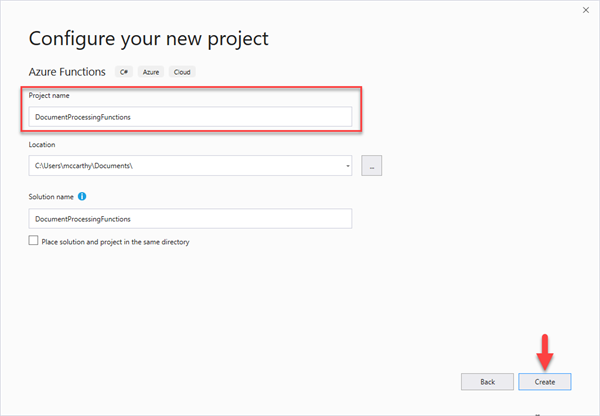
Next, name it "DocumentProcessingFunctions" and click the Create button (Fig.2).
Fig.2
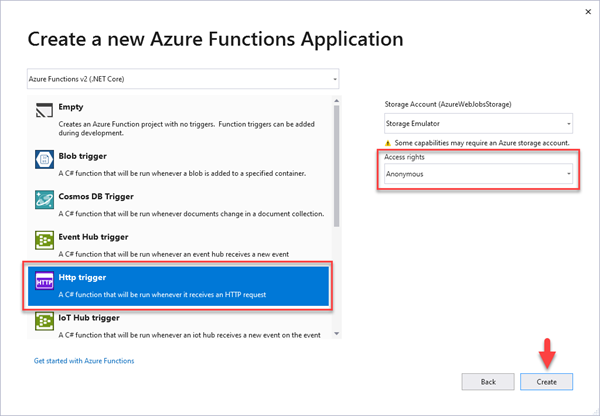
The last part of project wizard is to configure the function settings. To keep this demo simple, let's choose HttpTrigger and set access rights to Anonymous (Fig.3).
Fig.3
When Visual Studio finishes generating the project, do a project Rebuild to restore the NuGet packages and compile.
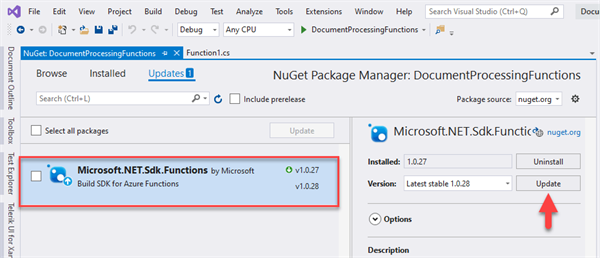
There's one last thing to do before we start writing code. At the time of writing this article, the project's Microsoft.NET.Sdk.Functions package is a version behind. Let's update that now (Fig.4).
Fig.4
Adding PdfProcessing References
Now that the project is primed, it's time to add the Telerik Document Processing assembly references. There are two ways to do this; via NuGet package or assembly reference.
Although the .NET Framework versions have NuGet packages, at this time the .NET Standard versions are only shipped via NuGet inside the Telerik.UI.for.Xamarin package. However, installing the Telerik UI for Xamarin NuGet package pulls in a bunch of unnecessary dependencies (e.g. Xamarin.Forms). Therefore, the best option is to reference the assemblies directly.
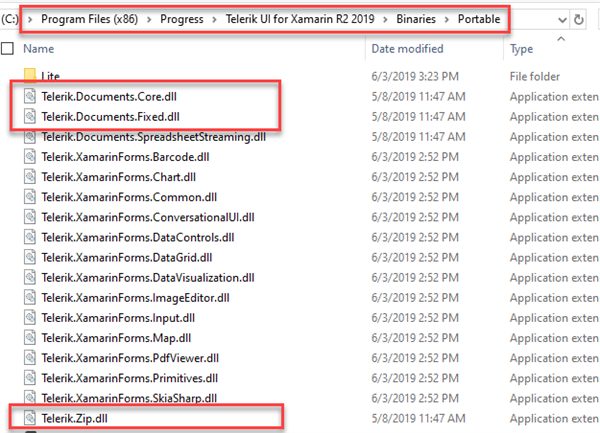
You can find the Document Processing assemblies in the Telerik UI for Xamarin installation folder. This folder location depends on which operating system you're using.
- Mac: User\Documents\Progress\Telerik UI for Xamarin [2019 R2 or later]\Binaries\Portable
- PC: C:\Program Files (x86)\Progress\Telerik UI for Xamarin [2019 R2 or later]\Binaries\Portable (Fig.5).
Fig.5
Note: If you do not already have UI for Xamarin installed, you have two options for a quick fix. Option 1: If you have a license, download it from the Telerik UI for Xamarin downloads page. Option 2: If you don't have a license, starting a trial on the Telerik UI for Xamarin page will download the installer.
Let's now add the three required Telerik references for RadPdfProcessing to the project (Fig.6).
Fig.6
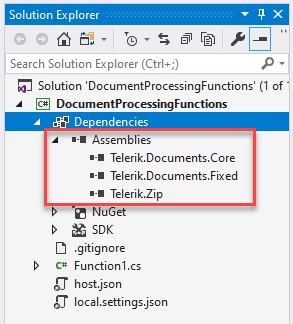
Now that the references are added, we're ready to start writing the function.
Writing the Function
The project gets generated with a generic Function1 class. We don't want to use this because the function's class name is typically used for the FunctionName, which becomes part of URL for the HttpTrigger. Yes, you can rename the Function to be different than the class, but we'll stick to the defaults for this tutorial.
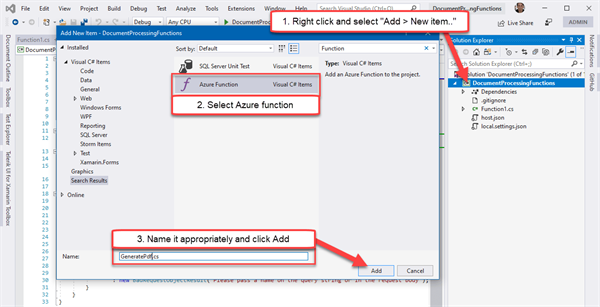
Let's delete Function1.cs and add a new function to the project. You can do this with the same way you add a class, except you want to choose the "Azure function" template (Fig.7).
Fig.7
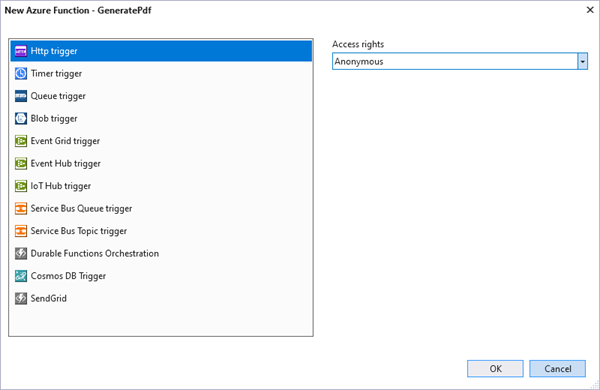
This will open a new window in which you select the function's settings. As we did earlier, choose HttpTrigger and set the access rights to Anonymous (Fig.8).
Fig.8
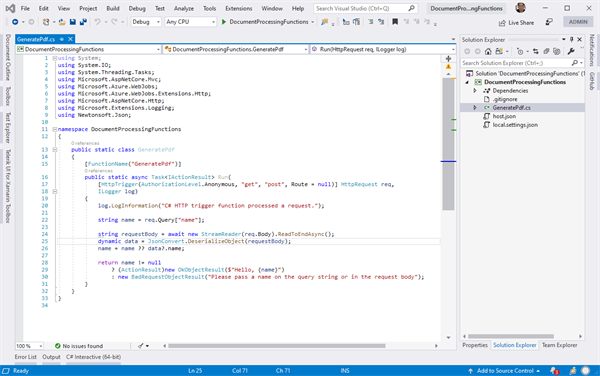
Your project should now look like this (Fig.9):
Fig.9
Walking through how Azure functions work, or instructions on how to use RadPdfProcessing itself, is outside the scope of this tutorial. However, I still didn't want to drop a big code block on you without explanation, so I've left code comments to explain what each section does.
At a high level, here are the stages:
1. The function is triggered when a GET/POST is requested at the function's URL. There may or may not be a pageCount parameter passed in the query string (default is 10,000 pages).
2. A sample BarChart.pdf file is downloaded from a blob using HttpClient to be used as the original source.
3. RadPdfProcessing comes in and creates a working document. A for-loop, using the pageCount, is used to insert a page into that document (that page is a full copy of the sample PDF).
4. The final PDF file created by RadPdfProcessing is returned to the client using FileResult.
Here's the code, you can replace the entire contents of your GeneratePdf class with it:
usingSystem;usingSystem.IO;usingSystem.Linq;usingSystem.Net.Http;usingSystem.Threading.Tasks;usingSystem.Web.Http;usingMicrosoft.AspNetCore.Mvc;usingMicrosoft.Azure.WebJobs;usingMicrosoft.Azure.WebJobs.Extensions.Http;usingMicrosoft.AspNetCore.Http;usingMicrosoft.Extensions.Logging;usingTelerik.Windows.Documents.Fixed.FormatProviders.Pdf.Export;usingTelerik.Windows.Documents.Fixed.FormatProviders.Pdf.Streaming; namespaceDocumentProcessingFunctions{ publicstaticclassGeneratePdf { [FunctionName("GeneratePdf")] publicstaticasync Task<IActionResult> Run( [HttpTrigger(AuthorizationLevel.Anonymous, "get", "post", Route = null)] HttpRequest req, ILogger log, ExecutionContext executionContext) { log.LogInformation("START PROCESSING"); // Check to see if there was a preferred page count, passed as a querystring parameter. stringpageCountParam = req.Query["pageCount"]; // Parse the page count, or use a default count of 10,000 pages. var pageCount = int.TryParse(pageCountParam, outintcount) ? count : 10000; log.LogInformation($"PageCount Defined: {pageCount}, starting document processing..."); // Create the temporary file path the final file will be saved to. var finalFilePath = executionContext.FunctionAppDirectory + "\\FileResultFile.pdf"; // Remove any previous temporary file. if(File.Exists(finalFilePath)) { File.Delete(finalFilePath); } // Create a PdfStreamWriter. using(var fileWriter = newPdfStreamWriter(File.Create(finalFilePath))) { fileWriter.Settings.ImageQuality = ImageQuality.High; fileWriter.Settings.DocumentInfo.Author = "Progress Software"; fileWriter.Settings.DocumentInfo.Title = "Azure Function Test"; fileWriter.Settings.DocumentInfo.Description = "Generated in a C# Azure Function, this large document was generated with PdfStreamWriter class with minimal memory footprint and optimized result file size."; // Load the original file // NOTE: In this test, we're only using a single test PDF download from public azure blob. byte[] sourcePdfBytes = null; using(var client = newHttpClient()) { sourcePdfBytes = await client.GetByteArrayAsync("https://progressdevsupport.blob.core.windows.net/sampledocs/BarChart.pdf"); log.LogInformation($"Source File Downloaded..."); } if(sourcePdfBytes == null) { returnnewExceptionResult(newException("Original file source could not be downloaded"), true); } // Because HttpClient result stream is not seekable, I switch to using the byte[] and a new MemoryStream for the Telerik PdfFileSource using(var sourcePdfStream = newMemoryStream(sourcePdfBytes)) using(var fileSource = newPdfFileSource(sourcePdfStream)) { log.LogInformation($"PdfFileSource loaded, beginning merge loop..."); // IMPORTANT NOTE: // This is iterating over the test "page count" number and merging the same source page (fileSource.Pages[0]) for each loop // For more information on how to use PdfProcessing, see https://docs.telerik.com/devtools/document-processing/libraries/radpdfprocessing/getting-started for(var i = 0; i < pageCount; i++) { fileWriter.WritePage(fileSource.Pages.FirstOrDefault()); } // Now that we're done merging everything, prepare to return the file as a result of the completed function log.LogInformation($"END PROCESSING"); returnnewPhysicalFileResult(finalFilePath, "application/pdf") {FileDownloadName = $"Merged_{pageCount}_Pages.pdf"}; } } } }}Build the project, it's time to run it!
Function Time
Microsoft has a great tutorials on both how to test the function locally (via localhost) or publish it to Azure. I recommend stopping here to visit one of the options:
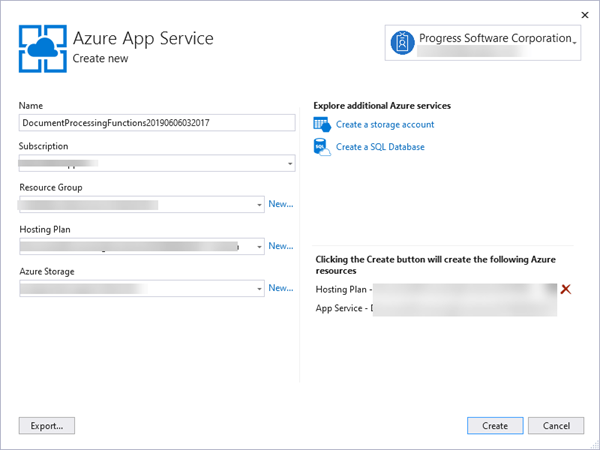
I personally love the built-in support Visual Studio has for publishing projects. In just a few clicks, the App Service was spun up and my Functions project was published (Fig10).
Fig.10Now it's time to test the function! For the default 10,000 page PDF, use the URL without any parameters:
- https://yourseviceurl.azurewebsites.net/api/GeneratePdf/
Less than 10 seconds later, you'll get the file result (Fig.11).
Fig.11If you want to change the number of pages, say to test one hundred thousand pages, you can pass a pageCount parameter.
- https://yourseviceurl.azurewebsites.net/api/GeneratePdf/?pageCount=100000
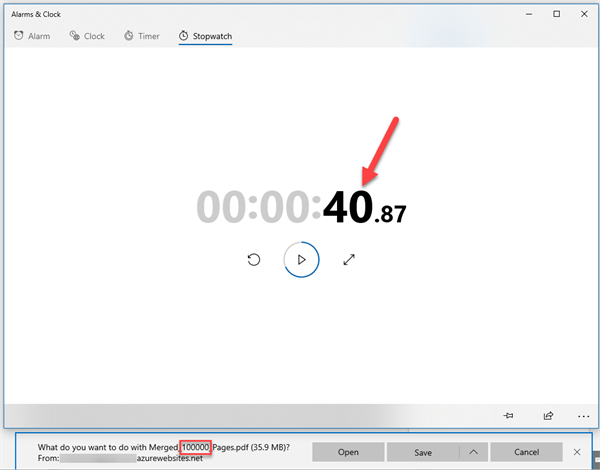
About 40 seconds later, yes 40 seconds for 100,000 pages, you'll get the file result (Fig.12)
Fig.12Of course the time it takes will depend on the processing work you're doing in the document. In this demonstration, I illustrate the power and optimization that PdfProcessing has. The original BarChart.pdf document contains both text and images, it's no slouch.
Wrapping Up
I hope this was a fun and enlightening tutorial, and you can find the demo's full source code in this GitHub repo. The main takeaway today is that RadPdfProcessing now works anywhere .NET Standard 2.0 will. .NET Core on Linux? Check. Xamarin.Forms? Check. Azure Functions? Check.If you have any questions for the Document Processing Team, feel free to open a Support Ticket or post in the Forums. The same folks who build the components also answer support tickets and forum posts.
Happy Coding!
