In the following blog post, learn how to create expressions with the ExpressionEditor control in Telerik UI for WPF.
What is Magic?
Most of us know that behind all illusions or magic is either great dexterity or clever engineering. Now, the former is not often related to software, but the latter is something we employ regularly into our products. In that train of thought one of the most telling characteristics of good software is if it manages to empower users to accomplish complex goals though simple actions. Sometimes an action might invoke simple code or a state-of-the-art algorithm. In any case, if the result is what the user intended to do, and it happened effortlessly, it often feels like magic happened right in front of their eyes.
How Do I Become the Illusionist?
In Telerik UI for WPF, RadExpressionEditor lets users build expressions that are then evaluated automatically. Whether it’s a simple check if a product is in stock or a complex, number-crunching, three-mile-long formula - they can do it. Up until now, the way to create an expression from a real-world formula was by using the available operators inside of RadExpressionEditor. Although all formulas boil down to simple operations, sometimes it takes quite a lot of effort to recreate a complex calculation. Other times, functions are so common in a certain field that not having them readily available and having to build them from scratch feels like The Stone Age.
In our R1 2019 release we have addressed that necessity; you can now add your own functions to the lot. And let’s face it, writing functions in C# is easier and way more powerful than letting your users write them in the editor. Also, you keep the clever engineering behind the curtains and all your users are left to do is enjoy the magic.
Let’s look at an example of adding two functions to RadExpressionEditor:
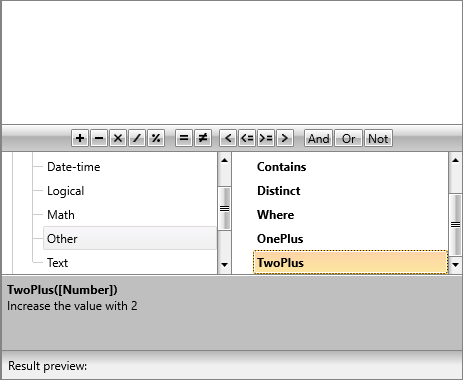
First you have to create a class that inherits from ExpressionFunctionContext. Inside this class is where the magic happens. For simplicity’s sake we’ll dial down this magic to a mere addition trickery. Here are two functions called OnePlus and TwoPlus that fit our bill:
publicclassCustomExpressionFunctionContext : ExpressionFunctionContext { [Description("Increase the value by 1")] publicintOnePlus(intinput) { return++input; } [Description("Increase the value with 2")] publicintTwoPlus(intinput) { returninput + 2; } }Next, we assign an instance of this class to the ExpressionFunctionContext.Context static property:
ExpressionFunctionContext.Context = newCustomExpressionFunctionContext();The last step is to create a class that inherits from ExpressionEditorViewModel and assign it to the ViewModel property of RadExpressionEditor. Inside the class override add the GetFunctionsItemModels method and add two item models describing the new functions:
publicclassCustomExpressionEditorViewModel : ExpressionEditorViewModel { protectedoverrideIEnumerable<EditorModelBase> GetFunctionsItemModels() { List<EditorModelBase> list = newList<EditorModelBase>(base.GetFunctionsItemModels()); var other = list.First(x => x.Name == "Other") asEditorCategoryModel; other.Children.Add(newFunctionEditorItemModel(typeof(CustomExpressionFunctionContext).GetMethod("OnePlus", BindingFlags.Public | BindingFlags.Instance), other.Name)); other.Children.Add(newFunctionEditorItemModel(typeof(CustomExpressionFunctionContext).GetMethod("TwoPlus", BindingFlags.Public | BindingFlags.Instance), other.Name)); returnlist; } } this.radExpressionEditor1.ViewModel = newCustomExpressionEditorViewModel();That is all, you will now see these two functions in RadExpressionEditor:

What’s on the Bottom of the Top Hat?
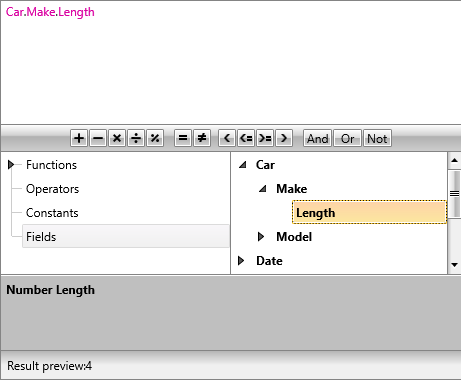
Sometimes you find something interesting and you start digging further into it. Other times you just need to get to the bottom of something out of necessity. Functions, rarely, directly take your view models as arguments. Most of the time you would like them to be decoupled from your business and data-layer logic. You might have a function that calculates the tax for a vehicle based on its power, but most probably this function will take the power as a numeric value instead of the whole vehicle object. For this case and many others, we have added drill down into the properties of your view models.
To enable the drill down functionality you have to set the IsFieldsDrillDownEnabled property of RadExpressionEditor to true:
this.radExpressionEditor1.IsFieldsDrillDownEnabled = true;
More Tricks up Your Sleeve
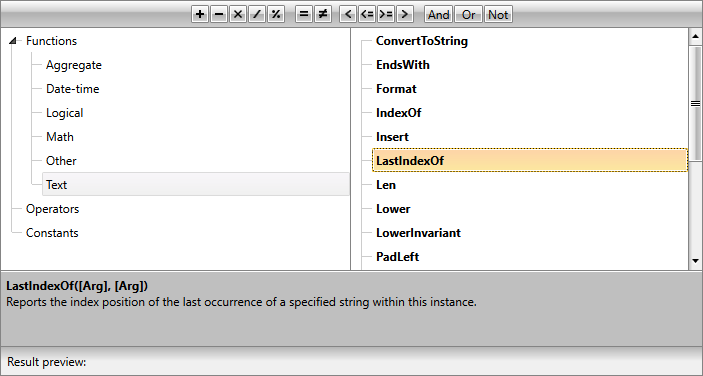
As we were sprinkling magic dust over RadExpressionEditor we decided to add the most popular string manipulation functions. Now your users will have access to them right out of the box.

For the full list of available functions head over to our documentation.
Now You See It…
Now it wouldn’t be a true magic show if things didn’t mysteriously disappear. Well maybe not so mysteriously, but you can now remove or modify the hierarchy of the functions inside of RadExpressionEditor. You have access to the view models of the expression editor and you can rearrange the functions and operators as you see fit.
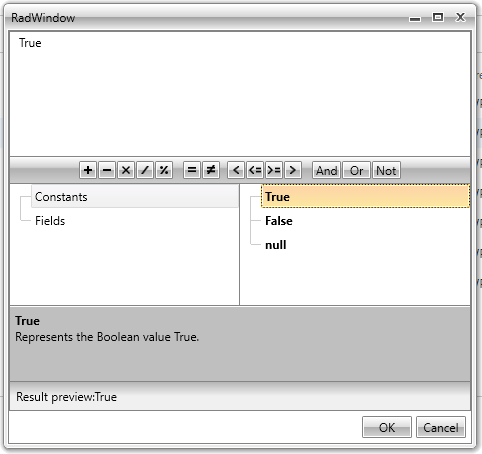
Let’s make all categories other than the Constants disappear:
First create a custom view model by inheriting from ExpressionEditorViewModel and override the GenerateCategories method where we return only the Constants category view model:
publicclassCustomExpressionEditorViewModel : ExpressionEditorViewModel{protectedoverrideIEnumerable<EditorCategoryModel> GenerateCategories(){foreach(EditorCategoryModel model inbase.GenerateCategories()){if(model.Name == "Constants"){yield returnmodel;}}}}
You can see more options to customize the categories and operators in our documentation.
Next Steps and Feedback
It’s now time for you to go out on the stage and amaze your audience. Don’t forget to write back and share your experience playing with the new tricks up RadExpressionEditor’s sleeve.
If you're new to Telerik UI for WPF, you can download a free trial today and test out the latest functionality. Let us know what you think.