You can easily create a cross-platform desktop and mobile chat application for your project or business by leveraging the Telerik UI for WPF & Telerik UI for Xamarin toolkits and the powerful Chat control.
We recently debuted our Conversational UI (check out our blog post on the matter) and were curious how easy it would be to build a real-time chat application not only between two or more users, but also across multiple platforms. As it turns out, it is very easy due to the consistent API of RadChat controls for WPF, Xamarin and SignalR. To make your own chatbot development easier, we then wanted to share our solution with you.The solution that we are going to create is separated into three projects.
First is our server project, which is used to transfer messages to the users. It is built with SignalR, which is the .NET library that allows bi-directional communication between a server and a client.
Second we'll build a WPF application with our Telerik UI for WPF suite. The main control used in the application is the RadChat component. It allows developers to integrate chat UX with consistent look and feel with the existing UI.
Finally we'll create a Xamarin project which consisting of three mobile applications–for UWP, iOS and for Android, built with the great help of Telerik UI for Xamarin.
Creating the Server Application
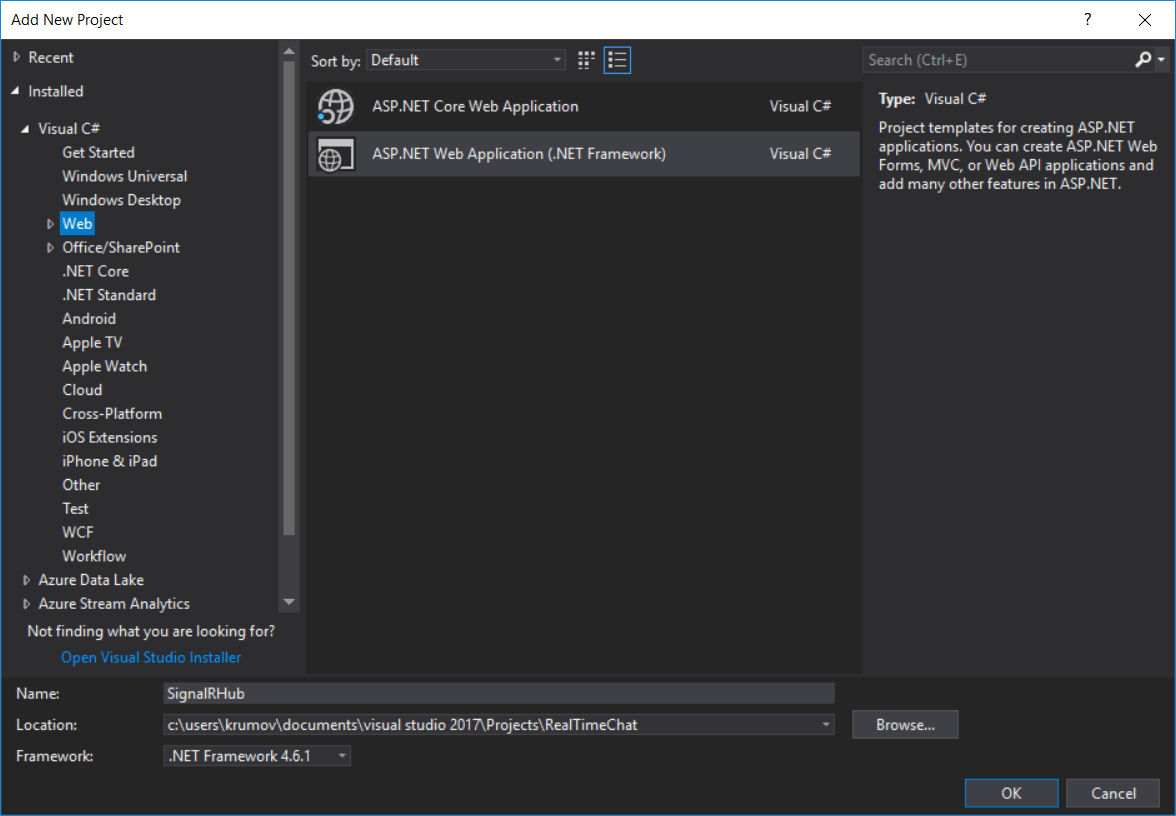
First of all, as usual we need to create a new blank ASP.NET Web application:
File -> New Project -> ASP.NET Web Application
![1 1]()
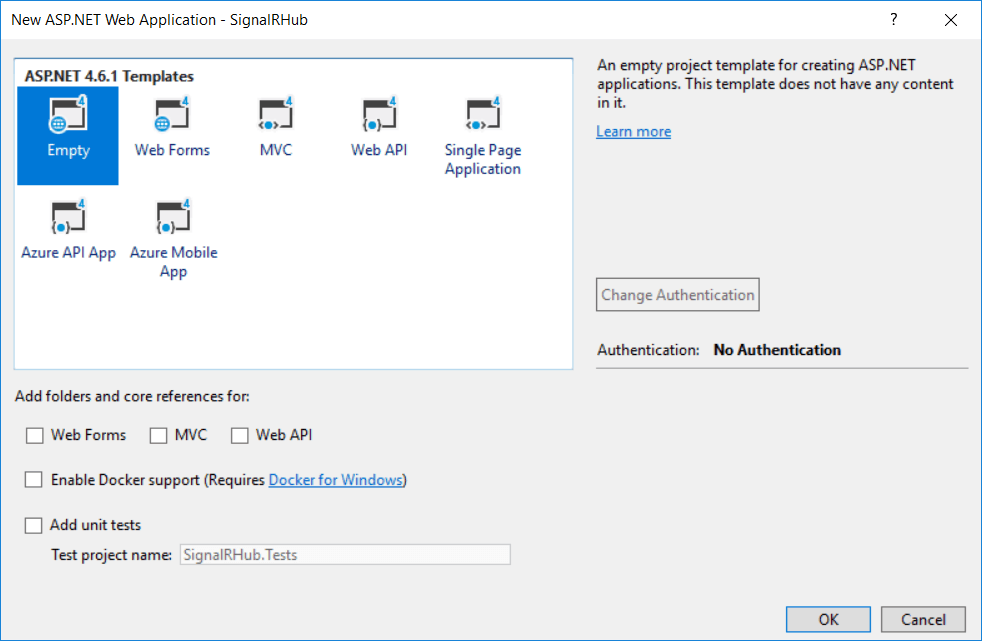
Select the Empty template and click OK:
![22 22]()
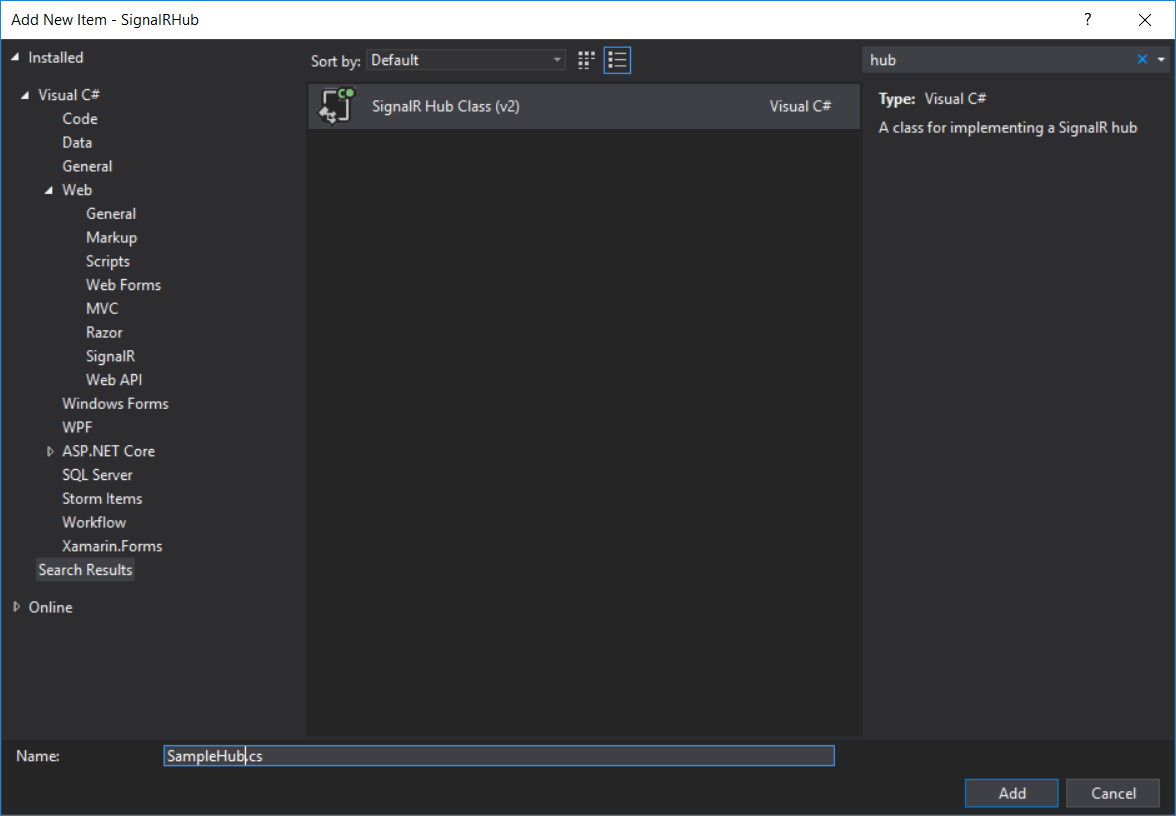
Now you have to install the SignalR library. This happens automatically after adding a new SignalR Hub class to your project. This class will be used at a later stage in the application for implementing the communication between the different clients.
![3 3]()
If you don’t have the SignalR Hub template in VisualStudio, you can install it manually by using the NuGet package:
Replace the generated code with the following:
public class SampleHub : Hub{private static Dictionary<string, string> userNames = new Dictionary<string, string>();public void Send(string name, string message){Clients.AllExcept(userNames[name]).broadcastMessage(name, message);}public void Register(string userName){if (!userNames.ContainsKey(userName)){userNames.Add(userName, Context.ConnectionId);}else{userNames[userName] = Context.ConnectionId;}Clients.All.usersLoggedIn(userName);}public override Task OnDisconnected(bool stopCalled){var userName = string.Empty;foreach (var key in userNames.Keys){if (userNames[key] == Context.ConnectionId){userName = key;}}userNames.Remove(userName);Clients.All.usersLoggedOut(userName);return base.OnDisconnected(stopCalled);}}As you can see the SampleHub class derives from the Microsoft.AspNet.SignalR.Hub, which allows you to define methods which will be called from the client applications (WPF & Xamarin). We added some custom logic for handling the users that are connected to the service – the Register() and OnDisconnected() methods. The client applications should call the Send() method in order to send a new chat message. The Hub’s Send() method in its turn calls the broadcastMessage method which sends a message to all subscribed clients.
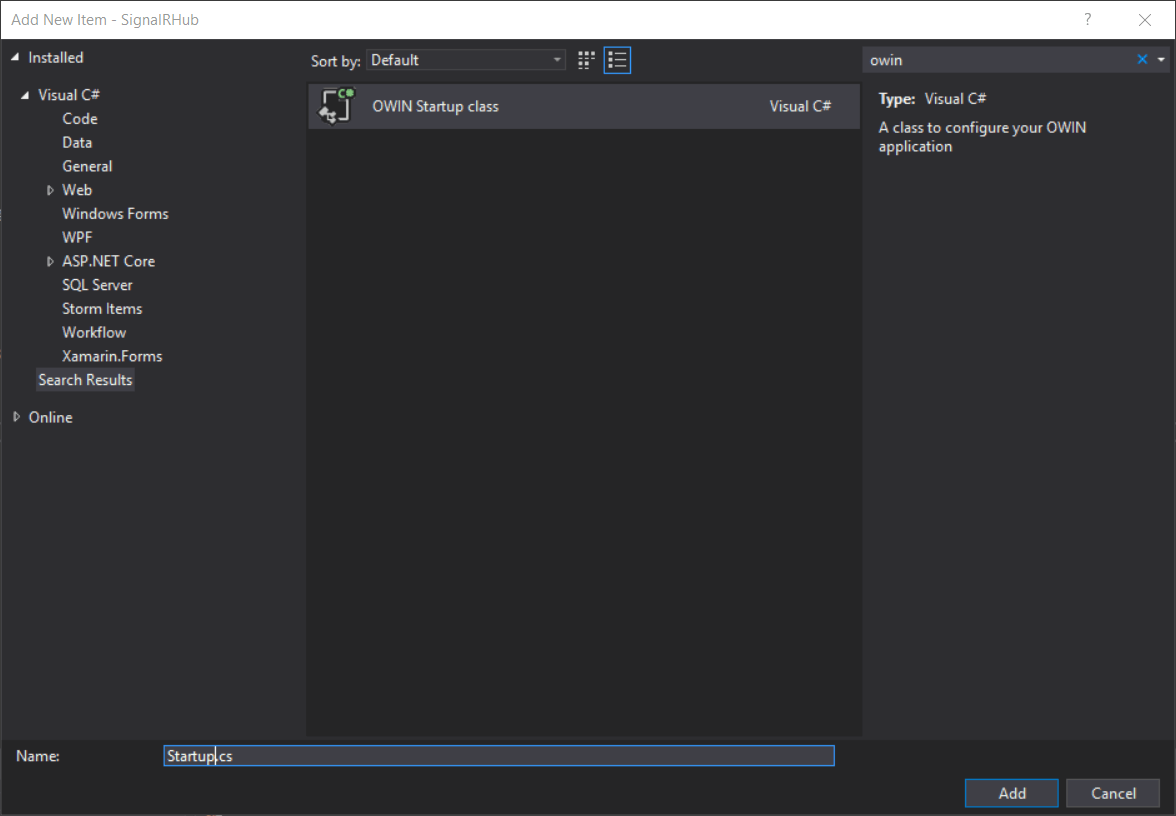
Add a new OWIN Startup class to the same project:
![4 4]()
And put the following code in it to set up the SignalR:
using Microsoft.Owin;using Owin;[assembly: OwinStartup(typeof(SignalRHub.Startup))]namespace SignalRHub{public class Startup{public void Configuration(IAppBuilder app){var config = new Microsoft.AspNet.SignalR.HubConfiguration();config.EnableJSONP = true;app.MapSignalR(config);}}}That’s it. You can run the server application.
Creating the WPF Application
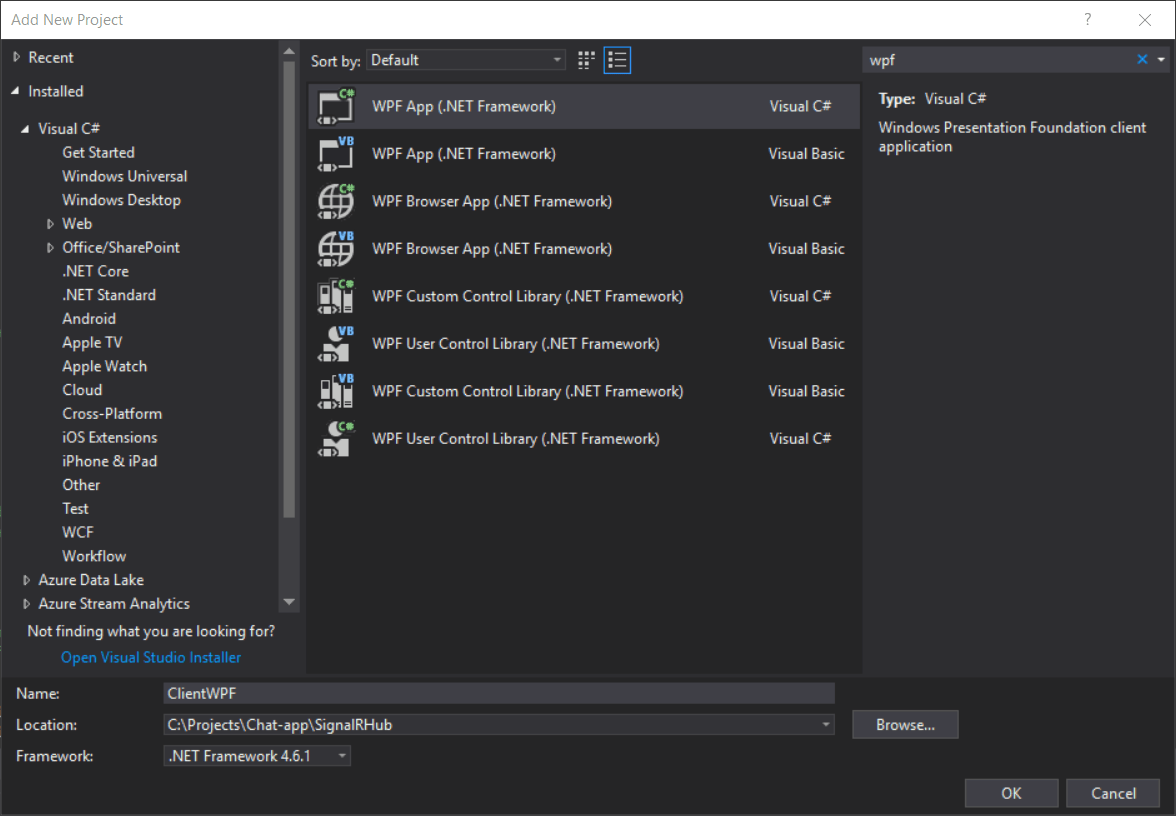
Create a new blank WPF application File -> New Project -> WPF App
![6 6]()
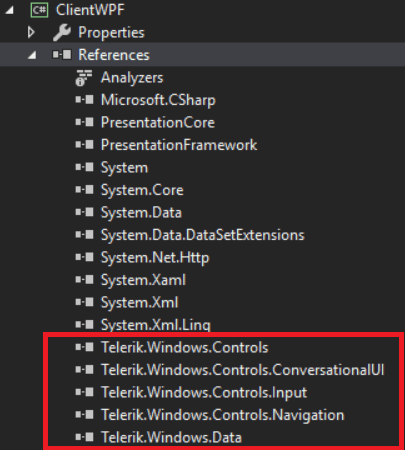
Add reference to the following libraries from your Telerik UI for WPF installation:
![7 7]()
You can check the Installing UI for WPF from MSI File help article for more information on how to install the controls.
- Install Microsoft.AspNet.SignalR.Client to the WPF application:
- Open Tools -> NuGet Package Manager -> Package Manager Console
- Run the following command: Install-Package Microsoft.AspNet.SignalR.Client
Now we are going to create a few very basic ViewModel classes which will serve to manage the connection between our RadChat component and the SimpleHub server application. Let’s start with a HubViewModel:
using Microsoft.AspNet.SignalR.Client;using Telerik.Windows.Controls;namespace ClientWPF.ViewModels{public class HubViewModel : ViewModelBase{protected IHubProxy Proxy { get; set; }protected string url = " http://localhost:59842/";protected HubConnection Connection { get; set; }public HubViewModel(){{this.Connection = new HubConnection(url);this.Proxy = Connection.CreateHubProxy("SampleHub");this.Connection.Start().Wait();}}}}The important thing to note here is the creation of a HubConnection object by using the URL which is generated after running the server application in IIS.
Here is the other needed ChatViewModel:
public class ChatViewModel : HubViewModel{private TextMessage currentMessage;public TextMessage CurrentMessage{get { return currentMessage; }set{if (value != null || value != currentMessage){currentMessage = value;OnPropertyChanged("CurrentMessage");}}}private string userName;public string UserName{get { return userName; }set{if (value != null || value != userName){userName = value;OnPropertyChanged("UserName");}}}private Author currentAuthor;public Author CurrentAuthor{get { return currentAuthor; }set{if (value != null || value != currentAuthor){currentAuthor = value;OnPropertyChanged("CurrentAuthor");}}}private ObservableCollection<TextMessage> allMessages;public ObservableCollection<TextMessage> AllMessages{get { return allMessages; }set{if (value != null || value != allMessages){allMessages = value;OnPropertyChanged("AllMessages");}}}public ChatViewModel(string userName){this.UserName = userName;this.CurrentAuthor = new Author(this.UserName);this.AllMessages = new ObservableCollection<TextMessage>();// Invokes the Register method on the serverthis.Proxy.Invoke("Register", this.UserName);// Subscribes to the broadcastMessage method on the server.// The OnBroadCastMessage method will be raised everytime the Send method on the server is invoked.this.Proxy.On("broadcastMessage", (string from, string message) => this.OnBroadCastMessage(from, message));}internal void OnBroadCastMessage(string from, string message){App.Current.Dispatcher.BeginInvoke((Action)(() =>{this.AllMessages.Add(new TextMessage(new Author(from), message));}));}internal void SendCurrentMessage(){if (!string.IsNullOrEmpty((this.CurrentMessage as TextMessage).Text)){// Invokes the Send method on the server, which in turn invokes the broadcastMessage of all clients.this.Proxy.Invoke("Send", this.UserName, this.CurrentMessage.Text);}}}Define the RadChat component in the MainWindow:
<Windowx:Class="ClientWPF.MainWindow"xmlns:telerik="http://schemas.telerik.com/2008/xaml/presentation"xmlns:local="clr-namespace:ClientWPF"mc:Ignorable="d"Title="MainWindow"Height="450"Width="800"><Grid><telerik:RadChatx:Name="myChat"SendMessage="RadChat_SendMessage"DataSource="{Binding AllMessages}"/></Grid></Window>At the startup of our WPF application we would like to open a new Prompt Window in which we can enter the user name. Then, we will create our ChatViewModel class which is the DataContext of our RadChat:
public partial class MainWindow : Window{public ChatViewModel ViewModel { get; set; }public MainWindow(){InitializeComponent();RadWindow.Prompt(new DialogParameters{Content = "Enter an UserName:",Closed = new EventHandler<WindowClosedEventArgs>(OnPromptClosed)});}private void OnPromptClosed(object sender, WindowClosedEventArgs e){if (e.PromptResult != null && e.PromptResult != string.Empty){this.ViewModel = new ChatViewModel(e.PromptResult);this.DataContext = this.ViewModel;this.myChat.CurrentAuthor = this.ViewModel.CurrentAuthor;}} }After the users has already specified their name, they can send messages. To implement the logic for sending the messages to the server, we would need to handle the RadChat’s SendMessage event:
private void RadChat_SendMessage(object sender, Telerik.Windows.Controls.ConversationalUI.SendMessageEventArgs e){this.ViewModel.CurrentMessage = e.Message as TextMessage;this.ViewModel.SendCurrentMessage();}The ViewModel’s SendCurrentMessage() method invokes the Send() method from the server app. In this way, our message is being sent to all clients attached to the server.
With that, our WPF application is ready.
Creating the Xamarin Mobile Application
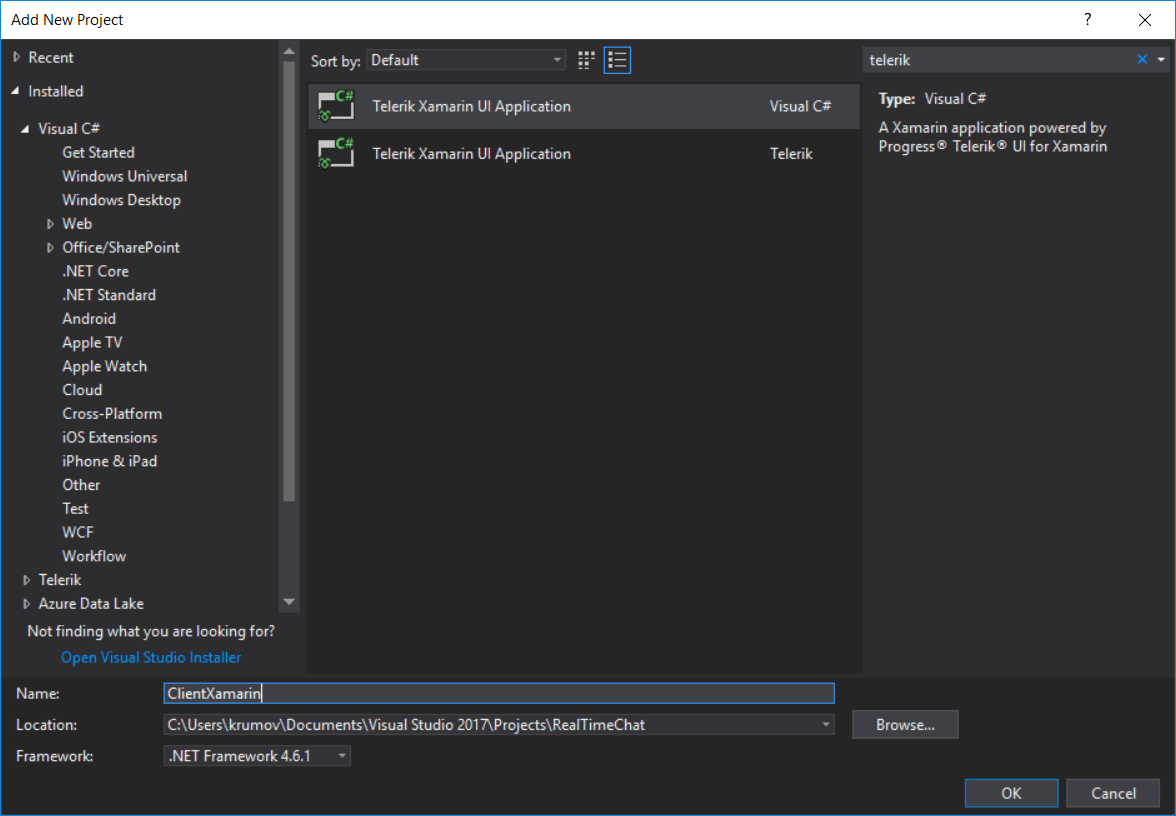
- Create a Xamarin application using the Telerik Xamarin UI Visual Studio template:
![12 12]()
Using the template, you get all the setup you need to start your application.
After rebuilding the solution, all packages and binaries will be updated and users will be ready to choose a startup project and deploy it to the targeted platform. For the purpose of this example we are creating Android, iOS and UWP applications. You can check the Getting Started help article which describes in detail how to install Telerik UI for Xamarin.
Again, we will have to add the SignalR Client package to the portable project. This can be done through the NuGet Package Manager:
![222 222]()
Now the application has the needed set up and we can modify it by adding some ViewModels to the portable project. We are going to add ViewModels which are very similar to the ones from the WPFClinet application, so I will not describe each method in detail. The code for the view model classes can be reused but this is not the topic of the current blog post, so I won’t dig into that.
Let’s add the HubViewModel:
public class HubViewModel : ViewModelBase{protected IHubProxy Proxy { get; set; }protected string url = "http://localhost:59842/";protected HubConnection Connection { get; set; }public HubViewModel(){{this.Connection = new HubConnection(url);this.Proxy = Connection.CreateHubProxy("SampleHub");this.Connection.Start().Wait();}}}It’s just like the one from the ClientWPF application, except that it derives from ViewModelBase:
public class ViewModelBase : INotifyPropertyChanged{public event PropertyChangedEventHandler PropertyChanged;public void OnPropertyChanged([CallerMemberName] string propertyName = null){var handler = PropertyChanged;if (handler != null){handler(this, new PropertyChangedEventArgs(propertyName));}}}Now add the ChatViewModel:
public class ChatViewModel : HubViewModel{private string mCurrentMessage;public string CurrentMessage{get { return mCurrentMessage; }set{if (value != null || value != mCurrentMessage){mCurrentMessage = value;OnPropertyChanged();}}}private string mUserName;public string UserName{get { return mUserName; }set{if (value != null || value != mUserName){mUserName = value;OnPropertyChanged();}}}private ObservableCollection<TextMessage> allMessages;public ObservableCollection<TextMessage> AllMessages{get { return allMessages; }set{if (value != null || value != allMessages){allMessages = value;OnPropertyChanged();}}}public ChatViewModel(string userName){this.UserName = userName;this.AllMessages = new ObservableCollection<TextMessage>();// Invokes the Register method on the serverthis.Proxy.Invoke("Register", this.UserName);// Subscribes to the broadcastMessage method on the server.// The OnBroadCastMessage method will be raised everytime the Send method on the server is invoked.this.Proxy.On("broadcastMessage", (string from, string message) => this.OnBroadCastMessage(from, message));}internal void OnBroadCastMessage(string from, string message){Device.BeginInvokeOnMainThread((Action)(() =>{this.AllMessages.Add(new TextMessage() { Author = new Author() { Name = from, Avatar = string.Empty }, Text = message });}));}internal void SendCurrentMessage(){if (!string.IsNullOrEmpty(this.CurrentMessage)){this.Proxy.Invoke("Send", this.UserName, this.CurrentMessage);}}}Again, the ChatViewModel looks the same as the one from the WPF app. The only difference is that there is no Dispatcher in Xamarin.Forms. Instead of using a Dispatcher.BeginInvoke(), we can use Xamarin.Forms.Device’s BeginInvokeOnMainThread() method.
We continue creating the views. Add the following XAML markup at ClientXamarin.Portable’s StartPage:
<?xmlversion="1.0"encoding="utf-8"?><ContentPagexmlns="http://xamarin.com/schemas/2014/forms"x:Class="ClientXamarin.Portable.StartPage"><StackLayoutVerticalOptions="CenterAndExpand"><LabelText="Welcome to Conversational UI demo!"HorizontalOptions="Center"VerticalOptions="CenterAndExpand"/><LabelText="Please enter your name:"VerticalOptions="Center"HorizontalOptions="CenterAndExpand"/><EntryText="{Binding UserName, Mode=TwoWay}"Margin="5"Completed="Entry_Completed"/><StackLayoutOrientation="Horizontal"VerticalOptions="Center"HorizontalOptions="CenterAndExpand"><ButtonText="Login"Clicked="Login_Button_Click"Margin="5"/></StackLayout></StackLayout></ContentPage>Add a new class named LoginViewModel. It will be used to pass the entered by the user value for UserName from the StartPage to the page that will be created later:
internal class LoginViewModel : ViewModelBase{private string mUserName;public string UserName{get { return mUserName; }set{if (value != null || value != mUserName){mUserName = value;OnPropertyChanged();}}}public LoginViewModel(){}}The StartPage.cs file looks as follows:
public partial class StartPage : ContentPage{internal LoginViewModel ViewModel { get; }public StartPage(){InitializeComponent();this.ViewModel = new LoginViewModel();this.BindingContext = this.ViewModel; }private async void Login_Button_Click(object sender, EventArgs e){this.NavigateToChatPage();}private void Entry_Completed(object sender, EventArgs e){this.NavigateToChatPage();}private async void NavigateToChatPage(){if (!string.IsNullOrEmpty(this.ViewModel.UserName)){var chatPage = new ChatPage(this.ViewModel.UserName);await Navigation.PushModalAsync(chatPage);}}}Add a new ContentPage named ChatPage to the solution with the following content:
<ContentPagexmlns="http://xamarin.com/schemas/2014/forms"xmlns:local="clr-namespace:ClientXamarin.Portable"xmlns:telerikConversationalUI="clr-namespace:Telerik.XamarinForms.ConversationalUI;assembly=Telerik.XamarinForms.ConversationalUI"x:Class="ClientXamarin.Portable.ChatPage"><ContentPage.Resources><ResourceDictionary><local:SimpleChatItemConverterx:Key="SimpleChatItemConverter"/></ResourceDictionary></ContentPage.Resources><telerikConversationalUI:RadChatx:Name="chat"ItemsSource="{Binding AllMessages}"SendMessage="chat_SendMessage"ItemConverter="{StaticResource SimpleChatItemConverter}"></telerikConversationalUI:RadChat></ContentPage>The code behind of the ChatPage is:
[XamlCompilation(XamlCompilationOptions.Compile)]public partial class ChatPage : ContentPage{public ChatViewModel ViewModel { get; }public ChatPage (){}public ChatPage( string UserName){InitializeComponent();this.ViewModel = new ChatViewModel(UserName);this.BindingContext = this.ViewModel;}private void chat_SendMessage(object sender, EventArgs e){this.ViewModel.CurrentMessage = chat.Message.ToString();this.ViewModel.SendCurrentMessage();}}Similar to the WPF app, we are using the SendMessage event in order to notify the other clients for a new message.
The next step is to create a Converter class of the type IChatItemConverter so we can convert the data items into chat messages and vice versa:
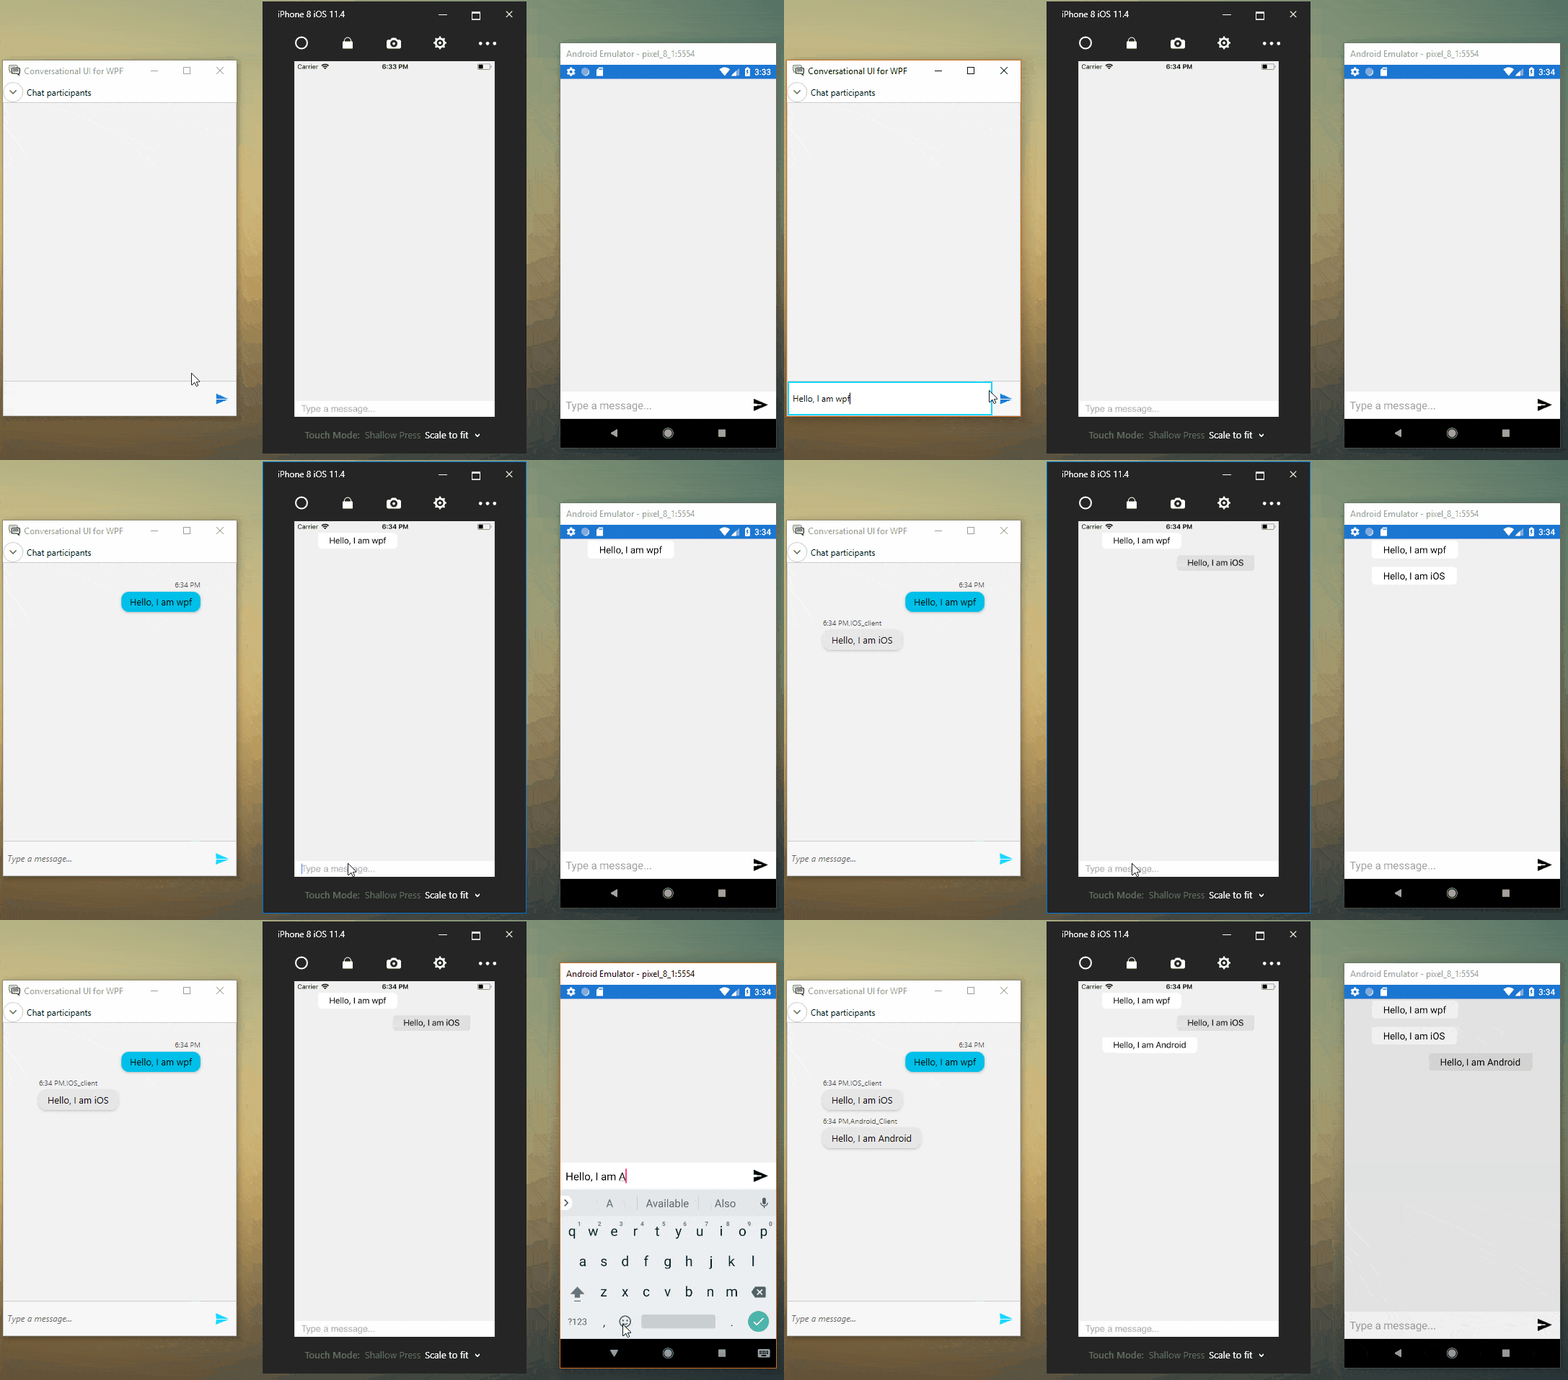
public class SimpleChatItemConverter : IChatItemConverter{public ChatItem ConvertToChatItem(object dataItem, ChatItemConverterContext context){return (TextMessage)dataItem;}public object ConvertToDataItem(object message, ChatItemConverterContext context){TextMessage item = new TextMessage();item.Text = message.ToString();item.Author = context.Chat.Author;item.Author.Avatar = string.Empty;return item;}}That’s it! Now, we have a real-time chat application which is working on iPhones, Androids and Desktops.
![RadChat_WPF&Xamarin3 RadChat_WPF&Xamarin3]()
Closing Words and Next Steps
I hope you found this blog post informative, and that it will help you create a chat application for your business or project. The SampleHub application is deployed to Azure, so feel free to download the app and drop us a line with your feedback. We will be more than happy to see you there, so feel free to share your thoughts!
You can find the source code under our GitHub repository.
Lastly, if you are building WPF or Xamarin apps, but prefer to focus on the business logic, while also styling your applications with performant and beautiful UI, you might want to check out Telerik UI for WPF and/or Telerik UI for Xamarin. Both suites offer a free 30-day trial to try them out.
Thanks and happy coding!
