In this guide, learn how to create an ASP.NET Core application using Kendo UI for Angular from scratch.
Using cutting edge technology means overcoming that initial learning curve. Many times, we would like to just jump in and get started without starting from scratch. But as we all know the best meals are the ones that are well prepared, and rushing into things too quickly ends up making someone sick or leaving an entire meal in the trash.
In this article, we'll find a happy medium—we'll look at how to get started with Angular using ASP.NET Core by following a simple recipe with clearly defined ingredients. We'll start by walking through all of the ingredients necessary to make a successful project. Next we'll follow the recipe, learning where each ingredient fits. Finally, the application will be fully baked and ready to serve with all of its cutting edge goodness.
The Ingredients
Prepping the ingredients is the most important part of any recipe. Let's look at what we'll need to be successful and why each item is important to our project.
ASP.NET Core
ASP.NET Core 1.1 is a next generation architecture for building scale-able .NET web applications that run on any platform. Web API was consolidated with MVC in ASP.NET Core, making it a great platform to host endpoints for our application's data.
ASP.NET Core will act as the server component for the application. The responsibility of ASP.NET Core is to power core business logic, interact with a database and provide application services like: email, authentication, and SMS to name a few.
Node Package Manager (npm)
Many of the ingredients for this application will come from the JavaScript community. The dependencies needed for frontend development are all easily managed through npm either from the Command Line Interface (CLI) or from within Visual Studio.
Angular, TypeScript & Webpack
ASP.NET Core is capable of generating HTML for the client-side of the application on its own, but with the addition of Angular we can do so much more. Angular allows us to build rich interactive client-side applications using a component based architecture.
Using Angular requires some additional tooling since it relies heavily on TypeScript. To support Angular, we'll be using Webpack to compile TypeScript, as well as to bundle and minify static resources.
dotnet CLI
Typically one would expect to use Visual Studio's File > New project template to begin a new project. However, because of the cross platform nature of ASP.NET Core development we'll be using the dotnet CLI, a command line tool used to generate .NET project templates. Since the command line is ubiquitous, it suits ASP.NET Core development because it can be used anywhere.
Kendo UI for Angular
Like any great chef would tell you, presentation matters. We'll use Kendo UI for Angular to finish out the look of the application. With beautiful UI controls, Kendo UI for Angular delivers high performance Angular UI components without any jQuery dependencies.
Prep Work
Let's begin by putting all of our ingredients in place. Some quick prep work can make sure that we stay clear of any hangups. This is critical, as the last thing you want to do is waste hours of precious time troubleshooting problems that have already been addressed by using newer versions.
Before beginning your next project, make sure the following tools are installed and you're running the latest bits. You can find everything you'll need below:
- ASP.NET Core installers
- npm -
$ npm install npm@latest -g
The Recipe
We'll start by installing the Microsoft ASP.NET Core JavaScript Services. JavaScript Services is a set of technologies for ASP.NET Core developers built by the ASP.NET team. It provides infrastructure that you'll find useful if you use Angular/React/Knockout/etc. on the client, if you build your client-side resources using Webpack, or if you otherwise want to execute JavaScript on the server at runtime. We'll be using a JavaScript Services project template installed by the dotnet CLI. The template will take care of the Angular, TypeScript and Webpack dependencies for us.
From the command line install the JavaScript Services templates:
dotnet new --install Microsoft.AspNetCore.SpaTemplates::*

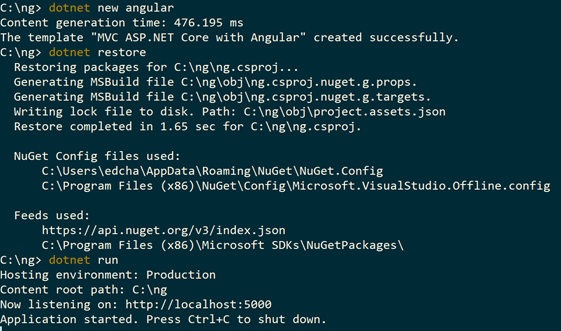
Next, run the dotnet new angular command—using the angular parameter will specify the Angular template. The template will create a fully functioning starting point for your new application. Once the template has run, the dependencies will need to be restored by running dotnet restore. Once the dependencies are restored you can start up your new ASP.NET Core Single Page from within Visual Studio, or from the command line by calling dotnet run.
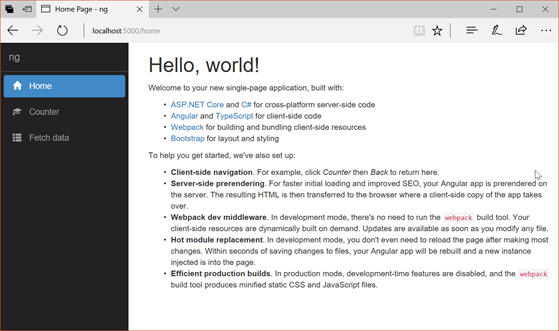
Navigating to the app in our browser shows us the template in action.
The Template
The JavaScript services template is pre-configured with Angular, TypeScript and Webpack. The application back-end is powered by ASP.NET Core, with Angular taking almost all responsibilities for the client-side. You'll notice very little in the way of Views or .cshtml.
The client-side application source files are found in the ClientApp directory. Each folder under ClientApp contains the parts to a single component, a template (.html), component logic written in TypeScript (.ts), and optionally component styles (.css). These files will be compiled by Webpack prior to run-time. Webpack configuration files are included in the template. These configuration files define compilation, bundling and deployment to wwwroot.
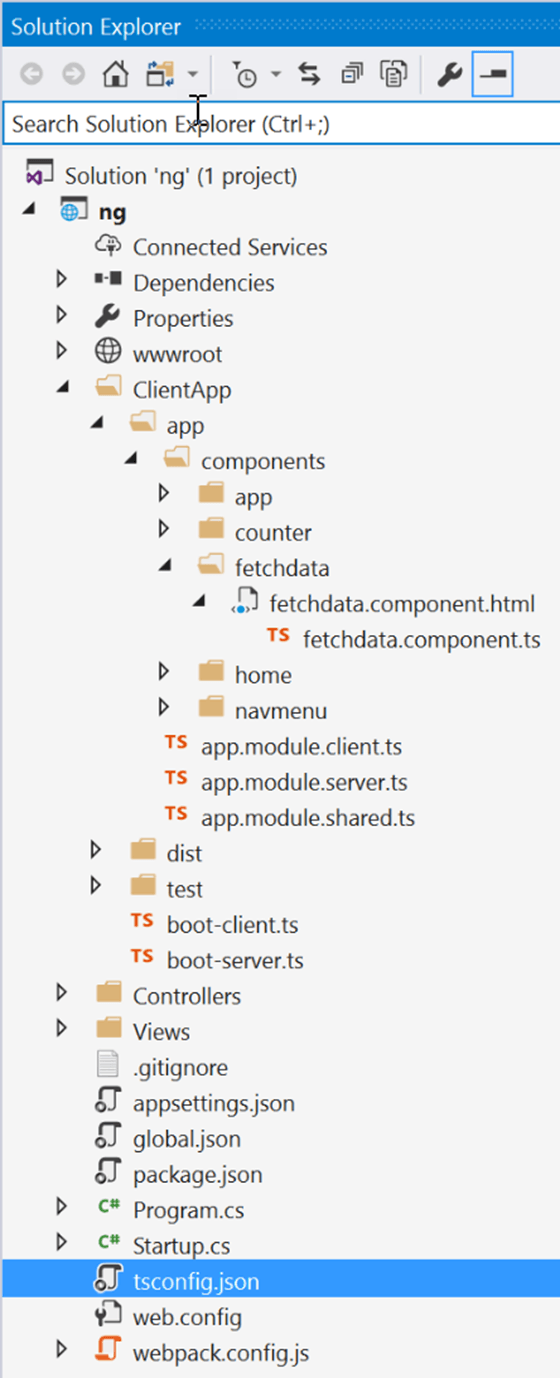
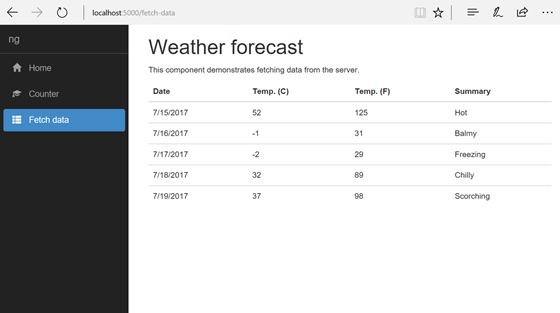
In ClientApp a few sample components demonstrate how to use Angular. The counter is a component that shows how to wire up a button that increments a counter. Also included is a fetch-data component, this component shows how to consume data from an API endpoint.
Time to Bake
With the project scaffolding ready let's modify some components. Working with components will get us familiar with the app's structure and work-flow of the tooling. We'll add robust UI components using Kendo UI for Angular to the existing app components.
First, Kendo UI works best with the latest version of Angular, so let's update our Angular references:
npm install --save @angular/animations@latest @angular/common@latest @angular/compiler@latest @angular/core@latest @angular/forms@latest @angular/http @angular/platform-browser@latest @angular/platform-browser-dynamic@latest @angular/platform-server@latest @angular/router@latest
Next, we'll add the Kendo UI dependencies to the project. Kendo UI for Angular is packaged and distributed as a set of discrete, scoped npm packages, which are available from npm.
It's time to add Kendo UI components to the project. We'll add the Kendo UI Button and Grid components from the command line using npm.
npm install --save @progress/kendo-angular-buttons @progress/kendo-angular-l10n @angular/animations
npm install --save @progress/kendo-angular-grid @progress/kendo-angular-dropdowns @progress/kendo-angular-inputs @progress/kendo-angular-dateinputs @progress/kendo-data-query @progress/kendo-angular-intl @progress/kendo-angular-l10n @progress/kendo-drawing @progress/kendo-angular-excel-export @angular/animations
Next we'll import the component directives into our source code. Because Kendo UI for Angular uses Ahead-of-Time Compilation (AoT), we'll declare the modules in the app's shared module. Open ClientApp/App/app.module.shared.ts and add the following declarations:
...; import { ButtonsModule } from '@progress/kendo-angular-buttons'; import { GridModule } from '@progress/kendo-angular-grid'; imports: [ ButtonsModule, GridModule, ...,Kendo UI just wouldn't be complete without some nice styling. Let's add the default Kendo UI theme to our project via npm.
npm install -S @progress/kendo-theme-default@2.38.1
The npm package deploys to our node_modules folder, however we'll need the CSS file referenced in our project. To do this we'll add a reference in webpack.vendor.config.js to the CSS that our app requires. Webpack is pre-configured to bundle CSS files into a single vendor.css file which is output to the wwwroot folder for deployment.
entry: { vendor: [ ..., '@progress/kendo-theme-default/dist/all.css',
Once the reference is added, we'll need to run Webpack to rebuild vendor.css.
In package.json we'll add the Webpack command for rebuilding vendor dependencies for the application.
"scripts": { "test": "karma start ClientApp/test/karma.conf.js", "webpack:vendor": "webpack --config webpack.config.vendor.js", ...To run the script from npm execute npm run webpack:vendor from the command line.
Now that Kendo UI for Angular is installed, let's replace a few components that are part of the samples. One of benefits of Kendo UI is that a single theme controls the style of all Kendo UI components, even simple controls like the button. Let's modify the sample to use a Kendo UI button.
In ClientApp/app/components/counter/counter.component.html you'll find a button that increments a counter. Replace the standard button with a Kendo UI Button.
<buttonkendoButton (click)="incrementCounter()" [primary]="true">Increment KUI</button>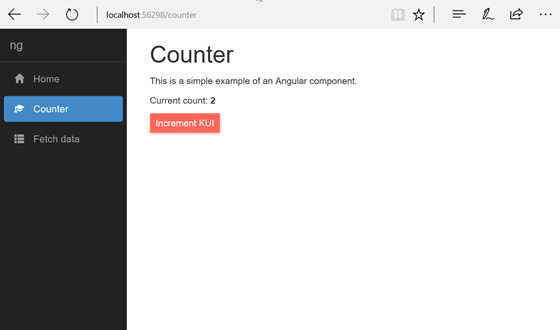
Next, we'll modify the fetch-data sample by utilizing the Kendo UI grid. Since Kendo UI has robust data binding capabilities this will be an easy task. In ClientApp/app/components/fetchdata/fetchdata.component.html a table has been explicitly defined using Angular templates.
<tableclass='table'*ngIf="forecasts"> <thead> <tr> <th>Date</th> <th>Temp. (C)</th> <th>Temp. (F)</th> <th>Summary</th> </tr> </thead> <tbody> <tr*ngFor="let forecast of forecasts"> <td>{{ forecast.dateFormatted }}</td> <td>{{ forecast.temperatureC }}</td> <td>{{ forecast.temperatureF }}</td> <td>{{ forecast.summary }}</td> </tr> </tbody> </table>We can replace the entire template with a single kendo-grid component. At the absolute minimum we can bind the data property and the grid will generate the columns and headings.
<kendo-grid[data]="forecasts"></kendo-grid>To further enhance the UI we can customize each column.
<kendo-grid[data]="forecasts"> <kendo-grid-columnfield="dateFormatted"title="Date"></kendo-grid-column> <kendo-grid-columnfield="temperatureC"title="Temp. (C)"width="150"></kendo-grid-column> <kendo-grid-columnfield="temperatureF"title="Temp. (F)"width="150"> </kendo-grid-column> <kendo-grid-columnfield="summary"title="Summary"></kendo-grid-column> </kendo-grid>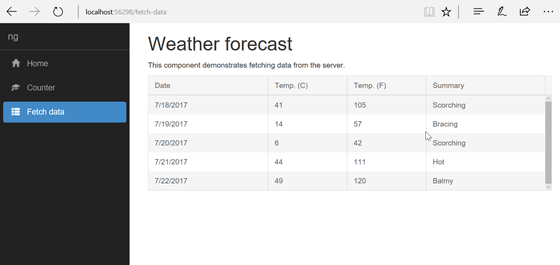
Time To Serve
The ASP.NET Core JavaScript Services dotnet CLI template, combined with Kendo UI for Angular, provide a solid platform for dishing out modern web applications. Using the JavaScript Services generator makes short work of starting a new Angular project. It comes with everything needed for client and server side development and excellent samples to get you started. The growing library of Kendo UI for Angular components with world class features like data binding, internationalization and themes make a full course meal ready to serve. The completed starter project can be viewed on GitHub. Please remember this app requires the scoped Progress NPM registry to restore dependencies.
Editor's note: This post was originally published in November 2016, and has been updated for completeness and accuracy.